| |
|
Click on a thumbnail picture below to see the full size version.
|
100 Entries.
|
|
Friday, March 3
|
View Page
|
 |
GPC Convention Pre-Show Events
It was great to have the opportunity to tour the Neptune�s Harvest full facility which included the area the boats provide the raw material, to where it is processes, packed and distributed. All locations were close by but did require some driving and it was great to have both Garry Miller and Russ Pugh along for the ride. We were even able to stop at the historic Gloucester�s Fisherman Memorial. Then it was off to the Gloucester House restaurant where we learned how calamari was invented� and even sampled some;-)
This was all before the official convention so the multi-year wait was worth it.
|
|
�
|
|
Friday, March 3
|
View Page
|
 |
GPC Convention Hotel Room
Who could forget the �hidden� light switch in the bathroom. It sure gives the walls a nice clean look and the large towel is easy to find in the dark... and so is the light switch;-)
|
|
�
|
|
Friday, April 7
|
View Page
|
 |
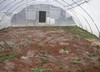
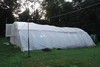
Greenhouse is Up!
Trying to find a day that is not windy or raining has been a slight challenge, but the greenhouse is up and amendments are going in today. This structure is 32ft wide and 40ft long and covered with 6mil. poly.
|
|
�
|
|
Friday, April 7
|
View Page
|
 |
Soil Amendments
After looking over the soil test there is not much that is needed, just some slight adjustments required. Here is a list of what was added to the greenhouse space�
Peat Moss: 33 cubic feet
0-0-50 (Sulfate of Potash): 25 pounds
Borax: 2.0 pounds
|
|
�
|
|
Friday, April 7
|
View Page
|
 |
Soil Amendments Added
Here is a look at all of the amendments added to the soil surface. My turf grass cover crop did not do so well as it was seeded last year during an extended heat wave, but there was at least some roots established.
After this image the soil was tilled and then a hydrogen peroxide drench was completed. TerraClean 5.0 was used at a rate of 3 gallons of concentrate (27% Hydrogen Peroxide and 5% Peroxyacetic Acid) into 275 gallons of water. This was applied to moist soil and over about 1,100sq.ft. Two days after this TerraGrow (beneficial microbes) were added to the same area. This was then covered with weed block to help prevent weeds from growing since (ideally) this will be a warm environment.
|
|
�
|
|
Sunday, April 9
|
View Page
|
 |
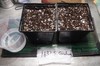
Seed Starting Day!
Only growing one plant this year so the 1832.5 Graham �20 (F: 1938 Sperry x M: 1339 Graham) is the chosen one.
The seed was received directly from Jamie and placed in the freezer until today when it was removed for about 2 hours at room temperature, and then soaked in water for about 2 hours. After this it was placed in a moist paper towel in a sealed snack bag and into a cooler with a heat mat and thermostat set for 86F (30.5C). This was set-up ahead of time and the typical fluctuation in temperature is 84-87F so this is ideal for pumpkin seed germination.
|
|
�
|
|
Tuesday, April 11
|
View Page
|
 |
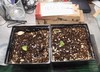
Germination Day!
As is expected the seeds produced a radicle (germination) after about 36-48 hours after being placed into the germination chamber. Now just waiting on emergence�
|
|
�
|
|
Thursday, April 13
|
View Page
|
 |
Emergence Day!
Looks like an even start for both seeds. For timing, this is four days after the initial soak. They are under a 315-watt CMH (Ceramic Metal Halide) light that has a 4200K bulb to help simulate natural sun light. If you want the technical details than they are also receiving about 200-250 PAR, which is a measure of light intensity.
The CMH light is preferred over other options because it also produces some heat which is a good thing early in the season. Also, this light will be following the chosen seedling out in the cold frame to help extend the daylight and improve the plant efficiency of CO2.
|
|
�
|
|
Sunday, April 23
|
View Page
|
 |
Planting Day
There have been soil heating cables buried, three 100-watt heat lamps, thermostats, the CMH light installed and also the CO2 system has been tested and is fully functional� Now the seedling can be added;-)
The CMH grow light is on a timer and runs from 4am-9am and then from 6pm-10pm, the reason for this is to extend the day to an 18 hours of light (6 hours of dark) cycle. However, the times are carefully selected as the 4am start time is also providing heat which is often needed early in the season to reduce the chance of frost. Now, there are also three 100-watt reptile ceramic heaters on a thermostat, but since the day is going to be extended anyway, this is offering the greatest efficiency of the system.
For CO2 enrichment there is a photosensor on the sensor so it will only dose when the light is on and/or the sun is out. This is on a manual switch to turn off, when the cold-frame needs to be vented during the day. It is set for 900ppm and has not problem maintaining this level. Sometimes it will over shoot, but 1,200ppm is the theoretical economic maximum so there is no problem being a little over as it tends to settle in around 1,000ppm. There is a 50lb compressed bottle being used as the source which in this small space with a small plant will last about 45 days! (In-season that same bottle typically lasts 7-10 days.)
|
|
�
|
|
Monday, April 24
|
View Page
|
 |
Heating the 1832.5 Graham �20 (F: 1938 Sperry x M: 1339 Graham)
It has been cooling at night so extra heating is justified. Not only is the CMH grow light used to ensure an 18-hour day (photoperiod), it turns on in a the small cold-frame around 4am to add some heat as well to lighting. To ensure the area around the plant does not get excessively hot there is a thermostat to turn off the three 100-watt ceramic reptile heaters around the plant. These are used since they generate no light so the photoperiod is completely controlled by the grow light and sun. In addition, there are soil heating cables buried in this 5ft. x 5ft. area. The soil temperature set is 70F (21C) and the heat lamps are set to 68F (20C), but during the day it does get much warmer than this due to the sunlight.
However, at night having the root zone a little warmer than the top growth can help encourage more aggressive rooting which is the reason for the temperature differences.
The seed coat can be seen on the small rock where the sensor is as a memory of what started it all;-)
|
|
�
|
|
Monday, April 24
|
View Page
|
 |
Sensors and Readouts
The two thermostat readouts can be seen in this image. The far one is for the heat lamps (set at 68F/20C) and the near one is for the soil temperature (set at 70F/21C).
Below the far one there is a black rectangle which is where the CO2 sensor has been placed (and set at 900ppm). There is a small fan to keep air circulating, but the sensor is placed here so it will not have to be moved as the plant grow and this small area is easily filled with CO2 when needed.
|
|
�
|
|
Monday, April 24
|
View Page
|
 |
Pumpkin Plant Anemia
Just after transplant there can be a little transplant shock and while it has been cloudy the grow light should be supplying enough for photosynthesis so something else must be going on.
What Could Cause This? (This is what has resulted in this same look in the past and how to correct the issue.)
1. Soil heating cable thermostat failed stressing the roots with hot 90F/32C temperatures. (This has been corrected with the live readout thermostats.)
2. Magnesium/Sulfur deficiency (This has been corrected with some drenches and foliar sprays up to 2TBS/gallon of Epsom salts
3. Cold shock (This has been correct with the heat lamps and soil heating cables.)
4. Light Deficiency (By adding an official 315-watt CMH plant grow light there is not shortage of light intensity PAR)
However, none of these are the main cause for the issue. After trying a few of these and only seeing the anemia progress it was determined to be an iron deficiency.
Now, it is important to remember that often times there can be a delay on the plant response to notice the color correction so try not to over add to a tender seedling resulting in grower induced issues.
|
|
�
|
|
Sunday, April 30
|
View Page
|
 |
Advanced Plant Anemia
While this may seem much worse than the previous image (and in many ways it is) this is showing the plant coming out of the anemia. How could this be, it looks so yellow? Do not adjust your screen, the plant is this bright yellow, so how can this be an improvement? You want to look closely at the leaf pointing to the left. Looking toward the petiole attachment there is a slight greening occurring due to a very specific nutrient�
This is iron deficiency evident by the yellowing of the newer leaves compared to the older growth.
So, why did the plant get so yellow? (See the next posting�)
|
|
�
|
|
Sunday, April 30
|
View Page
|
 |
Correcting Anemia with Chemistry
While many of the typical early plant anemia causes were corrected (methods provided two posts earlier) the advanced and distinctive bright yellow strongly suggests iron deficiency. Since this was not a problem in the past some iron fertilizer had to be ordered. For a variety of reasons, the shipment was delayed, so chemistry skills were put to use.
Fertilizers typically offer a balanced pH for plants or even better yet, have a chelated forms for easy plant absorption this was not an option.
However, iron is iron right? Yes� but also no;-) This is where chemistry meets biology or a little biochemistry needs to be taken into consideration.
Using a ferrous sulfate solution as pictured is the same ingredient that is in most iron fertilizers so in this way it is the same. However, read closely and you will see that it has been acidified with sulfuric acid. Upon testing it has a pH around 2.0 which is not very plant friendly, not to mention the 0.02 Molar concentration.
So, with some careful dilution and pH adjustment the plants received a ferrous sulfate solution as a drench at 700ppm (1.0 EC) with a pH of 6.4. This was applied on 4/27, 4/30, 5/2, 5/4. Next image posted will show the plant on May 7th.
|
|
�
|
|
Monday, May 1
|
View Page
|
 |
Recipe for Fertilizer
While the general idea was provided in the previous entry for making the iron fertilizer, here are the details�
Starting Solution: Ferrous Sulfate Solution 0.02 Molar, acidified (with sulfuric acid)
Protocol: Take 50mL of the starting solution and add it to 850mL of water (distilled preferred). Once the new volume of solution is mixed add a trace amount of pH Up to achieve a final solution that is 660ppm (0.94EC) and 6.1 pH.
Apply to plants every other day for about a week (four applications over eight days).
The return of green color to the actively growing leaves should be seen by the second or third application and in ten days the plant should be its normal (iron sufficient) green coloration.
|
|
�
|
|
Sunday, May 7
|
View Page
|
 |
The Same 1832.5 Graham �20 (F: 1938 Sperry x M: 1339 Graham)
*Yes, this is the same plant that has been in the previous postings, no trick photography, sleight of hand or plant changes, this is just now an iron sufficient plant.
This does not even look like the same plant, but shows the importance of identifying and correcting nutrient deficiencies early. In fact, the plant may be deeper green than it should be as the iron application and absorption had a slight delay. One other note is the leaf on the right that is yellow is the same leaf in previous images that has some of the green leaf veins and as you can tell, once the leaf �matures� do not expect it to green up, the goal is to look at the potential progression in the developing growth to see if corrective measures are working.
Also, the official iron fertilizer as now arrived, but does not look like it is currently needed, but continual monitoring will occur to stay ahead of any future potential iron deficiency issues.
|
|
�
|
|
Wednesday, May 17
|
View Page
|
 |
*Frost Warning*
This is a very late frost for this area and while there may be a larger plastic stricture over this smaller one it is not worth the risk. So, in addition to blankets, tarps and mill fabric was layered. At the bottom the CMH grow light is on so this is also going to give some heat.
In addition, the thermostats will ensure the heat lamps do not over heat the plant.
|
|
�
|
|
Thursday, May 18
|
View Page
|
 |
Frost Confirmed
Well, the area did get a frost, but the pumpkin plant actually seemed to grow so the heat and light was effective.
Blueberry plants were covered and most made it though, however other growers in the area suffered losses due to the unseasonably cold temperatures.
|
|
�
|
|
Tuesday, June 13
|
View Page
|
 |
2365 Wolf Pollen From the Wallace Patch
Growing only one plant the goal was to get a cross that was not a self, if possible, this year. The 2365 Wolf on paper looks like a great genetically different lineage to cross with the 1832.5 Graham, so, the next goal was to find some pollen.
Ron Wallace was willing to spare some male flowers as his pollination was on a different day. So, after work the drive was made with a water pitcher for a quick patch tour and harvesting of some of his 2365 Wolf male flowers.
Thanks, Ron, for the male flowers and all of your help over the years!
|
|
�
|
|
Wednesday, June 14
|
View Page
|
 |
Pollination Day for the 1832.5 Graham �20
After getting home last night from Ron�s the 2365 Wolf flowers were placed in an inside windowsill to get some of the early morning sunlight and on cue, they opened on their own. The female flower had the blue cup over it (even though it is in a greenhouse with insect netting so no bees could get in) and when removed the flower opened up fully symmetrical as can be seen in the image which is a good sign.
The pollen was plentiful, fluffy and put to good use, now hopefully the pollination takes.
|
|
�
|
|
Wednesday, June 14
|
View Page
|
 |
Beautiful Flower and Lobes
Cross: F: 1832.5 Graham �20 x M: 2365 Wolf �21 (from Ron Wallace)
Date: June 14th, 2023
Distance Out: 19ft.
Lobes: 5
Symmetry Rating: 9.5/10 (this is a grower discretion rating, looking at the image you may have a different symmetry rating)
Looking along the main vine when a female flower is seen developing in the sweet spot this is what all growers hope to see when it opens. The outside of the flower and pumpkin can look normal but it is not until an inspection of the lobes and inside of the flower where the growers gets a better idea of its symmetry. Now, this is not to say that there is always a correlation to lobe symmetry and final shape, but overall, a higher degree of symmetry is preferable.
|
|
�
|
|
Friday, June 16
|
View Page
|
 |
Anthesis Applied 48-hours Post Pollination
The cup is left on the flower and does offer a little size comparison and the pumpkin seems to be growing even from just two days ago. Anthesis was applied as a fine mist about 48-hours after pollination. Sometimes it is applied a little earlier (an hour or two) as in just at or before sunrise, to keep the water droplets on the pumpkin a little longer before it evaporates off. In contrast, if possible, the pollination process is done just after sunrise to give time for everything to warm-up as this helps with the pollen transfer. These small details of timing will not guarantee success but the intention is to offer the best odds and maximize the chance at success.
The goal is to increase the duration and the rate of cell division. This will often slow the visual expansion of the pumpkin, but as long as it stays shiny this is intended to be the keeper.
|
|
�
|
|
Friday, June 16
|
View Page
|
 |
Artificial Light
Not the best image of the plant, but two CMH lights are being used to help ensure the plant is receiving the full duration of light (photoperiod) of the day. There has been a lot of diffused light (clouds, smoke, haze) resulting in a daily delay of sun rise and an early sun set when it comes to light intensity (PAR).
As a result, these lights come on around 5am until only about 8am and then on again 6pm to 9pm. The goal is to ensure that during the natural lower light periods (which have been very low due to the light diffusion) when the sun is low in the horizon, the plant is still kept on the same photoperiod.
Since it is around the longest day of the year, if the plant perceives days are shortening, it may think it is closer to harvest time and the goal is to encourage growth and development� not ripening.
What made this easy is these are the same lights that were in the smaller cold-frame just raised up. The other advantage of adding more light intensity in this case in particular is the addition of carbon dioxide that is being supplemented. This environmental change allows plants to utilize more of the light.
|
|
�
|
|
Wednesday, June 21
|
View Page
|
 |
Overall Plant: 1832.5 Graham �20
The plant is looking great with basically only water being added up to this point via the drip tape.
Drip irrigation details�
Total of 48 lines each 31ft. long to cover my 40ft x 32ft single plant area
Drip Tape Thickness: 15mil.
Emitter Spacing in Tape: 8 inches
Flow Rate per 100ft @ 8psi: 20 GPH (or 0.34 GPM)
Space between Drip Tapes: 9 inches
Run Time: Daily for 15min. (*During the peak growth and heat of summer, an additional irrigation event for 5-10min. depending on the weather would be added.)
Estimated Water Usage: 100 gallons per 15min. irrigation over 1,280 sq.ft.
The chair with the white sheet has the June 14th pollination under it and the other chairs are used to shade the main vine and potential back-up female flower.
This is showing the traditional Christmas tree style method of pruning with the main vine running down the center of the structure and secondary side vines coming out at right angles to the main. All tertiary growth is removed as early as possible to minimize the wound sites and allow the plant to more easily heal itself.
It may be a little hard to tell but the secondary vines are also pinched at a point that (ideally) when the finished expanding end-up at the edge of the structure. The goal is to end up with a 30ft. (9.1m) wide plant with a length around 35ft (10.6m) or so.
Where the main currently is (under the chair) it will be turned 90-degrees and treated as a secondary once it makes the turn. Sometimes this is allowed to continue to run after it reaches the edge with some creative turning but this is just to keep it going and most likely does not contribute that much to the pumpkin as the main vine tip may be potentially 50ft. away from the pumpkin.
|
|
�
|
|
Wednesday, June 21
|
View Page
|
 |
Day 7 (F: 1832.5 Graham �20 x M: 2365 Wolf �21 (from Ron Wallace))
The pumpkin is growing and still has that nice shine to it. Yesterday (the day before official touch down the area was prepared for the pumpkin now, and for the duration of its growing cycle following this sequence�
1. The area is raked to try and take away any low or high spots and while it may not be perfectly level it intended to match the consistent slope of the land.
2. Two pieces of 5ft.x5ft. mill fabric as added to the soil surface.
3. An approximate 4ft. x 4ft. piece of plywood is added that has been painted to reduce water absorption and help smooth the surface.
4. Two more layers of mill fabric are added on top of the plywood.
5. The mill fabric-plywood-mill fabric sandwich is slid under the pumpkin and as far under as is possible. (Estimated 18� or so.)
6. A power cord is run to the area and a 4� desk fan is added on the stem side along with two ultra sonicators incase a mouse happens to be passing by, they will keep on going and not stay around. *It is important to remember that ultrasonic waves behave more like a laser beam of light and not like sound. Meaning the ultrasonic �speaker� needs to be pointed in the area of the expected pest, the �speaker� will not fill the area with noise like many think. This is why there are three angled speakers to ensure complete coverage around the pumpkin.
7. Pool noodles are placed under the vine as needed to get the right angle as setting the pumpkin up now is critical. In the image the stem is too far down so a little extra blocking up of the main is needed to level out the pumpkin so when the flat spot is developed it is sitting level and will hopefully stay that way.
8. Final step is to put a chair over the pumpkin and place a white sheet on it to provide shading but also allow for some air circulation.
|
|
�
|
|
Saturday, June 24
|
View Page
|
 |
Day 10 Day 7 (F: 1832.5 Graham �20 x M: 2365 Wolf �21 (from Ron Wallace))
Image quality may not be the best because a friend stopped over and this image is from their phone camera which is the only day 10 picture of the pumpkin. It is still early and measuring at this size is more likely to do more harm than good so the image is all the data that is collected for day 10.
Comparing to the previous day 7 image the vine has been lifted via a pool noodle so the pumpkin is now sitting level. It is critical to get the pumpkin positioned correctly now so when the bottom flat spot starts it will be in the most advantageous area. If the flat spot starts to form and the pumpkin is out of position it is much harder to correct. Little tips like this now can save a lot of work and potential issues later in the season.
|
|
�
|
|
Thursday, June 29
|
View Page
|
 |
Fighting Aphids with Beneficial Insects
Aphids were noticed on the plant on June 25th so beneficial insects were ordered and they arrived today. Most growers will just go the chemical route when it comes to insects, however in some cases beneficial insects offer greater advantages such as no leaf ageing due to the active ingredient added, longer term control and reduced environmental impacts.
There are some different considerations when going this route as you need to have a positive identification on the target pest insect. The beneficials can be very host specific so if the pest insect identification is wrong, the beneficial insect match will also be wrong and the effectiveness may be poor. It is this scenario that some growers get into and think the beneficials did not work, so take this into consideration. Also, growers need to be careful what they are applying to the plant especially around the time of insect release.
The image is dark as low light hours are the ideal time for beneficial insects to be released into the growing area. This gives them a chance to get established and moisture is more likely to be present for a longer period of time. Misting the area of release with water is another way to help the insects transition to the area.
For this area which is about 1,200sq.ft. of growing area and a plant around 650sq.ft. plant at this time, the following insects were applied�
Green Lacewing = 5,000 Eggs
Assassin Bugs = 250 Eggs
The aphid population was generally isolated and in small pockets. May not be the idea case for beneficial insects but they will hopefully take care of the problem. Spraying insecticides as a general spray for isolated areas did not seem great to target beneficials applied in isolated areas should be a better approach.
|
|
�
|
|
Saturday, July 1
|
View Page
|
 |
Green Lacewing Application
This is a little heavy application, but the green lacewing eggs come in a carrier that is something like rice hulls or vermiculite consistency. In areas of expected greater infestation a quick pour is applied to the leaves in hope it will not be far away from a pest food source.
However, growers should try and make a finer application over a larger area than what is pictured. This can cause spot damage to the leaf and also the lacewings are cannibalistic meaning they will feed on each other before going to the pests. So, a finer spreading out of the beneficials is advised.
|
|
�
|
|
Saturday, July 1
|
View Page
|
 |
CO2 Controller- Titan Atlas 8
There are many CO2 controller options out there, however this one is a great fit for this pumpkin growing set-up. It has �Fuzzy logic� which is essentially a computer-controlled dosing system that will adjust to the growing environment to �learn� what duration of dosing will lead to what CO2 ppm levels. So, it does not massively over or under shoot the intended target and does conserve the CO2.
This controller also has a way to recognize when the exhaust fan comes on and will suspend CO2 injection when the fan is on preventing it from wasting CO2 when the venting is on. Also, it has a photosensor on the sensor so it will only dose when it is light out as this is when plants are able to use the carbon dioxide.
While this may not be a cheap up front cost controller it does save on CO2 in the long run that saves both money but also the hassle of moving those 180-pound (when full of 50lb of CO2) bottle around.
The target level is in the 900-1200ppm range so typically aiming for 1000ppm is a good setting. Here the current reading is 1110ppm so right in the target range so all is good.
|
|
�
|
|
Saturday, July 1
|
View Page
|
 |
CO2 Regulator
Here the pressure of the 50lb CO2 bottle can be seen along with the actual flow rate. The typically bottle pressure initially is around 800psi.
The flow rate is about 6 to 7 cubic feet per hour. For such a large area many people wonder why it is not set higher, and the reason for this is if the CO2 flows too fast it will cause the regulator to freeze-up and essentially not be able to close the valve. An open valve will result in the bottle emptying uncontrolled which is not good. If this does happen, the CO2 level will go up to over 3000ppm and while 5000ppm is considered not to be safe, this is about three times what the plant can use so it is just a waste of material.
Yes, even in a greenhouse with hot temperatures this freeze-up can occur. This is why getting everything dialed in and adjusted is important. This rate was set with a combination of calculations and then trial and error for this growing area.
More is not better and at this flow rate it will still go through the entire 100ft. loop of �rain tubing� (1/8� black tubing with a pin hole ever 12inches or so). This is placed under the plant canopy to reduce the chance if it being lost and increase the proximity to the plant leaves. This also helps with an even distribution in the growing space with fans to help keep air movement and circulation.
|
|
�
|
|
Saturday, July 1
|
View Page
|
 |
Overall Plant Picture: (F: 1832.5 Graham �20 x M: 2365 Wolf �21 (from Ron Wallace))
The plant has been progressing well and the pumpkin is getting bigger so all is well� currently. The application of the beneficial insects can be seen and also the CMH lights over the area where the cold-frame was. These are still on the longest day of the year photoperiod. They come on a little before sun rise for about 2 hours and then come on around sun set for another 2 hours or so.
While these lights may not be covering much percentage of the plant the hope is that it keeps the plant thinking it is June, and continues its youthful growth and not it maturing/ripening stages until much later.
|
|
�
|
|
Tuesday, July 4
|
View Page
|
 |
Day 20 for the (F: 1832.5 Graham �20 x M: 2365 Wolf �21 (from Ron Wallace))
OTT = 206�
Est. Weight = 200 pounds
This pumpkin is growing fast, considering it is only 20 days old. Getting is placed properly on the mill fabric and plywood early was a good move as now it is set in place. The red pool noodles are helping with a slight upward pressure on the main vine and the sonicarors are moved to allow maximum coverage. However, soon additional sonicators will be added, which is always a good sign;-)
|
|
�
|
|
Tuesday, July 4
|
View Page
|
 |
Day 20 1832.5 Graham �20 Plant Overview
The plant is looking great (and so is the pumpkin) and it has just about filled in the allowed area. There are still a few side vines that have some room to grow and stretch, but overall, now the emphasis will be on plant health and pumpkin growth.
This is also where CO2 supplementation is less important. While it may help with plant and root growth it is not as beneficial for pumpkin growth, mainly since pumpkins are efficient water movers and do not have improved carbon sinks compared to a regular field pumpkin. When the plant reaches this size, it also correlates with warmer weather so a �sealed� plastic structure is no longer needed.
A summer plastic set-up has been worked on and will be installed soon.
|
|
�
|
|
Wednesday, July 5
|
View Page
|
 |
Improve Side Ventilation
With hot weather predicted in the short term the current vents and fan are not able to move enough air, so one side of the plastic was raised and propped up. This improved air flow during the day and with the 30% shade netting it kept things as �cool� as possible.
This is only a temporary modification as the full structure plastic will be changed out to the �summer cover� soon. But when the summer cover goes on the CO2 system is removed and keeping the plant a little longer with CO2 is wanted.
|
|
�
|
|
Wednesday, July 5
|
View Page
|
 |
Hot Day
Despite having venting and a large fan running it can still get quite hot in the greenhouse style structure. When the sun is directly on the CO2 bottle, it can cause it to increase in pressure. A previous post shows the normal bottle pressure (~800psi), but here is the heat induced elevated pressure which reads 1750psi. When the sun goes down and the exhaust fan shuts off the controller and regulator will go back to normal dosing.
The flow rate is regulated so it will not impact this aspect and once the temperature cools down the pressure will also reduce. (Gay-Lussac�s Law of Temperature and Pressure.)
|
|
�
|
|
Wednesday, July 5
|
View Page
|
 |
Improving Under Canopy Air Flow
Despite the side venting and fans running it seemed like the leaves were creating a restricted air flow around the plant. This could be in part due to the plastic end walls of the structure, so a quick addition of a box fan was added to see if it helps.
There does seems to be improved air flow which is important for general cooling, carbon dioxide refreshing, and reduced moisture build-up. These leaves are quite tall so the box fan does work but carpet drying style fans may be more efficient so these will be considered as a potential future improvement.
|
|
�
|
|
Wednesday, July 12
|
View Page
|
 |
Cold to Warm Season Structure Change: Cold Weather Set-Up
Seems like the weather is going from one extreme to another and the heat is here and getting worse. So, despite the less-than-ideal conditions to make the change (sunny, hot and humid today) the change needs to be made for the plant.
To try and beat some of the heat the goal was to get up right at sunrise and get as much done before the sun gets on the working area.
This is an image of the structure before the work was started. It is a full sheet of 6mil greenhouse plastic that is about 45ft. long and 50ft. wide. It has been buried at both sides and has been able to hold the heat and help provide some early season benefits, but now this same set-up would be a hindrance on plant growth. Excessively hot and humid conditions are not beneficial so there has been a summer design created to still offer some benefits.
|
|
�
|
|
Wednesday, July 12
|
View Page
|
 |
Cold to Warm Season Structure Change: Large Plastic Down and Insect Netting Up
The larger sheet of plastic has now been removed from the structure and rolled up on the far side. What now can clearly be seen is the insect netting that is clipped up which will allow for side ventilation, but prevent insects from getting into the plant.
Specifically, this is the insect netting is Protek net 70g and is up on each side about 8ft. to 10ft. tall. The details about the insect netting from the manufacturer are provided below�
Proteknet Exclusion Insect Netting (70gr) | Optimal Airflow
Mesh: 0,85mm x 1,40mm (0,033" x 0,055")
Weight: 0.230 oz / ft� (70 g / m� )
U.V. Resistance
Porosity: 75 % approx.
Light Transmission: 90 % approx.
Material: High Density Polyethylene
Color: Clear
Lifespan: 5 years
Insects control : Armyworm, Brown Marmorated Stink Bug, Cabbage Root Fly, Chrysomelid, Corn Borer, Onion Maggot, Sawfly, Seedcorn, Squash Bug, Tarnished Plant Bug. Alao protects against Spotted Wing Drosophilia.
|
|
�
|
|
Wednesday, July 12
|
View Page
|
 |
Cold to Warm Season Structure Change: Quick Look In
This shows the plant and perspective in relation to the insect netting. There will be plastic going over the top. The goal was to get the insect netting up and clipped in place before the top plastic was added. Both will be wiggle wired in so the plastic and insect netting are held in the same U-channel. The insect netting is also shallowly buried along the soil to hold this in place. Both of these ends will help seal the transition points which is important for insect exclusion.
The goal is to make this change as quick as possible to not only beat some of the heat, but Squash Vine Borers (SVB) are around peak flight so at this moment in time the plants are exposed. As a result, having as many things as possible set-up ahead of time is important to help keep this process efficient.
|
|
�
|
|
Wednesday, July 12
|
View Page
|
 |
Cold to Warm Season Structure Change: Top Plastic �Roof� On
Now the top plastic is on (6mil 23ft. x 42ft.) and the modified ladder is being used to fix everything in place with wiggle wire. The goal is to keep control over how much water the plant gets from natural rain fall but still allow for ventilation and insect exclusion.
Nice when a plan comes together as the sun line is getting very close and it is certainly going to be a warm day.
|
|
�
|
|
Wednesday, July 12
|
View Page
|
 |
Cold to Warm Season Structure Change: Complete
Once the sun got on the area it got hot fast, but in the end, everything went to plan. Top plastic cover is on, insect netting is up and 30% shade cloth is in place for today.
With the change in structures there is additional plant stress since the humidity will suddenly be reduced. However, this may be a slight adjustment day for the plants as the humidity today is quite high. The shade netting should help reduce some of the light stress and hopefully keep the plant from getting leaf burn.
|
|
�
|
|
Thursday, July 13
|
View Page
|
 |
13 is Unlucky� Yellow Striped Army Worm
This is a new pest to show-up on the pumpkin plants and it is a Yellow Striped Army Worm. These insects are aggressive feeders and can quickly eat leaves to the point of defoliation.
While these tend to be an insect of concern on grass and cereal crops such as rye, wheat, sorghum and corn. However, none of these crops are present in the greenhouse so not sure how it got in, (likely from the soil) but these have been seen this year in particular in increased numbers.
At least these are large (easy to spot) insects so initial control has been the old, see and squish method. It does not seem like the numbers are high so by catching them early and physically removing them the hope is the population can be kept under control.
|
|
�
|
|
Thursday, July 13
|
View Page
|
 |
13 is Unlucky� Two Spotted Spider Mites
If the Yellow Striped Army Worm was not enough, they have pest friends in the form of Two-Spotted Spider Mites. The image shown is what the physical leaf damage looks like on pumpkin plants. An actual image of the spider mites is quite hard since they are so small. In fact, in order to get a positive confirmation (as there are different types of spider mites) a hand-held loupe with LED light was used at both 30x and 60x.
For control of spider mites, it is important to realize that they a are not insect they are arachnids. So, no insecticides can be used since spider mites are not insects. In fact, imidacloprid (active ingredient in Admire, Merit, Quali-Pro, Premise and Criterion to name a few) can induce females to lay more eggs!
However, catching them early is key and beneficial insects will be order and applied upon arrival.
|
|
�
|
|
Friday, July 14
|
View Page
|
 |
Day 30 for the (F: 1832.5 Graham �20 x M: 2365 Wolf �21 (from Ron Wallace))
OTT = 318�
Est. Weight = 703 pounds
Avg. over last 10 days = 50.3 pounds
The plant has filled in most of its space and overall looks to be in good shape. The pumpkin is growing very well and luckily was positioned well on the plywood and mill fabric so that it does not need any adjustments at this time. More sonicators have been added and also a small desk fan directly on the blossom as a preventative measure.
|
|
�
|
|
Saturday, July 15
|
View Page
|
 |
Leaf Margin Burn Issue Perplexing Issue of the Year: Background
Leaves near the pumpkin have started showing this marginal burn to them. Now this is nothing new as typically when a pumpkin starts to grow aggressively the demand for plant potassium is often also increased and this is a characteristic symptom of potassium deficiency. Which since it seems it is the leaves near the pumpkin would seem to correlate, but�.
*While potassium was part of the fertilizer program it was increased slightly as typically this will stop the progression of the marginal burn. This means that the leaves that are yellow on the edges stay yellow (for the remainder of the season) but the problem should not progress to other leaves.
*The increased potassium did not seem to have any impact on the progression of the marginal yellowing/burn.
|
|
�
|
|
Saturday, July 15
|
View Page
|
 |
Leaf Margin Burn Issue: Close-Up
This image is a zoom in from the previous post. The intention is to show some of the variable yellowing that is occurring. Looking specifically at the center of the image the leaf that is a little more shaded than the other seems to have the yellowing to a greater degree compared to the upper leaf.
While only a section of the plant (leaves near the growing pumpkin) have this issue, it is important to pay attention to these seemingly small details. Sometimes there just is variance in the way symptoms appear, but this seems to be a clue to help explain what is actually going on.
|
|
�
|
|
Saturday, July 15
|
View Page
|
 |
Leaf Margin Burn Issue: Upper Leaf
In general, having all of the leaves on the same plane (or level) is the goal, but there is inherently some leaf height variability. This image shows what a fully mature upper leaf looks like at the early stages of marginal leaf burn progression.
Now, just looking at this image, it is classic potassium deficiency, but there is more going on in this case;-)
Luckily, a tissue test was taken of the overall plant about a week before these images so the results can be used to see what may be going on essentially at the onset of the problem.
|
|
�
|
|
Saturday, July 15
|
View Page
|
 |
Lead Margin Burn Issue: Lower Leaf
Here a leaf that is more shaded is pictured in contrast to leaves around it receiving more sun. It is the shaded leaf that seems to have the most sever yellowing of the margin. It is important to note that just having one leaf showing this is an indication but not necessarily a confirmation of anything. But keeping an attentive eye for a possible pattern based off this should be kept in-mind.
|
|
�
|
|
Saturday, July 15
|
View Page
|
 |
Leaf Margin Burn Issue: Under Canopy Secondary
This is one of those weaker secondary vines that is slowly growing and since it is behind it is under the fully mature leaves. As a result, it is getting minimal light. Many growers would have removed it, but it was kept since it was still growing and could be needed if some of the other leaves were lost later in the year and did not seem to impact the pumpkin growth.
However, this was an important key to figuring out this marginal leaf burn issue. It seems these leaves are the most impacted by the yellowing to the point that there is also marginal leaf browning occurring.
Alone this would not explain much, but with the shaded leaves showing more yellowing than those in full sun and seeing this leaf which is the most shaded showing the most yellowing lead to a potential pattern.
|
|
�
|
|
Saturday, July 15
|
View Page
|
 |
Leaf Margin Burn Issue: Tissue Tests in and Summary of Observations
Leaves near the pumpkin started to show some yellowing of the margins. This looked like a classic potassium deficiency so some sulfate of potassium (0-0-50) was added via drip tapes (~400ppm or 0.6 EC) however conditions seem to still progress.
The original thought was the pumpkin was taking in the potassium resulting in a deficiency however, looking at the tissue test result there are no major deficiencies present for any nutrient. In addition, the tissue test results showed excessive potassium and nitrogen.
The images show mainly the leaves near the pumpkin with two secondaries past the pumpkin (at the moment) showing the most yellowing progression. The secondary showing the most yellowing is a weak one that is below the main canopy and is shaded.
|
|
�
|
|
Saturday, July 15
|
View Page
|
 |
Margin Burn Issue: Pattern Noticed
The image provided here is from another grower under similar environmental factors, showing the same issue at the same time of year. So, now a pattern can be established. Similarities include, high nutrients (especially nitrogen) based on tissue test results, limited sunny days, plant being grown under plastic cover.
With this additional information and speaking to many growers a diagnosis has been reached which is�
|
|
�
|
|
Saturday, July 15
|
View Page
|
 |
Leaf Margin Burn Issue: Diagnosis = Nutrient (Salt) Toxicity
While this marginal burn can look like potassium deficiency (and most of time this is the issue) other environmental factors must be taken into consideration. This is why is important to ask questions and not jump to a quick diagnosis. In this case, the reason for leaf marginal burn is Nutrient Salt Toxicity. Mainly due to excessive Nitrogen and Potassium due to the combination of the following three main factors�
-Plant was being grown in a covered structure. (This prevented natural rain and the washing of the leaves, which allowed the build-up of salts on the leaves to occur in particular the margins.)
-Sunlight was filtered for most of the time due to clouds and/or wildfire smoke. (This reduced photosynthesis not allowing the plant to fully use the nutrients (salts) the roots were translocating. This is also why the shaded leaves showed more advanced symptoms.)
-Tissue Tests Confirmed High Potassium and Nitrogen. (These were present in high amounts and essentially forced out of the leaf at the edges (margins) through the process of guttation and these salts were left behind when the water evaporated in the morning resulting in a marginal burning of the leaves.)
The process of problem solving can be quite challenging, but it can also be rewarding when a probably cause is diagnosed.
If you want the scientific articles to support the above diagnosis�
Bian Z, Wang Y, Zhang X, Li T, Grundy S, Yang Q, Cheng R. A Review of Environment Effects on Nitrate Accumulation in Leafy Vegetables Grown in Controlled Environments. Foods. 2020; 9(6):732. https://doi.org/10.3390/foods9060732
Marginal Chlorosis on Cantaloupe Leaves https://sites.udel.edu/weeklycropupdate/?p=4562
Guttation Explanations: https://www.snexplores.org/article/scientists-say-guttation
Thanks to all of the growers that have provided insight and information it is great to be part of such a supportive community!
|
|
�
|
|
Saturday, July 15
|
View Page
|
 |
Stem Split (F: 1832.5 Graham �20 x M: 2365 Wolf �21 (from Ron Wallace))
Doing a regular evening inspection all initially looked well until the under side of the stem was observed. Looks to be the start of a stem split. Others have said cut the stem to reduce the stress and after a quick email to confirm the process the decision was made to make a preventative cut in the stem.
|
|
�
|
|
Sunday, July 16
|
View Page
|
 |
Under Stem Cut Made 24-hours After Initial Cut (F: 1832.5 Graham �20 x M: 2365 Wolf �21 (from Ron Wallace))
The concept is to provide a stress relief to reduce the zippering effect of the split continuing on the pumpkin where it could enter the cavity and become fatal. It may not seem like making a split bigger would help, but it did relive some stress almost immediately. The knife used to make the split has a thin blade and the width of the cut area is already larger. However, in better news, the split on the actual pumpkin has slowed at the same time.
|
|
�
|
|
Monday, July 17
|
View Page
|
 |
Stem Side (F: 1832.5 Graham �20 x M: 2365 Wolf �21 (from Ron Wallace))
Stem side of this pumpkin looks great, but it is common for splits to occur 180-degrees from each other. While the initial cut to the stem made on the late evening of the 15th today (the 17th) the decision was made to also make a cut about at the 12 o�clock position since the other split is at the 6 o�clock position.
The reason for the delay is it did not look like the top was in danger of a split and the fear of making a stem cut in the wrong position would essentially mean two cuts instead of one. However, after seeing how well the first cut went the risk to reward ratio was in favor of a cut in the most likely area.
Negative impacts would be minimal and a top cut could allow better air flow.
|
|
�
|
|
Monday, July 17
|
View Page
|
 |
Upper Cut Made (F: 1832.5 Graham �20 x M: 2365 Wolf �21 (from Ron Wallace))
This shows the process mid-cut which was hard to do for a stem that looks to be in great shape. Key is a sharp and thin knife. Also have an idea of how far you want to go and take your time.
|
|
�
|
|
Tuesday, July 18
|
View Page
|
 |
Aphid and Spider Mite Infested Leaves Removed
There was a leaf that just did not look right randomly on the plant as it had some slight discoloration. It was an older leaf which is in part expected but making my way to the leaf and inspecting the underside there was a hot spot of both aphids and two-spotter spider mites.
There are mostly aphids in the image, but circled in green is a small concentration of about seven two-spotted spider mites. This shows just how small these are and when there is only a few of them spaced out it can be very hard to initially detect.
|
|
�
|
|
Tuesday, July 18
|
View Page
|
 |
Beneficial Insects
Mites can be very difficult to control chemically as resistance can build in a population quickly. So, getting some beneficial insects established is a better long-term solution. Here there are two Mite Predators being released this evening in the 1,200sq.ft. greenhouse space.
Late evening/night time release is advised to allow them to establish during times of low light.
Background on each insect..
Phytoseiulus persimilis PLUS (4,000 total) P. persimilis PLUS are reared in an innovative way to include mobile mites (adults and juveniles) PLUS eggs in each bottle. Unlike traditional P. persimilis, P. persimilis PLUS arrives pale and changes to orange/red after predation on pest mites begin. Optimum Temperature and Humidity: 68-90�F (20-27�C) and 60-90% Relative Humidity
Neoseiulus (= Amblyseius) californicus (5,000 total) Neoseiulus (= Amblyseius) californicus is an oblong, tiny predatory mite that feeds on a variety of prey and is useful in prevention, control and management of infestations of various spider mite species. It can also be used as a preventative control of broad mites, cyclamen mites, and some russet mite species. Since they are slower feeders than other mite predators (P. persimilis, N. fallacis), N. californicus should be used in conjunction with other suitable beneficial insects in the presence of large pest populations. Optimum Conditions: 50-105�F, 40-60% RH
|
|
�
|
|
Thursday, July 20
|
View Page
|
 |
New Fans Added to Improve Under Canopy Air Circulation
In an effort to increase the under-canopy air flow these Three B-Air 1/4hp air mover fans were added to the greenhouse. They can be daisy chained together and are all set on the lowest setting and work great. After seeing Henry�s dairy ( Henry-the giant pumpkin grower) with what seemed like 10 different types of fans he liked these the best and they seem to be working out great.
One is down the left-hand side, one down the main and one down the right-hand side of the plant. All are in a line at the first two secondaries and pointed up the plant and are reaching a good 75% of the plant as leaves can be seen slightly moving which is the goal. The setting could be increased, but this seems to be unnecessary as the low setting is what looks to be right.
|
|
�
|
|
Monday, July 24
|
View Page
|
 |
Top Stem Split Update (Initial Cut Made on July 17th, 7-days ago)
The top preventative stem cut did not open much but has healed over. This was likely not needed looking back but the original split certainly seems to have been slow to progress post stem cutting.
This is a great little trick to try and help keep a pumpkin going and not lose it to a stem split into the cavity. It seems this would be most effective if caught early in the process, which is why daily inspects of the plant and pumpkin are so important.
|
|
�
|
|
Monday, July 24
|
View Page
|
 |
Artificial Lighting Test
In an attempt to test the theory that the marginal leaf burn noticed earlier was due in part to excessive nutrients not being able to be processed due to a lack of light to drive photosynthesis and experiment was conducted.
Adding artificial lights to help the plants be able to photosynthesize longer to allow them to use more of the nutrients and reduce the chance of them building up and being exuded from the plant resulting in leaf burn.
High pressure sodium (HPS) lights were used for a few reasons over LED lights�
1. HPS lights generate heat so the leaf temperature will be warm which is normal for these outdoor grown plants.
2. HPS lights can be mounted well above the canopy improving overall leaf area coverage.
3. HPS lights were easy to get on short notice;-)
Special note these are Gavita double ended 1000-watt HPS lights being used in the comparison. However, these is also a 315-watt Sun Boss CMH light over the crown area but this was too far away and not part of the light reading observations, but can be seen in the image.
|
|
�
|
|
Monday, July 24
|
View Page
|
 |
Artificial Lights Used to Extend the Day
The lights are not on for very long, they are mainly used to �extend� the day. The lights are on from about 5am-7am and again from 7pm-9pm. However, since the goal is to get an idea of what the lights are actually adding in relation to PAR (Photosynthetic Active Radiation), which is a measure of the intensity of light of the wavelengths that plants can actually use for photosynthesis. While lights may look bright to us, we are more preceptive of lumens and not PAR.
To get an idea of only what the artificial lights are producing, readings were take just before 9pm when the PAR outside was -0- (moon can be seen in the image). So, any light reading is based only on the artificial supplementation and not the natural light.
To provide a general idea of the reading summaries of the leaves around the lights were generally in the 160-210 (�mol photons m −2 s −1) range with the greatest coverage being around 150 (�mol photons m −2 s −1)
Now when sunlight is over 1,600 how can this �little� amount of light impact anything? Remember plants cannot use the full intensity of the sun and also these lights are intended to only extend the day.
|
|
�
|
|
Monday, July 24
|
View Page
|
 |
Artificial Light Placement in Relation to the Pumpkin
Why this location? Well, the area receiving the greatest percentage of usable light (essentially PAR of 100+ is where the leaves were showing the most yellowing.
In a study looking at the influence of HPS supplement light on growth and yield of greenhouse cucumbers show that there were yield improvements with light intensity of 100+ with 300 showing the most notable increase.
Study Link:
Blain, J., Gosselin, A., & Trudel, M. (1987). Influence of HPS Supplementary Lighting on Growth and Yield of Greenhouse Cucumbers. HortScience, 22(1), 36-38. Retrieved Aug 26, 2023, from https://doi.org/10.21273/HORTSCI.22.1.36
|
|
�
|
|
Monday, July 24
|
View Page
|
 |
Artificial Light Coverage Area
Again, while this looks like full plant coverage, the percentage of the plant that is actually receiving light that it can use to drive the photosynthetic process is much smaller than it appears.
However, the advantage is this is set to come one for two-hours in the morning and two hours in the evening to essentially keep the plant in the summer solstice like photoperiod. By providing some light just before sunrise and some more post sunset this will keep the duration of continuous darkness (how plants tell time) like the end of June. The hope is that this will allow the plant to act more vegetatively and less likely to ripen to keep the growth rate high and with this the plant using as many of the available nutrients as possible.
This up regulation of photosynthesis should (hopefully) reduce the progress of the margin burn as the plant can use more of the (excessive) nutrient salts accumulating in the leaf margins.
|
|
�
|
|
Monday, July 24
|
View Page
|
 |
Day 40 for the (F: 1832.5 Graham �20 x M: 2365 Wolf �21 (from Ron Wallace))
OTT = 386�
Est. Weight = 1,232 pounds
Avg. over last 10 days = 52.9 pounds per day
The plant is still in great shape and the pumpkin is starting to get some deeper ribs. The white box fan is running 24/7 and there is a white sheet on the pumpkin. This keeps air moving around the pumpkin at all times to hopefully prevent potential issues.
Looks like it is going to be an orange pumpkin.
|
|
�
|
|
Thursday, July 27
|
View Page
|
 |
Beneficial Insects Species Part 2
While two species were previously added on July 18th (Phytoseiulus persimilis PLUS and Neoseiulus (= Amblyseius) californicus) these were on order and take longer to grow at the facility.
The idea behind adding these was to clean-up what the two previous species of predatory mites may have missed. Also, since they are effective in higher temperatures this is another plus as it is the end of July/early August time of year. These also fly so they can seek and destroy potential new pockets of spider mites that may emerge.
Details for the specific species added..
Stethorus punctillum 100 count
Best option for high temperature, low humidity growing! Spider mite destroyers (Stethorus punctillum) are efficient locators of spider mite colonies in greenhouse, field crops, nurseries and indoor growing. Actually tiny ladybugs, S. punctillum eat more than 40 mites per day as adults and lay eggs near pest mite colonies. They will eat all stages of spider mites and find new infestation sites on their own by flying making them ideal for established mite populations.
Release S. punctillum once infestations are spotted or in environments where P. persimilis are not effective (high temperature/low humidity).
Optimal Conditions: 67-90�F, 30-90% RH. Known to survive temperatures over 100� in field crop applications.
|
|
�
|
|
Saturday, July 29
|
View Page
|
 |
Shade and Cool System for Pumpkin: Overall Look
No, the pumpkin is not this big, but this shows the shading and cooling system that have proven helpful this year. It involves a box fan, white sheet and some clamps. The goal is to keep air moving around the pumpkin and also keep it shaded while limiting the number of leaves around the pumpkin that are shaded in the process.
|
|
�
|
|
Saturday, July 29
|
View Page
|
 |
Shade and Cool System for Pumpkin: Clamp Placement
The large white sheet has a clamp at each corner which includes two by the main vine and two more which are orange in this case and near the box fan. These provide some weight to hold the sheet in place, along with two on the handle of the fan. This is important to avoid blocking the back air intake of the fan as this would reduce the air flow around the pumpkin.
There is also a fan blowing up and at the stem which helps keep the stem dry and also lifts the sheet on this side of the pumpkin. The combination of both fans adds more air to aid in the cushion affect and help lift the sheet off the surface of the pumpkin.
|
|
�
|
|
Saturday, July 29
|
View Page
|
 |
Shade and Cool System for Pumpkin: Clamp Hold-Down
On each side of the pumpkin (about mid-way on the sheet, clamps are placed to hold the white sheet to the mill fabric. This provides a fixed point to help limit the movement of the sheet which helps ensure directed air flow.
Having this fixed point also allows for the sheet to lift off the pumpkin but not go anywhere so the air flow goes around the pumpkin while still maintaining the shade effect.
|
|
�
|
|
Saturday, July 29
|
View Page
|
 |
Shade and Cool System for Pumpkin: Air Cushion
This shows how the sheet is kept off the pumpkin due to the air flow which also provides continual air flow. This way the pumpkin gets air flow but also shade without the need for a structure and it minimizes the chance of sun damage or rot forming.
Now, no system is perfect so keep in-mind that if it rains, or the sheet gets wet, this system will not work very well. In this case a supporting structure should be constructed to help prevent the sheet form coming in contact with the pumpkin and restricting the air flow.
One advantage of this system is that if a fan does fail it will be very noticeable so the grower can check to see what may be happening.
|
|
�
|
|
Saturday, July 29
|
View Page
|
 |
Shade and Cool System for Pumpkin: Rodent Control
Not only does this system provide all of the benefits stated above it also provides enough clearance to still allow the effective use of the ultrasonicators utilized to help keep the rodents away from the pumpkin.
Keeping the sheet in a known location that is near, but still away from the actual pumpkin creates this air flow space which works out great for the sonicators to do their job as the wavelengths behave more like a laser light and not like sound. So, anything physically in the way would reduce the effectiveness so having this gap area for air flow is beneficial to the pumpkin in addition to the rodent deterrent so it is a win-win.
|
|
�
|
|
Tuesday, August 1
|
View Page
|
 |
Humidity Control System: Basics
While the humidity has been high (tropical) for most of the summer, it was these days seemed to correlate with the �best� pumpkin growth. So, in an effort to keep the good times going a misting system was researched and implemented.
Now, a misting system is different than an irrigation system and the goal is more of a fog than larger irrigation water droplets. The intention is to increase the water vapor in the air while minimizing the amount of water that accumulates on the surface of the leaves.
What can be seen here is the thin white tubing that is about 96ft long with 26 total misting nozzles. This was chosen as it can go along the perimeter of the pumpkin plant in a U-shaped orientation which will help increase humidity while still keeping the pumpkin and main vine as dry as possible. Zip-ties are used to help hold and direct the misting nozzles into the growing space.
|
|
�
|
|
Tuesday, August 1
|
View Page
|
 |
Humidity Control: Sensor Placement
The placement of a sensor is very important and the importance of this consideration often neglected by many growers. So, growers need to consider this placement carefully as it will be how the system perceives and adjusts the environmental conditions.
Growers should determine what they think is the best placement and then observe the sensor and system in action and be willing to make adjustments if necessary. This is in part why this sensor has been mounted on a tall bamboo stake with a zip-tie as this can allow for easy adjustments if needed. Luckily this sensor has a 15ft. cord so there is a lot of freedom to ensure the �best� location is found.
As can be seen in the picture the sensor is place about 5ft in from the edge of the plant and not directly below a misting nozzle. In addition, it is also at plant height which is just above the leaf surface to ensure the environment the plant is being exposed to is closest to what the sensor is reading.
This sensor also has a photo sensor so it knows day vs night so placing it above the leaves and ensure it is not being blocked is especially important as different target humidity levels can be set for day vs night.
|
|
�
|
|
Tuesday, August 1
|
View Page
|
 |
Humidity Control: Equipment
While many growers choose to use a repeat or cycle timer this system adjusts to the actual conditions. If you know the humidity is always low a repeat or cycle time may work, but the goal here is to ensure the humidity does not drop below a certain level and if the humidity is above this level no additional misting is needed.
As a result, the sensor placement is important as that is what will be telling the system to activate or remain idle. In addition to the sensor and processing controller, when the system determines humidity needs to be added an electrical signal is sent to the (gray) normally closed �� valve. This has water supplied by the green garden hose ready to go with house pressure and when the valve opens it can then flow through the 200-mesh filter and to the misting nozzles. While salt build-up can be an issue and the 200-meash filter will not likely prevent this, it will ensure that no large particulates that may be in the water get into the system resulting in clogging of the very fine misters.
|
|
�
|
|
Tuesday, August 1
|
View Page
|
 |
Humidity Controller (TrolMaster Legacy BETA-6 Digital Day/Night Humidity Controller)
This shows the main brains of the humidity control system. Here if a humidifier or dehumidifier is connected and also the day and night target levels. Since a dehumidifier was not needed this was set to be a humidifier which was the previously shown with the valve set-up.
Selecting the target humidity was a little harder. The goal was 65%, but when this was set the system seemed to run longer than intended leaving the leaves excessively wet, even after some sensor adjustments. So, while it was originally set at 65% adjustments lower were made in increments until the system was operating (coming on and off) at what seemed to be the correct times. This ended up being a set point of only 45% humidity and while this is below the goal of 65% it did seem to help cool the space and provide some supplementation of humidity to the growing space.
This is part of growing as just looking at a readout and having a number set in-mind is a good starting point, but then look at the conditions and make adjustments to ensure it is beneficial to the plant.
Having this automated means some days it runs a lot and other days hardly at all. At least now there is a system that will help ensure the humidity does not drop below a certain level and the hope is this will help keep the pumpkin growing.
|
|
�
|
|
Wednesday, August 2
|
View Page
|
 |
External Heat Source
This shows the external set-up with the indirect heater as there have been some unexpected cool nights which is not common during this time of year. This set-up is a little bit of a challenge as plastic needs to be set-up to seal the structure when supplemental heat is being added.
The indirect heater keeps the exhaust gases outside of the growing area and only the hot air is directed into the growing area via the large white tubing that can be seen.
|
|
�
|
|
Wednesday, August 2
|
View Page
|
 |
Plastic Set-Up
While this is labor intensive only during the cool nights was this set-up around sun set and taken down after sun rise. The ladder has been modified with a bar so that it can span the hoops easily. In the position shown this allows the extra plastic to be lifted up and attached to the purlins of the structure via wiggle wire.
|
|
�
|
|
Wednesday, August 2
|
View Page
|
 |
Hot Air Induction System
This shows where the hot air is directed into the structure. It is set at about a 45-degree angle to allow for natural air circulation to help ensure even temperatures for the plant.
|
|
�
|
|
Wednesday, August 2
|
View Page
|
 |
Thermostat
This is mounted a plant height and outside of the direct heat flow to help provide an accurate reading of the growing space. With some adjustments to the analogue reader it keeps the growing space around 72F (22C) at night.
|
|
�
|
|
Thursday, August 3
|
View Page
|
 |
Day 50 for the (F: 1832.5 Graham �20 x M: 2365 Wolf �21 (from Ron Wallace))
OTT = 426�
Est. Weight = 1,639 pounds
Avg. over last 10 days = 40.7 pounds per day
It seems that all of the extra items put in place are helping come together to keep the pumpkin growing. While naturally a pumpkin will slow in growth as it ages to call just over 40 pounds a day average a slow down is just a testament to its incredible growth previous.
However, with the quick growth there are two deep ribs and a bit of a sag line. Not much that can be done at this point, but try and keep the growth and environmental conditions consistent.
While any one of the systems implemented may not add much, the additive effect of all of them is what may be creating the �ideal� environment which includes�
High Tunnel Structure- To help control some of the moisture that the plant is exposed to during rain fall events.
Artificial Lighting- HPS lights are used to increase the day light length to simulate the solar solstice. (On from about 5am-7am and again from 7pm-9pm.)
Humidity Control- To help ensure the humidity levels do not drop below 45% and ideally targeting 65% while trying to keep moisture off the leaves as much as possible.
External Heater- Goal is to keep the night time temperatures around 72F (22C)
Irrigation Stagger- While 150 gallons of water is given a day, this amount is not all given at once. At 9am 100 gallons is provided and then at 1pm the additional 50 gallons is provided.
Fertigation- Using a 275-gallon stock tank the water is added and then the nutrients are mixed in with the aid of a ppm (parts per million) or EC (Electrical conductivity) meter. The goal is about 380ppm (on the 700ppm scale) or 0.6 EC.
All of this may be a lot of work but it is nice to see the pumpkin respond;-)
|
|
�
|
|
Thursday, August 3
|
View Page
|
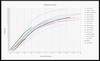 |
Dreamer Chart
When a pumpkin grows quicker than what you have grown in the past it is hard to get a good idea of its potential. So, (thanks to Jamie) comparing it to some other heavy weights that have been grown, plotted, the solid green line labeled �Matt�s� (my pumpkin) graphically shows how it compares and gives its current growth rate some context. The growth rate seems to be even better than I have hoped for.
The title� �Dreamer Chart� is appropriate, does indicate that the system that has been worked on for the last 5-years is starting to come together.
|
|
�
|
|
Friday, August 4
|
View Page
|
 |
Sad Update� Pumpkin Rib Split
Not the update, I want to provide, but the pumpkin has developed a rib split into the cavity. Spray foam has been added to hopefully seal it up so it can be brought to an official weigh-off for a weight.
However, all special additions will be removed which include�
-Artificial lighting
-External heater
-Irrigation (less total water applied only once a day)
-Minimal fertilizer
The hope now is to keep the pumpkin alive and not cause the current split to expand more or induce more splitting. This is unfortunate especially after all of the extra inputs and challenges that were over come this season.
|
|
�
|
|
Sunday, August 13
|
View Page
|
 |
Day 60 for the (F: 1832.5 Graham �20 x M: 2365 Wolf �21 (from Ron Wallace))
OTT = 448�
Est. Weight = 1,896 pounds
Avg. over last 10 days = 25.7 pounds per day
After going on the Vermont Giant Pumpkin Growers Summer Patch Tour the first order of business was to measure the pumpkin. It may have been a little after sun set, but nothing a headlamp and flashlight cannot help with;-)
Looking at the numbers it seems like the cutting back on the extras and also the age of the pumpkin have resulted in slower growth. This will hopefully allow the pumpkin to stay together to get weighed at the Woodstock Fair weigh-off. Even thought it will be a dmg entry after a full season of work it would be great to know what the pumpkin does actually weigh.
|
|
�
|
|
Thursday, August 17
|
View Page
|
 |
Day 64 for the (F: 1832.5 Graham �20 x M: 2365 Wolf �21 (from Ron Wallace))
Overall, this is a nice comparison image showing a comparison of a pollination size pumpkin to what it can look like �only� 64 days later. Even watching the pumpkin grow it is impressive what these plants can do. The ability to push water, sugars and go through cell expansion is impressive.
|
|
�
|
|
Wednesday, August 23
|
View Page
|
 |
Day 70 for the (F: 1832.5 Graham �20 x M: 2365 Wolf �21 (from Ron Wallace))
OTT = 457.5�
Est. Weight = 2,014.5 pounds
Avg. over last 10 days = 11.85 pounds per day
Last measurement for the pumpkin with the current goal is� survive to get weighed. There was some additional spray foam added since the pumpkin is still growing and this led to some potential gaps along the edges of the split. These applications are precautionary in hopes of ensuring a good seal and the expandable foam is not something that is a patch standard so by using it up this season the hope is to not need it in the future.
Great color and growth rate of the pumpkin that has shown the high tunnel (greenhouse) system that has been refined over the year can grow a big pumpkin, now it is just getting a few other factors to line-up.
|
|
�
|
|
Wednesday, August 30
|
View Page
|
 |
Preparing for the Lift
With the main goal to get a weight on the pumpkin �just in-case� it did not make it to the weigh-off the inline scale was attached to the lifting ring. During the set-up this shows the zeroing of the scale with all of the lifting straps and ring in place. This will help ensure there is no calculations needed from the scale read out, what is seen is the weight of the pumpkin.
|
|
�
|
|
Wednesday, August 30
|
View Page
|
 |
Clean Main Vine After the Pumpkin
This older portion of the plant is typically the first to show any potential internal problems. Seeing that the vine near the stem is clean indicates quality plant health which could have continued to push the pumpkin if it was not being harvested early to get a weight due to the split that had occurred.
|
|
�
|
|
Wednesday, August 30
|
View Page
|
 |
Clean Main Vine After the Pumpkin
It is always nice to cut the main vine and see water come out along with clean (green) internal structure. This means the xylem and phloem were still fully functional and able to continue to send water and nutrients to the growing pumpkin.
|
|
�
|
|
Wednesday, August 30
|
View Page
|
 |
Scale Readout = 1626.9 pounds*
While many growers would be happy with this weight this is actually only a tease. If you have been following the diary you know it was taping much heavier, so the reason this is a tease is a grower was video taping the scale as the pumpkin was being lifted. As the straps were coming tight the internal integrity of the pumpkin was compromised and the straps tore through the pumpkin. (Good thing the scale was attached.)
Based on the video play back this was the highest the scale read and the actual pumpkin never left the ground. So, the true weight will never be known so it is more like 1626.9++ pounds.
To go this far in the season with a pumpkin with this growth rate and to not even know what it weighed just adds to the disappointment.
|
|
�
|
|
Wednesday, August 30
|
View Page
|
 |
Mystery Weight Pumpkin at least Looks Good
In the setting sun the orange color really pops and the pumpkin does look good (minus the blow out in the lower right portion of the image). You have to enjoy the process of growing a giant pumpkin as you are never sure what will happen in the end.
|
|
�
|
|
Wednesday, August 30
|
View Page
|
 |
Stem Health
Just like the main vine, here is a cross section of the stem that is also in great condition. So, if it was not for the split, the plant could have continued to feed the growth rate of the pumpkin.
|
|
�
|
|
Wednesday, August 30
|
View Page
|
 |
Pumpkin Removal
It would have been great if the pumpkin came-up in one piece, but instead it had to be chopped up and removed in pieces. It did loose some weight via pumpkin guts when the straps tore through the pumpkin, but the trailer did have a sag to it for sure.
|
|
�
|
|
Saturday, September 2
|
View Page
|
 |
First Secondary by Crown
It was great to see the pumpkin growers at the weigh-off even though I did not have an entry. However, there was still plant/patch clean-up to complete. Upon removing the first secondary from the main crown the continued plant health can still be seen. So the plant was still able to actively move water which is further confirmation that the system I have been working on is favorable for both plant and pumpkin growth rate.
|
|
�
|
|
Saturday, September 2
|
View Page
|
 |
Cleaned Growing Area
This shows the growing area (32ft. wide and 40ft. long) with the plant fully removed. This is an important part of the process, with the next step being to also remove the drip tapes and some residual weeds so grass seed can be planted as a cover crop.
|
|
�
|
|
Saturday, September 9
|
View Page
|
 |
Northeast Mix Grass Seed
Many growers select a mustard or a winter rye cover crop, both of which can be effective. However, since the (current) plan is not to grow in this location next year a more perennial cover crop was selected.
Going the turf grass route can be expensive, but it does produce a dense root structure that is easy to manage for next season and many more to come. It also helps establish soil structure by not having to till the soil, just a shallow raking and planting of the grass seed and the area should be good to go.
|
|
�
|
|
Saturday, September 9
|
View Page
|
 |
Northeast Mix Grass Seed: Blend Details
It seems there are always changes in the formulation, so here is the blend that was part of the bag used for the cover crop this season.
|
|
�
|
|
Saturday, September 9
|
View Page
|
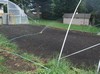 |
Growing Grass� Add Water
There was a heat wave so this delayed the planting of the grass seed as from past experience avoiding 90F+ days will help the grass seeds establish more effectively. In addition, ensuring the newly planted seeds are well watered is another important part of the process. In this case the soil condition is not a concern;-)
|
|
�
|
|
Friday, September 15
|
View Page
|
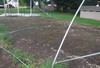 |
Grass Seed Emergence!
Right on cue about 6 days post seeding the little initial grass blades can be seen covering the area. There were several days of down pours which has resulted in some washouts but overall, in part due to a heavy seeding the area should have a nice cover before winter sets in.
There has been a lot of rain this season and the general pattern has not changed. Typically watering twice, a day is advised, well due to the weather there have only been two times the irrigation system has been used.
|
|
�
|
|
Sunday, December 31
|
View Page
|
 |
End of 2023
The cold-frame has been moved over 32ft. and new doors have been installed for next year. So, far no snow or really cold temperatures to speak of with the grass cover crop doing well on all growing sites.
Overall, this was the best and worst season. The best since I showed my system works as I had the fastest growing pumpkin ever, but the worst season since I was not able to get the pumpkin to a weigh-off due to a split.
Goal now is to refine the current system, and hope for no splits.
|
|
�
|
|
|
