|
Tuesday, January 1
|
View Page
|
 |
December 2018
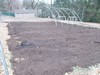
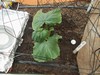
Applying Leaf Compost
Every season starts shortly after the previous season ends and this year was no exception. I decided to only grow two plants in the 2019 season and go all out. In short, this means I am playing a higher than normal stakes game and will likely either have a great pumpkin year or a lot of fishing time, so in my opinion I cannot have a bad year;-)
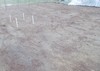
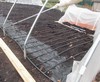
I have been bringing in compost to the planned two pumpkin plant locations. Each site will be about 32 feet wide and 40 feet long (about 1280sq.ft.) with the actual area the plant is allowed to take up being a slightly less.
|
|
�
|
|
Tuesday, January 1
|
View Page
|
 |
December 2018
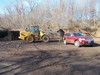
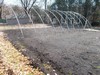
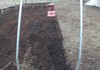
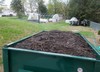
Loading The Trailer
Equipment is a great thing, and here is the trailer being loaded with leaf compost before being transported to the pumpkin patch. It only took one bucket to fill the 2 cubic yard trailer.
|
|
�
|
|
Tuesday, January 1
|
View Page
|
 |
December 2018
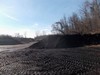
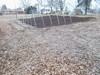
Leaf Compost Stock Pile
This is a look at the stock leaf compost pile, and even though I took quite a few loads out it barely looked like I took anything.
|
|
�
|
|
Tuesday, January 1
|
View Page
|
 |
December 2018
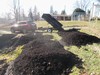
Unloading The Compost
Having a dump trailer made the unloading process very fast and efficient. Each 2 cubic yard pile was selectively placed to ensure even coverage over the two planting sites. The blue snow shovel is plastic and made getting the compost that was adhered to the corners of the trailer easy to dislodge with no damage to the trailer.
|
|
�
|
|
Tuesday, January 1
|
View Page
|
 |
December 2018
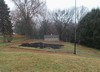
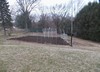
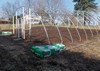
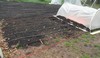
Compost In The Patch
Here is what the patch now looks like with the leaf compost piles generally covering a 40 feet x 64 feet area which will be where two plants will grow in 2019. All totaled I estimated about 34 cubic yards (17 trailer loads) of compost was brought in for this area.
|
|
�
|
|
Friday, March 15
|
View Page
|
 |
Hail Storm
Hail is not very common in the area, and hopefully this storm that produced dime sized hail counts for the season. It melted fast, but this is a sight I do not like to see at any point of the year.
|
|
�
|
|
Thursday, March 28
|
View Page
|
 |
Pumpkin Grower Helping a Fellow Pumpkin Grower
It is great when fellow pumpkin growers help each other out and this is a prime example. I have helped this grower out in the past with soil test results, disease diagnosis, patch tours and general pumpkin help. He returned the favor with delivery of his tractor and operated it to help spread the compost I had deposited in the patch. We were cutting it close to having enough light before the sun completely set, but we got it done just in time.
|
|
�
|
|
Sunday, March 31
|
View Page
|
 |
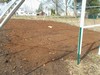
Spread Compost
Here is a look at the compost post tractor spreading. It ended up being about 3 inches thick across most of the planned growing area. The yellow rope you see is to mark the division between my two plants as I have something unique planned for one of the plants;-)
|
|
�
|
|
Sunday, March 31
|
View Page
|
 |
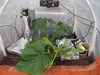
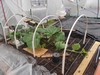
Indoor and Outdoor Plant Plan
This image shows the plans I have for one of my plants. This hoop structure is not planned to only be up for an early start, but will be up for the entire growing season. There are still many items to set-up but I am starting with the hoops to get a general idea of the area the structure will occupy.
|
|
�
|
|
Sunday, March 31
|
View Page
|
 |
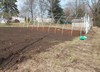
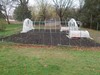
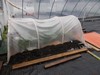
Not Using the Entire Patch This Year
The entire patch is 60 feet x 100 feet, but I am only going to be growing in a portion of this area where the compost was placed and leveled which is 40 ft x 64 feet. There are still more hoops to put up, but those will have to wait for another day.
|
|
�
|
|
Sunday, March 31
|
View Page
|
 |
Patch Overview March 31st, 2019
Here is my traditional patch image angle so the general progression can be seen over the course of the year. If you are curious about the large white boxes, those will be explained later, but they are going to be part of insect screen covers for the ventilation system.
|
|
�
|
|
Saturday, April 6
|
View Page
|
 |
Steaming Compost
All of the structure hoops are up and work is being done on the end walls. However, this morning the steam off the compost can be seen as it starts to heat up from the sun which has just broken though some early morning clouds. The compost itself was finished and stable; this was simply the high amount of moisture evaporating after a quick change in temperature.
|
|
�
|
|
Sunday, April 7
|
View Page
|
 |
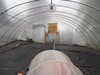
Indoor Structure and Soil Preparations
If you look carefully compared to the previous image there have been wind braces added and the first run of purlins installed to help increase the rigidity of the structure.
On the ground there are 10 bags of peat moss (total of 30 cubic feet) that will be added to the growing site of the structure. (*Note: there will also be 10 bags added to the traditional outdoor growing site as well, but my trailer could only hold so many bags at once.)
|
|
�
|
|
Sunday, April 7
|
View Page
|
 |
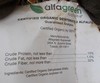
Peat Moss
This is an image of the label for the peat moss used. Peat moss was chosen to be added to help increase the general soil porosity, its high CEC (Cation exchange capacity) of 100-200 and its ability to hold 10 to 20 times its dry weight in water. All of these are positive qualities for giant pumpkin growing and peat moss was chosen because of its consistency compared to another media such as coco coir.
|
|
�
|
|
Sunday, April 7
|
View Page
|
 |
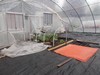
Peat Moss Color Difference
In the structure, the recently spread peat moss can be seen by a clear change in soil color. The peat moss has not been incorporated yet, so this is the reason for the distinction at the current time.
|
|
�
|
|
Sunday, April 7
|
View Page
|
 |
Peat Moss Added to Indoor Structure Grow Site
This shows a close-up of the actual structure area with a lone single 50 pound bag in the middle which is calcitic limestone. This is added to counter act the naturally acidic properties of peat moss so the overall pH does not shift much since it is right around my target pH of 6.8.
|
|
�
|
|
Sunday, April 7
|
View Page
|
 |
Calcitic Lime
A single 50 pound bag of calcitic limestone was added to the structure area which is about 1280 sq. ft. to help keep my pH stable and not become acidic as the peat moss will typically reduce soil pH levels.
Allyndale Limestone is a local company based in East Canaan, CT. However, their CT mine location is dolomitic limestone and the calcitic actually comes from just to the north in Massachusetts. This is a great lime source and is the powdered form which has a high surface area to volume ration for improved soil contact. The only downfall is making the application. Wind will easily cause drift and it is difficult to run through a spreader so be cautious.
|
|
�
|
|
Sunday, April 7
|
View Page
|
 |
Even Spread of Powdered Lime
Powdered lime is great for having a high surface area to volume ration to help with the interaction with the soil particles, but it makes it a challenge to apply. The bag was placed in the middle so that an aluminum can could be used to help with the spreading process. Overall, it came out fairly even which makes the next step of raking it in much easier.
|
|
�
|
|
Monday, April 8
|
View Page
|
 |
Breaking-up Soil for Heating Cables
Sometimes the weather dictates when the heating cables should be installed and this was one of those years. The soil was dry enough and the day was relatively warm so today was the installation day. The white pvc pipe marks the side walls to the cold frame which are spaced 5 feet wide and 3 feet from each other in row. Soil in about a 5ft x 6ft area that is 8-10 inches deep is removed and then pitch forked to increase the drainage and aeration.
|
|
�
|
|
Monday, April 8
|
View Page
|
 |
Installing Heating Cables
This is the pattern I use for my 40ft. soil heating cables that have a built-in thermostat. It is important to have the thermostat in-between two heating elements and about midway through the image the power cord can be seen on the left hand side for orientation. This pattern is held temporarily in place with bamboo stakes and it can be very helpful to let the cables heat up in the sun before trying to get them to lay in this pattern. If it is a cold and/or cloudy day the cables can be plugged in and allowed to heat up to aid in trying to reduce the frustration of installing them.
Testing the cables before installing them each year is highly recommended to ensure the time spent will produce the desired result.
|
|
�
|
|
Monday, April 8
|
View Page
|
 |
Soil Heating Cables Installed
Once soil is placed on top of the cables the bamboo stakes are removed and the rest of the previously excavated soil is replaced.
The final product should look almost like nothing happened as is seen in this image. There is a slight color difference but this area is now ready for the next part of the growing process.
|
|
�
|
|
Tuesday, April 9
|
View Page
|
 |
Peat Moss For The Outdoor Site
Both sites (structure and outdoor) have the soil heating cables buried and now, the 10 bags (total 30 cubic feet) of peat moss will be added to the outdoor plant site. Once this is done, one 50 pound bag of calcitic lime will also be spread to replicate the soil treatment procedure that was followed for the structure growing site.
|
|
�
|
|
Tuesday, April 9
|
View Page
|
 |
Soil Amendments Line-Up
*Listed from right to left
Kelp Meal
Humic Acid
Greensand
Alfalfa
Ferrous Sulfate
Copper Sulfate
Manganese Sulfate
|
|
�
|
|
Tuesday, April 9
|
View Page
|
 |
Kelp Meal
This is a universal fertilizer and while it will not provide high amounts of primary nutrients it does offer many trace elements, vitamins and plant hormones. This can be used also as animal feed due to its many trace elements that offer a good general nutrient supplement.
For giant pumpkins, I use a high rate of soil application which is about 65-75 pounds per 1,000sq.ft.
|
|
�
|
|
Tuesday, April 9
|
View Page
|
 |
Humic Acid
Humic acid can help plants uptake nutrients and reduce leaching. This is a finely ground granular product that should be cautiously applied especially if it is windy out.
For giant pumpkins, I use a rate of about 15-20 pounds per 1,000sq.ft.
|
|
�
|
|
Tuesday, April 9
|
View Page
|
 |
Greensand
While many growers will note the potassium this contains, I do not add it for this purpose. The plant availability of the nutrients is very slow due to the long time it takes to break down in the soil. However, I do add it for the trace elements that much like the kelp meal, can be beneficial to the plant and soil biology but are not needed in any large quantities.
For giant pumpkins, I use a rate of about 30-40 pounds per 1,000sq.ft.
|
|
�
|
|
Tuesday, April 9
|
View Page
|
 |
Alfalfa
This is another animal feed that I add to my soil in the spring. It is in a powdery form which makes the application process a little challenging. There is a feed pellet form, but this would take longer to break down, so this is why I prefer the powdery horse feed additive grade. In addition alfalfa is known to contain the plant hormone triacontanol, which is a plant growth regulator that has been shown to increase crop yields. There is also nitrogen, but again I do not think much of this is used by the plant.
For giant pumpkins, I use a rate of about 15-20 pounds per 1,000sq.ft.
|
|
�
|
|
Tuesday, April 9
|
View Page
|
 |
Ferrous Sulfate
Ferrous sulfate (Iron(II) sulfate) is a product I typically do not add, but needed to this year to help keep everything in balance. I personally, prefer to have a soil slightly lower in nutrients but balanced rather than to high and out of sync. Also, tissue tests in the past have indicated that my plants are on the lower end of the range suggested range for iron. Adding some to the soil may be helpful at reducing the amount I may need to supplement with in-season. Be careful when adding nutrients since it is much easier to add nutrients than to try and take them away.
Rate applied is based on soil test.
|
|
�
|
|
Tuesday, April 9
|
View Page
|
 |
Copper Sulfate
Generally in New England soils are low in copper, so this is something I typically add both in soil and as a liquid feed. Rates are small which can make even spreading a challenge so see below the tip I used to help with an even distribution.
Rate is based on soil test.
|
|
�
|
|
Tuesday, April 9
|
View Page
|
 |
Manganese Sulfate
From what data I have seen, I have reason to believe that pumpkins consume more manganese (Mn) than may be currently recognized. It seems that this is something I am always in need of, so it could just be my soil does not hold it very well, or the pumpkin plants are efficient at removing it.
Rate is based on soil test.
|
|
�
|
|
Tuesday, April 9
|
View Page
|
 |
How To Spread Small Quantities Over a Large Area
This is my tip when you need to spread small quantities over a large area, mix them with a product (example kelp) that will be applied at a high rate to act as a carrier. When you mix everything together it can make it much easier to ensure an even distribution rather than trying to precisely apply each product individually.
In the image this is my spreader that contains some kelp (brown/tan) in the bottom and then copper sulfate (blue) and manganese sulfate (white). I will hand mix all three of these together and then add in some more kelp which with be further mixed to ensure an even distribution before applying. This does save time and creates a consistent end product distribution.
|
|
�
|
|
Tuesday, April 9
|
View Page
|
 |
Soil Amendments Added
Here all of the soil amendments have been applied and while mostly the kelp can be seen (since it was applied at the greatest rate) everything is ready to be incorporated into the soil profile. I use a walk behind tiller for this purpose.
|
|
�
|
|
Tuesday, April 9
|
View Page
|
 |
One Till Per Year
Here the amendments are being tilled in after being recently added to the growing sites. Even though the structure is set-up everything has been added evenly across both planting areas. In addition, both areas are being tilled at the same time, as if they were the same. This is part of the intention to keep as much consistency across both planting sites as possible. The support hoops to the structure provide a little obstacle during the tilling process, but these also help keep my tillage paths parallel.
|
|
�
|
|
Tuesday, April 9
|
View Page
|
 |
Troy-Bilt Horse Tiller
This is a late 1980�s Troy-Bilt Horse Commercial rear tine tiller. It is only used it in the spring so proper storage, and a winter test run are important to make sure it is ready to go the day it is needed.
|
|
�
|
|
Wednesday, April 10
|
View Page
|
 |
Seed Starting Day! = April 10, 2019
The seeds are started in the evening and today is the official starting day! The seeds are taken out of the freezer, labeled with permanent marker, filed and then given about a 2 hour soak in tap water before they go into the germination chamber.
The chosen seed for this year is the 1989.5 dmg Daletas �17 (F: 1756 Howell/Jolivette x M: 1625 Gantner)
|
|
�
|
|
Wednesday, April 10
|
View Page
|
 |
Digital Thermometer
The germination chamber uses a 17 watt single tray seed starting mat (9� x 19.5�) as the heat source and is assembled in advance of seed starting day to ensure the temperature is right where it should be. It is set-up in a basement which runs on the cool side (65F or 18C) which makes it easier to regulate the temperature. The target temperature range is 82-84F (28-29C) that is determined with a temperature sensor placed under the plastic bag that contains the seeds to ensure an accurate reading of what the seeds are being exposed to.
|
|
�
|
|
Wednesday, April 10
|
View Page
|
 |
Germination Chamber
This shows the seeds in a cooler with a seed starting (single tray sized which is (9� x 19.5�) heat mat in the bottom. A standard 1020 crate is elevated about one inch above the mat and then some dish towels are placed in the tray. The seed bags are placed on the towels with the temperature probe under one of the sealed bags which will provide an accurate seed exposure temperature reading.
The seed bags contain the seeds in a paper towel that has been wet and then rung out so it is moist, but not dripping wet and then placed in a sealed plastic bag.
There are also some back-up seeds (the 2170 Daletas �18 this year) started at the same time, �just in-case�.
|
|
�
|
|
Friday, April 12
|
View Page
|
 |
Germination in 48 Hours!
After about 48 hours both 1989.5 dmg Daletas �17 seeds have produced a radical and were placed into planting containers containing Pro-mix BX growing medium. The containers were prepared ahead of time on a seed starting mat and under a HPS (high pressure sodium) grow light, which is why there is an orange tone to the image. A CMH (ceramic metal halide) light would be a preferred choice, but since the seedlings do not spend long inside the HPS works out well.
|
|
�
|
|
Saturday, April 20
|
View Page
|
 |
Drip Tape Main Line (Header Line) Preparations for Structure Plant Site
Even though it has been a very wet spring, this will likely change as the season progresses, so to be proactive the drip irrigation main line is being assembled. This main line is for the structure grown plant and each emitter has an on/off valve for precise regulation of each drip line to allow for better control over the entire plant irrigation. Being able to water the newer and older growth portions of the plant differently, will provide the opportunity to ensure the proper amount of water is fed with the intention of maximizing production and efficiency.
|
|
�
|
|
Saturday, April 20
|
View Page
|
 |
Outdoor Grown: Drip Tape Specifics
For my traditional outdoor grown plant I use the following drip irrigation set-up�
Total of 27 lines each 30ft. long to cover my 40ft x 32ft single plant area
Drip Tape Thickness: 15mil.
Emitter Spacing in Tape: 12 inches
Flow Rate per 100ft @ 8psi: 27 GPH (or 0.45 GPM)
Space between Drip Tapes: 18 inches
Run Time: Daily for 30min. (*unless it rains.)
Estimated Water Usage: 100 gallons per 30min. irrigation over 1,280 sq.ft.
|
|
�
|
|
Saturday, April 20
|
View Page
|
 |
Indoor Grown: Drip Tape Specifics
For my structure indoor grown plant I plan on using the following drip irrigation set-up since the plant will not be receiving any direct natural rain.
Total of 48 lines each 31ft. long to cover my 40ft x 32ft single plant area
Drip Tape Thickness: 15mil.
Emitter Spacing in Tape: 8 inches
Flow Rate per 100ft @ 8psi: 20 GPH (or 0.34 GPM)
Space between Drip Tapes: 9 inches
Run Time: Daily for 30-60min. (*This will depend on the season and plant stage of development as I can also control the flow to each line individually, so I may select to have two 30min. irrigation events per day during peak growth and heat.)
Estimated Water Usage: 150 gallons per 30min. irrigation over 1,280 sq.ft.
|
|
�
|
|
Saturday, April 20
|
View Page
|
 |
Indoor Drip Line Organization
A 3ft wide greenhouse floor/weed barrier has been installed before the main header drip tape to ensure the valves will be easy to access and relatively clean to allow for operation when needed. At the present time each is in the "on" position, to allow for testing and observations. However, there is the option for custom irrigation to best fit the plants needs as the season progresses.
Each line has two U-Shape wire hold downs, with one around mid way (16ft) and the other near the end, to keep every line as parallel as possible. With only 9� spacing this can be quite the challenge to initially accomplish, but once completed it allows for even and consistent irrigation over the entire growing area.
|
|
�
|
|
Saturday, April 20
|
View Page
|
 |
Patch Overview: April 20th, 2019
Drip Irrigation
This images shows a general patch overview and the difference in the spacing of the drip tapes between the indoor (9�) and outdoor (18�) plant areas. The wind has been moving some of the drip lines as they have not taken a set from recently being taken off the stock roll.
Cold Frames
The small cold frames that are in both the structure and the outdoor site are 5ft. wide and 9ft. long. For construction details check out this video I made�
https://www.youtube.com/watch?v=2y_9s9AQqYc
Large Structure End Walls
The end walls on the structure are up and 6mil greenhouse grade plastic has been installed along with the 48� aluminum high velocity shutter vents. There is a tilt to the patch with the left side being higher than the right. To take advantage of this natural elevation change there is one vent on the left that will have an exhaust fan and two vents on the right (lower side) that will provide the cool outside air intake.
There is still plenty of work to do, but progress is being made.
|
|
�
|
|
Saturday, April 20
|
View Page
|
 |
Cold Frame Set-up Is Now Plant Ready
This shows the area prepared before the plant goes in the ground.
The drip lines have been already installed so the plant can easily grow over them and the planting location can be selected so that it does not have a drip line directly in contact with the initial planting site.
A ceramic 100watt reptile heat lamp is on a timer (on at 7pm and off at 9am) and used as a heat source at night that does not give off any light to ensure the proper photoperiod is received by the plant.
Heat cables have been buried and running for at least 24 hours prior to planting and the white circle is actually a soil thermometer which is reading 72F (22C) which is the ideal soil temperature.
There is a black wire decorative fencing around the plant site which helps support blankets and sheets that may need to be put on during cold nights. This keeps the area to heat small and the sheets off the plants and heaters which reduce the chance of damage. The fencing is also fold-able which makes for easy off-season storage.
The orange color at the top of the image is mill fabric/ plastic belting material that will go under the pumpkin, but at the moment it is acting like a weed block for the cold-frame. It is a great width (5ft) and also helps hold in some of the heat generated by the heating cables to help improve soil warming efficiency.
|
|
�
|
|
Saturday, April 20
|
View Page
|
 |
Ideal Soil Temperature = 72F (22C)
When heating the soil it is important to remember the ideal soil temperature is less than the ideal air temperature. The target temperature for the soil (root zone) is 72F (22C) and based on this thermometer my heating cables have elevated the temperature of the root zone to 70F (21C) which is ideal. It takes about 18-24hr for the soil temperature to stabilize so it is important to test the cables before burying and also before the plants go in.
If the cables are installed and run for a few days (or even over a week or more) this can help flush out potential insects and reduce the chance of damage to a new transplant. However, this is not always possible but making sure everything is good to go before the plants are planting can save a lot of frustration.
Now that everything has passed the initial set-up tests tomorrow will be planning day.
|
|
�
|
|
Sunday, April 21
|
View Page
|
 |
April 21st, 2019 Easter Sunday (and Planting Day)
Outdoor 1989.5 dmg Daletas �17 (F: 1756 Howell/Jolivette x M: 1625 Gantner)
This plant looks great and has been a top two from the start. There is nothing negative to say about this plant at the current time and it seems to be developing normally based on a close inspection of the main vine growing tip. The site has been prepared and seems to be stable to help support the plants growth and reduce its transition to the cold-frame environment.
|
|
�
|
|
Sunday, April 21
|
View Page
|
 |
April 21st, 2019 Easter Sunday (and Planting Day)
Indoor 1989.5 dmg Daletas �17 (F: 1756 Howell/Jolivette x M: 1625 Gantner)
This plant has been a top two from the start but does have some yellowing of the second true leaf. I do plan on adding some Epsom salts at the rate of 2 TBS per gallon as both a soil drench and a foliar application to help it green-up as it also endures some transplant shock.
|
|
�
|
|
Sunday, April 21
|
View Page
|
 |
Indoor 1989.5 dmg Daletas �17 (F: 1756 Howell/Jolivette x M: 1625 Gantner)
�Best� Treatment
While this plant will be grown indoors for the season, there have been some extra additions to the early season cold-frame to provide improved growing conditions from the start.
Heat
100 watt reptile heat lamp is standard in my cold-frames so this is nothing new. However, due to the consistently cold nights there may be two per cold frame to increase the heat around each plant.
Light
There is a 315watt CMH (Ceramic Metal Halide) DimLux grow light that is dimmable and running at 280 watts. This is on a timer and comes on at 3:00am and turns off at 10:00am to lengthen the day (photoperiod) and provide some additional heat during the coldest portion of the day. While the bulb that comes with this unit is quite good, I elected to upgrade even further to a Philips Green Power Master Color CDM bulb, 315 watts 3,100K.
Carbon dioxide
In addition there is also a 20 pound CO2 tank and controller with Fuzzy Logic. The sensor is mounted on a PVC pipe that is at about plant height to allow for a representative reading. This unit comes on from 4:00am (an hour after the light comes one) until 6:00pm (about an hour and a half before sunset) at a rate of 900ppm with a flow rate of 2 cubic feet per hour.
|
|
�
|
|
Sunday, April 21
|
View Page
|
 |
DimLux 315watt CMH (Ceramic Metal Halide) Grow Light
This is a very high quality grow light that has many beneficial features. For one, it is low profile design that has the ballast and reflector attached as a single unit.
It comes with a bulb that is efficient, but I have chosen to upgrade this and have the included bulb as an on hand back-up.
Another feature I like about this light is that it is also dimmable so I can set the height of the light and easily adjust the light intensity to try and avoid leaf burn. This can provide the maximum amount of light to the plant that also provides a broad spectrum including some in the UV light spectrum.
|
|
�
|
|
Sunday, April 21
|
View Page
|
 |
Philips Green Power Master Color CDM bulb, 315 watts 3,100K
While there is a good bulb included with the light at the current time this Philips Master GreenPower CMH (Ceramic Metal Halide) bulb is the gold standard for comparison. This bulb does this produce a broad spectrum of light that include UV wavelengths.
It also has a recommended bulb life of 8,000 hours with still 90% lumen/PPF production, and it only degrades to 85% productivity at 20,000 hours.
|
|
�
|
|
Monday, April 22
|
View Page
|
 |
Night System Check 0400
This shows the CMH grow light on at about 4:00am in the far cold-frame that is in the structure. It looks like both cold frames have lights but only the far one does, the closer one is getting back lit in the picture.
|
|
�
|
|
Thursday, April 25
|
View Page
|
 |
Outdoor 1989.5 dmg Daletas �17 (F: 1756 Howell/Jolivette x M: 1625 Gantner)
This plant has maintained is green color a little better than the indoor plant from the beginning. There have been some proactive applications of Epsom Salts, since the indoor plant has shown deficiency symptoms and applications have reduced the yellowing leaves. By making some applications the intention is to prevent a potential issue before it happens.
Overall this plant is looking to be in good shape despite the cloudy and cold weather pattern the region has been in that does not seem to have any forecasted breaks.
|
|
�
|
|
Thursday, April 25
|
View Page
|
 |
Indoor 1989.5 dmg Daletas �17 (F: 1756 Howell/Jolivette x M: 1625 Gantner)
The second true leaf has greened up nicely after a few Epsom salt treatments. However, the third leaf has some curling which looks like it could be potentially spray damage (applicator blight;-) This is likely because the second leaf had an application of Epsom salts and the newly developing leaf may have gotten some over spray resulting in the damage which is minimal. Seeing the second true leaf now have a more normal green color translates to the corrective applications being effective and will be continued in the short term. During this time, the leaf coloration will be monitored to see if deficiencies develop so corrective measures can be taken at the first sight of an issue.
Now that the leaves are of the correct shade of green the hope is the growth will progress at a quicker rate, even though the weather has not been favorable for growth.
|
|
�
|
|
Monday, April 29
|
View Page
|
 |
Frosty Morning
While it may look like a mist on the car, this morning there was a frost, and the car as turned into an ice box. A frost this time of year is not uncommon, but just shows the importance of having a system for heating in place and making sure to test it ahead of time. When the plants were inspected today, both were nice and warm indicating all of the heating sources that were installed were functioning as intended.
|
|
�
|
|
Wednesday, May 1
|
View Page
|
 |
May 1st General Patch Overview
The patch coming together, the weed block has been installed to help retain soil moisture and reduce the area that needs to be weeded. Even though this material does allow water to pass through, as the plants grow the weed block will be rolled back. This allows for the vines to be buried and reduces the weed pressure. After a period of time when the plant reaches its full size the weed block will ultimately be completely removed from the patch.
In the structure, on the left (North side) there is some yellow scaffolding which is placed in-line with the vent and will be where the industrial fan will be placed to help exhaust the hot air that will build inside the structure.
|
|
�
|
|
Wednesday, May 1
|
View Page
|
 |
Outdoor 1989.5 dmg Daletas �17 (F: 1756 Howell/Jolivette x M: 1625 Gantner)
Not much sun to speak of, which has caused the leaves to be a fainter green than would be considered normal. There is also some damage on the leaves which is a result from the heat lamps that have been running every night due to the cold weather and the leaves growing too close to the main heat source.
|
|
�
|
|
Wednesday, May 1
|
View Page
|
 |
Indoor 1989.5 dmg Daletas �17 (F: 1756 Howell/Jolivette x M: 1625 Gantner)
With the addition of the light and supplemental carbon dioxide, this plant is growing faster than any other plant I have seen. The weather has been not very supportive of plant growth so by adding these items to the growing environment inside the small structure it has really helped the plant show its true potential.
|
|
�
|
|
Wednesday, May 1
|
View Page
|
 |
Carbon Dioxide Set-Up
Adding carbon dioxide can have several different options each with different required equipment. The set-up I have selected is a compressed bottle system since it is easy to set-up and does not produce any unwanted by products compared to a generator system. The down fall is the need for continual bottle changes but for my given situation this system offers the most advantages.
Growing on the Bottle: https://www.youtube.com/watch?v=hsoPJ7TtaIM
Controller
A control is better option than simply using a timer system that runs the bottle for a predetermined duration at regular intervals. A control will help regulate the carbon dioxide level to help reduce the amount of carbon dioxide that is wasted. The ideal control will also be equipped with what is called �fuzzy logic� that uses a processor to learn the environment to best maintain a stable ppm of carbon dioxide.
Controlling CO2 Levels: https://www.youtube.com/watch?v=8KvvNMhhzq8
Fuzzy Logic Explained: https://www.youtube.com/watch?v=0_4uP6ZdTBU
Regulator
This attaches to the bottle are regulates the release and flow rate of carbon dioxide. This needs to be properly secured to the bottle to avoid uncontrolled carbon dioxide leaks.
Sensor
Sensor placement is important and since carbon dioxide is heavier than air it will sink. This sensor is placed just under the plant leaf height to allow for an accurate reading of the carbon dioxide levels the plant is exposed to.
CO2 Sensor Placement: https://www.youtube.com/watch?v=bdL_HfXEl1U
Bottle
Everything is attached to the compressed carbon dioxide gas bottle. These come in a variety of sizes and for the cold frame this is the most common size of 20 pounds. However, I will be up sizing to a 50 pound bottle when I am enriching the entire structure.
|
|
�
|
|
Wednesday, May 1
|
View Page
|
 |
Tank Regulator
The tank regulator not only provides a reading of the pressure in the bottle but it also allows for the control of the flow of carbon dioxide. In this image it is on and you want to look at the small green ball that is located toward the bottom of the column. Since the cold frame is a small and well sealed volume of space, after running the numbers, this has been dialed in to produce a flow rate of 2 SCFH (Standard Cubic Feet per Hour).
The goal is to set the flow rate to allow for the �fuzzy logic� processor to be effective. If the flow rate is too high, this will make it harder for the controller to maintain the predetermined carbon dioxide level. Based on observations the numbers check out and the level of carbon dioxide in the cold frame has been very consistent with my goal of 900ppm.
|
|
�
|
|
Wednesday, May 1
|
View Page
|
 |
Sentinel CPPM-4i CO2 Controller
There are many different brands of controllers out there and this is just one example. The goal is to find one that has �fuzzy logic� as this will allow for a more precise control of the carbon dioxide levels and reduce the amount that is wasted.
This controller will not be used for the season and is actually discontinued but it does have a nice feature that allows the grower to program the time and duration of carbon dioxide enrichment. It is important to ensure that enrichment only occurs during times of light exposure to the plants as this is when photosynthesis is taking place. Night time enrichment is simply a waste.
Other controllers use a photocell to determine �day� and �night� but the Sentinel controller allows the grower to select the specific time it will turn on and off. This can be advantageous, because if later in the day there is increased venting you may want to select the control to turn off to prevent costly carbon dioxide from being wasted.
With the grow light also active this controller has been programmed to come on at 0400 and run until 1700 and maintain a carbon dioxide level of 900ppm +/- 50 ppm. However, as the season progressed the run time was cut down to 0700 to 1300 with the same 900ppm set level.
This controller also provides a live readout of the time and ppm level. As can be seen in the image everything is operating as planned and the plant seems to be responding even at this early stage of development.
|
|
�
|
|
Thursday, May 2
|
View Page
|
 |
Loading Up More Compost
Even though compost was brought in during the off season there were a few small areas that needed some leveling so here is �Green Gene� loading up my trailer with a good two cubic yards of premium (personally made) leaf compost. This will be used to fill in a few low spots. It is still a wet and rainy weather pattern so luckily the tractor did not get stuck as it rained hard on the way home.
It is great when other pumpkin growers help each other out!
|
|
�
|
|
Friday, May 3
|
View Page
|
 |
Compost Delivered
Here is the leaf compost before being added to the patch. Once this is added the main soil work planed for the spring will be completed. However, there are still plenty of other tasks that need to be completed, but progress is being made.
|
|
�
|
|
Sunday, May 5
|
View Page
|
 |
All Systems Go (Indoor 1989.5 dmg Daletas �17)
So, far the carbon dioxide and the CMH light have been working out great. The weather this year has been some of the worst I have seen for growing. Consistent cloudy, rainy, and cool to cold conditions have been in place for about a month now. Adding the additional features of supplemental light and carbon dioxide have been important to get this plant to the current stage and rate of growth that is being observed.
One item of note is the leaf burn that occurred on the tall leaf in the image. This leaf grew very tall in a short period of time and simply grew too close to the light and suffered some burning. However, since the cold frame has a low ceiling height, to reduce the continued chance of leaf burn the dim setting has been utilized which is a very nice option to have. This feature found on the DimLux 315watt CMH allows for greater flexibility and is not commonly found on other CMH lights. It is currently turned down to run at 245watts which seems to have prevented further damage. If the leaf continues to get taller, there are still 205watt and 165watt options.
|
|
�
|
|
Sunday, May 5
|
View Page
|
 |
Indoor 1989.5 dmg Daletas �17
The plant certainly likes the addition of the grow light as the main vine wanted o grow up and the tip is now making about 180-degree turn back toward the light. Bamboo stakes are being used and slowly and carefully move the main vine in the proper direction on a daily basis.
While the plant has �touched down� the main vine developed a little bit of a pinch point so a few extra bamboo stakes are being used to stabilize the vine. The little damage that did occur does not bother me as there is only a slight splitting of the vine that is parallel to the main growth. As I see it, this will only help prevent (or at least reduce) the chance of the vine foaming later in the season. However, I think it will heal/seal-up as the season progresses. I have just not seen growth like this especially considering the season�s weather pattern.
|
|
�
|
|
Sunday, May 5
|
View Page
|
 |
Light Impact on the Leaf Coloration
Indoor 1989.5 dmg Daletas �17
Attention to detail is important and you have to look carefully in the image. Notice the green coloration difference in the area where the grow light is hitting compared to where it is not. It is subtle, but the upper horizontal portion of the leaf is darker green and the area that is flapped down is a fainter shade of green. This provides a visual indication of where the chlorophyll may be more concentrated allowing for greater sugar production. The shading directly correlates with the area that is receiving direct light exposure from the grow light, which further demonstrates the impact this light is having on the plant.
Having this level of attention to detail is important with many aspects of growing, this is just one example.
|
|
�
|
|
Wednesday, May 8
|
View Page
|
 |
Age Old Grow (12-6-6)
Every grower seems to have their own �go to� fertilizer and this is one that I have used in the past and have seen some of the results and collected some data on. The �Grow� formulation is beneficial early in the season, but I will also use it on full sized plants. It dilutes well and runs though my injector and drip tapes very easily with no filter clogging.
In addition to this, I have tissue tests to prove that despite what the label says, it is high in manganese (Mn) and iron (Fe). Keep in-mind the label stated values are guaranteed minimums, so the manufacturer is technically are not lying. Personally, I think giant pumpkins consume greater amounts of manganese (Mn) than is currently thought, so this is one of the reasons why I like to use this fertilizer. It does also provide other macronutrients, and favors a higher ratio of nitrogen compared to P or K, which is beneficial early in the season.
|
|
�
|
|
Wednesday, May 8
|
View Page
|
 |
Origin 360
Amino acids are the building blocks of proteins which are important for many vital plant functions (Ex. Enzymes). After talking with Steve Geddes this seemed like this was a product worth adding to my feeding program. The smell may not be the most pleasant, but it does mix well and also does not clog any of my irrigation components. Other amino acid / protein based products have had mixing issues that did not allow for an in-line injector and drip irrigation set-up to be used. This product seems to fit my fertigation system well and I plan on using this for the duration of the season.
|
|
�
|
|
Wednesday, May 8
|
View Page
|
 |
SuperThrive
Vitamin solutions may have more anecdotal than scientific information supporting their effectiveness, but this product falls in the category of low risk of harm and a chance at a benefit. Early root development is the area of greatest potential benefits so I have chosen to use some of this early in the season when the plants are aggressively producing new roots.
|
|
�
|
|
Wednesday, May 8
|
View Page
|
 |
Epsom Salts
It seems like early in the season my plants have a sulfur deficiency so I have needed to add some Epsom salts. Typically, watering plants with a rate of 1 TBS per gallon can help correct slight deficiencies and help prevent a deficiency from occurring.
If an issue is noticed stepping up the application rate to 2 TBS / gallon and doing a soil drench and foliar application can help the plants green up. However, just be careful for any applications or drift on newly developing leaves as this can potentially cause some mild leaf curl.
|
|
�
|
|
Thursday, May 9
|
View Page
|
 |
Plastic on Large Structure
Yesterday late in the day, with the help of my neighbor and dad the plastic was pulled over the supporting metal frame which is 40ft. long, 32ft wide and about 12ft. tall. It was a little bit of a challenge since the plastic has accumulated some rain water on it from the day before as I wanted to give it some outdoor exposure before applying it. This is greenhouse grade 6mil clear plastic which is the sweet spot in thickness. (4mil has the risk of tearing easily and 8mil is heavy and more difficult to apply and store.)
I had prepared the edges of the structure by digging a trench so, once we initially got the plastic squared up it could lay into the side trenches and then soil was added to seal and hold it in place. This proved to work well and be very effective. On the end wall sides, 4� long snap clamps that match the structures tubular frame were used which hold very well once attached.
The small silver spots that are seen on the plastic are tape to help seal up some small holes which were the result of carpenter ants that were using the stored plastic as a home. They had chewed though the plastic to create tunnels and these needed to be sealed up.
On the inside, the small cold frame is still up and functional and a large outdoor style ventilation fan has been added.
|
|
�
|
|
Sunday, May 12
|
View Page
|
 |
Interior Structure Additions (Part 1 of 2: Heating, Cooling and Insect Netting)
This shows supporting equipment looking from the base of the plant to where the main vine will grow in the future.
Heater
It has been getting cold at night, so I have added a supplemental torpedo style �Reddy Heater 200T� that runs on refined petroleum. This may not be the most ideal fuel source but it is only planned to be run for a few of the colder nights.
Misters
The white vertical PVC (polyvinyl chloride) pipes have Senninger Upright mini-Wobbler� outfitted with the #4 nozzle light blue (1/16�) which has a flow rate of 0.50 gpm (gallons per minute) and an approximate 32ft. diameter of coverage since I am running them at 20psi. These are intended to provide a cooling mist and not irrigate the plant. (Drip tapes are the intended irrigation source.) Adjustments are being made, but I am starting with having them run for 5min. every 15min. form 10am to 5pm since this is the hottest part of the day.
ZipDoor�
To get in and out of the structure while still having the option to �seal� the doorway required some innovation. I settled on getting a ZipDoor� Standard Door Kit for each side of the structure. It fits the requirements well, but the actual zipper needs some tape reinforcement to hold it in place.
Insect Netting
Not only are the vents sealed with insect netting the doorways are also. This is Protek Net Insect Netting in the 25 gr model. Some of the specifications are that it has 0.35mm x 0.35mm mesh size with 62% porosity, 90% light transmission, and a 2-3 year lifespan. This fine mesh was selected to provide a physical barrier to small insects such as aphids, thrips, white flies and mites. However, this is also part of the reason special screen boxes had to be build to provide increase in the area of the netting to allow for adequate air flow despite the reduced porosity of the material.
|
|
�
|
|
Sunday, May 12
|
View Page
|
 |
Interior Structure Additions (Part 2 of 2: Fans and Ventilation)
Note that the heater is on in this image, which also shows the placement to allow for the fans to mix the carbon dioxide and also the heat to prevent stagnate and stratified air inside the structure.
HAV Fan
This Atlas HAV (Horizontal Air Flow) 18� and 1/10hp, 1 amp fan moves 1790 CFM (Cubic Feet per Minute) at 1600 RPM (Revolutions Per Minute) which, will run 24-hours a day so even when the large yellow exhaust fan is off, so the air will continually be mixed.
Exhaust Fan
The large yellow fan is a Dayton outdoor mobile air circulator that has 42� diameter blades and two speeds. On low it will it will run 9,000cfm at 4.6 Amps and on high 15,000cfm at 5.3 Amps. This is an industrial air circulator that has a water-resistant motor which is important because of the mist cooling system I have installed will result in a consistently high humid environment.
Wall Shutter
The fan is placed directly in front of a Dayton 48� Backdraft Damper model # 4FZJ2 which allows for high-velocity applications. There is one in front of the large exhaust fan and two more on the other side that will allow for outside air to be naturally drawn into the structure.
Scaffolding
The yellow exhaust fan sit on MetalTech Safeclimb Baker Style 6ft. x 6ft. x 2.5ft. scaffolding that has an 1,100 lbs. capacity. The wheels were not installed and it was leveled by using heavy duty metal stakes which also provide a solid support system on what is uneven ground.
CO2 Mixing Fan
Under the scaffolding is a black 20� Hurricane Pro Heavy Duty Orbital wall/floor fan that is rated at 4,500cfm and a max 1,400rpm. This fan is pointed at the plant and is intended to help mix the carbon dioxide that will be supplemented. This fan oscillates inside the protective wire cage which is a nice feature.
|
|
�
|
|
Sunday, May 12
|
View Page
|
 |
Torpedo Heater: Reddy Heater 200T
This is a quick and efficient way to add some heat to such a large area (40ft. x 32ft.). This model also comes with a built-in thermostat, so I can dial in the temperature I want, and then walk away and it will come on as needed throughout the night which is very convenient. The built in fuel tank will allow a full nights run without the need for any mid-night fill-ups. Having fans is important to be able to distribute the heat evenly across the structure to reduce the chance of hot spots.
|
|
�
|
|
Sunday, May 12
|
View Page
|
 |
Two Sensor Thermometer
This is a Taylor 1441E Digital Thermometer that has two sensors. It can easily track minimum and maximum over a few days and provides the ability to get a reading of both the inside and outside temperatures.
The left sensor (LF) is in the structure and the right sensor (RT) is outside. After the heater has come on while adjusting the temperature setting there is almost a 25-degree F difference!
Sensor placement is important to help provide accurate temperature readings that can be used over the course of the growing season to help ensure all of the equipment operates when it needs to. So, I have placed this near my other sensors to act as a way to try and calibrate them.
|
|
�
|
|
Sunday, May 12
|
View Page
|
 |
Heater Direction
This provides an idea of the general direction the heater is placed. It is pointing downhill on a 45-degree angle that is in the general direction of the plant, but not directly at it to prevent heat damage. There are also some walking boards set-up along the perimeter on the weed block to help reduce soil compaction as I work my way around the plant/structure.
|
|
�
|
|
Sunday, May 12
|
View Page
|
 |
Excessive CO2 Levels
Running the torpedo heater does generate heat and also some other gas by-products. Carbon dioxide is one of these but I never had a way to measure exactly how much. The target carbon dioxide level is 900ppm, so seeing a reading of 4,871ppm is on the concerning side. Levels above 5,000ppm can be considered hazardous to humans and offer no benefits to the plant.
Also, the plant leaves are showing some signs of ozone damage which makes a difficult balance between, heating the plants to keep them growing, while also not damaging them with the resulting exhaust gasses from the torpedo heater.
Regardless, this was a great learning experience and provides some more data regarding the different aspects of the plant growing process.
|
|
�
|
|
Monday, May 13
|
View Page
|
 |
Cold Frame Removal on Indoor 1989.5 dmg Daletas �17
Today, the indoor plant has officially outgrown its small cold frame. I kept it in this to have a smaller area to regulate and also buffer some time to work on the bigger structure it will spend the rest of its life in. While the larger structure may not be fully complete it is generally functional and still has some manual requirements that are planned to be automated going forward.
The small black tubing is the carbon dioxide delivery system to provide an easy way to offer even distribution across the entire area. The main vine is right at the door (that has been removed on the right hand side) so it is about 8-9ft. long at this point. Typically, at this main vine length (9ft.) the side vines start to hit the sides (5ft. wide structure so about 2.5ft long side vines) as can be seen on the left side of the structure.
|
|
�
|
|
Monday, May 13
|
View Page
|
 |
Inside Cold Frame View of the Indoor 1989.5 dmg Daletas �17
With the door removed it offers a great look down the cold frame tunnel. This shows the plant, carbon dioxide system and CMH grow light set-up. The nodes on the main vine have been covered to encourage rooting. Green bamboo stakes are keeping the main vine centered in the grow space.
|
|
�
|
|
Monday, May 13
|
View Page
|
 |
Plastic On: Indoor 1989.5 dmg Daletas �17
Here is a before picture showing the two structures, with the small cold frame looking like a scale model of the larger one.
|
|
�
|
|
Monday, May 13
|
View Page
|
 |
Plastic Off: Indoor 1989.5 dmg Daletas �17
By comparing to the previous image the location of the equipment relative to the plant can be seen. The goal is to take some of the features of this small structure (minus the grow light) and scale them up to the larger structure.
|
|
�
|
|
Monday, May 13
|
View Page
|
 |
Recently Uncovered: Indoor 1989.5 dmg Daletas �17
Most of the equipment was concentrated at the early start of the plant to encourage quick growth from the beginning. Based on my historical records, and poor overall weather, something helped the plant grow quick for sure because this is the earliest a plant has outgrown its cold-frame based on my records.
|
|
�
|
|
Monday, May 13
|
View Page
|
 |
Special Set-up Layout: Indoor 1989.5 dmg Daletas �17
This is a focus on the special additions to the plant while it was in the cold frame�
-Carbon Dioxide Enrichment: Tank, regulator, controller and sensor
-Grow Light: CMH Grow light that is dimmable and was moved as the leaf on the left side the previous seasons burn can be clearly seen
-Heat Lamps: There are two 100-watt ceramic reptile heat lamps each on an aluminum tray
|
|
�
|
|
Monday, May 13
|
View Page
|
 |
Carbon Dioxide Sensor Protection
Placement of the carbon dioxide sensor is very important for accurate readings. However, the sensors are not water proof (or even water resistant) so it is protected under an umbrella. A clear flower girl wedding style (Kids Bubble) umbrella was chosen because of the shape that will offer great protection even with the addition of a misting system. Also, the next upgraded sensor that will be used for the entire structure carbon dioxide enrichment has a photocell so it needs to accurately receive light for proper operation while still remaining dry.
|
|
�
|
|
Monday, May 13
|
View Page
|
 |
Supplemental Light (CMH Grow Light)
Since there is no rain that will come in contact with the plant and the weather has been very cloudy I decided to set-up the CMH grow light over the plant and turn up the wattage to increase the coverage. It is covered in plastic because I have misters coming on to help increase the humidity and the light needs to stay in a dry environment. I only have this come in from 0400 to 1000 to also extend the day. However, on those very dark and cloudy days I have the option to turn this light on all �day�. The goal is to try and allow the plant to photosynthesize longer and make use of the carbon dioxide that is being supplemented during this extended �day� cycle.
|
|
�
|
|
Wednesday, May 15
|
View Page
|
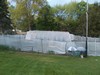 |
Patch Overview: May 15th, 2019
There is always something to do, and the most obvious addition is the Aluminet shade netting has been put up around the entire perimeter of the patch. While this does keep out unwanted animals (in addition to the various wire fences that are also installed) the main goal is to repel aphids. I have had some issues with early season virus infections that are aphid vectored (transmitted) and insecticides are ineffective since the aphid only has to come into contact with the plant to cause infection. The Aluminet reflects light which the aphids perceive as the sun and instinctively fly away from this light source. As a result they fly away from my plants to hopefully, prevent a virus infection. Ever since putting this Aluminet up I have not had an early season virus infection after going 2 out of 3 years previous.
The large structure is coming together with most systems installed and automated where possible. There is still some fine tuning that needs to occur but the main structure is set, but sometimes it is the small details that can take the most time and be the most frustrating. Progress is being made and I like seeing my original idea come together, one piece at a time.
|
|
�
|
|
Saturday, May 18
|
View Page
|
 |
Cold Frame Removal: Outdoor 1989.5 dmg Daletas �17
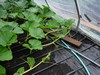
Five days after the indoor plant with all of the special additions (lighting and carbon dioxide) the outdoor plant has out grown its cold frame. In the background the supporting PVC pipes can be seen which makes for easy storage when the cold frame structure is not needed. The soil has been raked and leveled since vine burying will soon be occurring.
The vertical PVC pipe has a Senninger Upright mini-Wobbler� outfitted with the #5 nozzle beige (5/64�) which has a flow rate of 0.75 gpm (gallons per minute) and an approximate 39ft. diameter of coverage since I am running them at 20psi. This is a size larger size with greater flow than the one inside the large structure because there is greater chance for wind and I want to make sure the leaves get sufficient water coverage for cooling on those hot days. There will be two set-up to help ensure even coverage of the entire plant once full grown.
The main function of the mini-Wobbler� is to create a mist to allow for evaporative cooling for both the indoor and outdoor plants. It will naturally be warmer in the enclosed structure than this field grown plant, so, I have gone with less flow in the structure because of the more frequent run times throughout the day when compared to the outdoor plant.
|
|
�
|
|
Saturday, May 18
|
View Page
|
 |
Outdoor 1989.5 dmg Daletas �17
This shows the outdoor 1989.5 dmg Daletas �17 from a different angle that I will use as a comparison in the following entry in 12 days. This plant is growing in the same space, direction and base soil as the indoor plant. The goal is to provide a comparison to see if the structure itself provides a benefit to the overall plant growth.
|
|
�
|
|
Thursday, May 30
|
View Page
|
 |
12 Days Later: Outdoor 1989.5 dmg Daletas �17
These plants can grow quick, as this image is only 12 days after the previous entry. Vine burying is becoming a more regular requirement and it is starting to take more time as the number of secondary vines needing burying is increasing. About every 3-4 days there is enough vine exposed to warrant the time required to bury.
There is a female flower right at the mister, but this is a little close and early, so I think I will try and make the next one my keeper, if all goes well.
|
|
�
|
|
Thursday, May 30
|
View Page
|
 |
Update: Indoor 1989.5 dmg Daletas �17
This plant is looking great and it is only the end of May! There is a female flower that opened today and I had no intentions of pollinating it (too close and too early), but I let it open and the lobes looked very symmetrical, so hopefully this is a consistent trait with this plant.
Even though I have not measured this plant, based on my general observations I would say this is going to be my biggest ever when I measure on June 12th as a point in time, year to year to comparison I do to see how big my plants actually are.
|
|
�
|
|
Thursday, June 6
|
View Page
|
 |
Mr. Ron Wallace�s Patch For Pollen
I had what I thought was the perfect pumpkin so I did some traveling to get some 1911 Urena pollen. Nothing like a patch tour in the dark to scout for some flowers;-) Sadly the pumpkin I pollinated with these flowers sets, does not make it due to a vine to stem split that developed signs of rot.
|
|
�
|
|
Sunday, June 9
|
View Page
|
 |
Pollination Day: Outdoor 1989.5 dmg Daletas �17
This may be an early pollination date but the plant looks great and it is 17.5 ft out on the main vine so this is my intended keeper. I rate the lobes during pollination for symmetry and I gave this flower an 8 out of 10. Time will tell on the final shape, but from what I see at this early stage of development, I do not see a major issue and this is a contributing factor to why this is my planned �keeper� on my outdoor plant.
|
|
�
|
|
Tuesday, June 11
|
View Page
|
 |
Protection for the Outdoor 1989.5 dmg Daletas �17
Umbrellas offer some great benefits�
1.) Shade flower
2.) Keeps pumpkin and flower dry
3.) Allows Anthesis to be applied in the rain
4.) Provides some hail protections (I have seen this first hand.)
The blue plastic cup is to keep the lobes dry and protect from unwanted pollen coming in from bees. I put the cup on the night before the female flower will open and then leave it on for 48-72 hours after I hand pollinate the flower.
It was raining this morning, so you can see the dry circle of soil centered around the flower so the use of an umbrella is an easy and effective method.
|
|
�
|
|
Tuesday, June 11
|
View Page
|
 |
Anthesis Applied: Outdoor 1989.5 dmg Daletas �17
The proper application time is 48-hours after pollination to allow for the proper time that the cells are receptive to an increase in their division rate and duration. This is essentially mimicking a natural hormone response in the plant, only just extending the process a little longer.
You do not want the hormone to be active for too long or at a high concentration since either of these conditions this will cause a negative mutation as the end result. However, I think I have the concentration (in the parts per million), hormone mix (two hormones), and application time (48-hours post pollination) dialed in for maximum benefit. I make my applications just before sunrise to help ensure good coverage and that the mist has some contact time before the sun comes out.
I can say that the pumpkins are certainly slow to start growing because the energy is being put into cell division and not expansion. This can cause a little stress to a grower who may expect the pumpkin to start swelling up immediately after pollination, but I like to play the long game. Cells divide at the greatest rate for the first 20 or so days so maximizing this time is critical. With more cells early on this can lead to a bigger pumpkin later in the season as the pumpkin shifts from cell division to cell expansion.
|
|
�
|
|
Wednesday, June 12
|
View Page
|
 |
Outdoor 1989.5 dmg Daletas �17
Only 4 Square feet behind my biggest pumpkin on this date in my last 19 years of growing! (In 2018 the 1367 VanHoutte �16 held the record that ultimately went down to a bacterial disease in early August.) This plant has been great and growing aggressively with some side vines already terminated so the plant is a full 29ft wide. I also already have my chosen pumpkin so things are looking to be in good shape, at least today;-)
While it seems the standard for comparison this time of year is main vine length, I have had plants in the past that grow a great main vine but do not �fill-in�, so I developed the idea of Leaf Area Estimation which is basically the area of a triangle. (This works best for the standard Christmas Tree style of pruning.) All you have to do is measure the width of the plant and the length of the main vine. Then it is simply (1/2)*(width of the plant)*(main vine length) = Leaf Area Estimation.
Leaf Area Estimation= 333.5 square feet
Main Vine Length= 23 feet
|
|
�
|
|
Wednesday, June 12
|
View Page
|
 |
Indoor 1989.5 dmg Daletas �17
While the outdoor plant this year is basically tied for my biggest plant area on this date, this indoor plant seems to be in a different league. Not only is this the biggest plant I have ever had, it is almost double my previous plant size record! This is with generally the same starting date year to year, so there is no unfair advantage in regards to plant age.
All that I can say is carbon dioxide is making for a very efficient plant that is growing great in both plant area and also root development. Now, I just need this to translate into pumpkin growth;-)
While it seems the standard for comparison this time of year is main vine length, I have had plants in the past that grow a great main vine but do not �fill-in�, so I developed the idea of Leaf Area Estimation which is basically the area of a triangle. (This works best for the standard Christmas Tree style of pruning.) All you have to do is measure the width of the plant and the length of the main vine. Then it is simply (1/2)*(width of the plant)*(main vine length) = Leaf Area Estimation. For this plant I also needed to add in the area of a rectangle (width of plant)*(length of terminated secondary vines) because so many side vines were terminated the plant was no longer the typically triangle shape for this time of year.
Leaf Area Estimation= 612.25 square feet
Main Vine Length= 31 feet
|
|
�
|
|
Friday, June 14
|
View Page
|
 |
Early Problem Child Removed on the Indoor 1989.5 dmg Daletas �17
With the indoor plant, the intention is to swing for a home run so I am only getting three pitches. It looks like the first pitch is a strike.
The actual pumpkin looks great, but this split at the stem to vine juncture is concerning. It did dry, but when additional splits were noticed on the underside of the stem the difficult decision to remove the pumpkin was made. The vertical split was foaming each morning despite a fan on it 24 hours, would likely bring future problems.
This pumpkin was removed when it was 9 days old (pollinated on June 7th @ 21ft. out) as the cracking started developing on day 7 and seemed to be progressively getting worse at an accelerated rate.
*Note: This was the pumpkin pollinated with Ron�s 1911 so making the cut was extra hard.
|
|
�
|
|
Sunday, June 16
|
View Page
|
 |
Limited Space in the Structure
Inside my growing structure it is important to maximize space but not cause the issue of vines running over other vines. So, pruning and more importantly the timing of the pruning is critical. Here you can see the proper timing on earlier vines and I am going to explain how I go about pruning the actively growing vines to minimize loss in the following four postings�
|
|
�
|
|
Sunday, June 16
|
View Page
|
 |
Timing is Critical
Here three vines are visible. For reference the black weed block is 3ft wide.
The top vine shows the intended result where the vine stops before the end wall structure and the leaf still has a little area to expand.
The middle vine has been pruned but is not done expanding but it should end up right near the same distance as the top vine in the image.
The lowest vine (the one I am pointing to) is still actively growing but needs to be pruned (or pinched) now, so that it will end up in the same location as the others.
|
|
�
|
|
Sunday, June 16
|
View Page
|
 |
Meristematic Tissue
The meristem is the area of high cell division and the growing tip of vines is where there is a lot of cellular division and differentiation taking place. This shows a close-up of the vine in the previous image of exactly how the growing tip looks. For spatial orientation this is about 3ft from the end wall of the structure because this is where the weed block starts.
|
|
�
|
|
Sunday, June 16
|
View Page
|
 |
Proper Pinching Completed
Compare this to the previous image as you can see what portions were removed. Basically, leaving three leaves at this early stage will provide a chance for vine elongation to the point that it will just reach the end wall so no space is wasted and the vine does not try and grow up the structure end wall.
|
|
�
|
|
Sunday, June 16
|
View Page
|
 |
End Product
The reason for this early pinching is to limit the wound site to not only reduce the chance of infection, but to also ensure the plant efficiency is maximized. The walking board will be moved up to the next section of growing tips to allow for easy access and a reduction in the overall soil compaction around the plant.
|
|
�
|
|
Sunday, June 16
|
View Page
|
 |
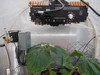
Carbon Dioxide Enrichment System: Current Reading 884ppm
The carbon dioxide enrichment system is operating as planned. The Titan Atlas 8 Digital CO2 Controller with Fuzzy Logic may be on the expensive side, but you pay for what you get. (The term �buy once, cry once� comes to mind.) The features it has certainly do keep CO2 costs to a minimum so plant productivity is maximized while CO2 costs are minimized.
I have been adjusting the target CO2 level as low as 750ppm, but with my newly automated ventilation system, I have upped it to 800ppm. I am using 50 pound tanks, which is just the CO2 and does not account for the actual bottle weight because the filled tank weighs in at 163 pounds total weight. A single 50 pound tank lasts for about 12 days or so, as it depends on the weather.
Days that the ventilation system is off for longer periods of time (cool and cloudy weather) use more CO2, because there is an automatic shut-off that when the exhaust fan is running the CO2 system remains at idle and will not inject CO2 that will simply be exhausted out the ventilation system. Having this feature saves on CO2 and makes things very efficient.
The current target CO2 level is 800ppm with a 50ppm dead band (50ppm above or below the set target) which has been working out well. I also think that the compost added is giving off CO2 because every evening the CO2 levels increase even though the enrichment system is turned off. There is also a photocell in the sensor that only will activate the system if the light levels are able to support photosynthesis which is when the CO2 is needed. I have seen it climb to over my preset level (sometimes as high as 1,000ppm) after sunset on a consistent basis. This is an advantage of having the CO2 levels displayed on the readout.
|
|
�
|
|
Sunday, June 16
|
View Page
|
 |
Regulator Flow Rate
While the activation of the regulator is dependent on the controller, the flow rate of CO2 is regulated via the brass adjustment knob. This has required some initial finesse because if the flow rate it to high, the regulator will literally freeze up due to the cooling effect of the compressed CO2.
The regulator is on in the image, and there is a small silver colored ball just above the 20 SCFH (Standard Cubic Feet per Hour) level. Through some trial and error the max flow rate before regulator freeze-up is about 25 SCFH even though the surrounding air temperature can be 85F+. This flow rate does work and the regulator will be wet but not completely freeze. There are inline heaters that could be purchased if a high flow rate was needed, but I do not want to add the additional equipment that could fail and result in a frozen regulator.
The tank is mounted to the scaffolding and located near an entrance door to make the exchange of bottles as safe and as easy as possible.
|
|
�
|
|
Sunday, June 16
|
View Page
|
 |
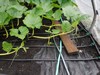
Vine That Needs Burying
This vine (recently pinched) needs to be buried to help with anchoring, improve rooting and protect it from potential squash vine borers (SVB). Typically, this length of vine (about 18�to 24�) takes about 3 days of growth at this point in the season.
If you wait too long the rooting will be slower and you do not gain some of the other benefits mentioned above.
If you do it every day, there is simply not enough vine length to allow for enough area to be present to bury effectively.
|
|
�
|
|
Sunday, June 16
|
View Page
|
 |
Dig a Trench and Apply Rooting Hormone
Some growers will create a trench where the vine will grow into resulting in reduce risk of damaging roots, but I simply dig the trench as needed. This is where trowel selection is important as it needs to be the right size, balanced and be comfortable. The specific one I use is the OXO Good Grips Transplanting Trowel that is around $10-15, and I like the soft non-slip grip and stainless steel blade. However, trowel selection should be a personal choice.
At the leaf junctions there are some purple dots, this is the placement of the CloneX rooting hormone which is a purple based gel. It contains Indole-3-Butyric Acid which is an Auxin class of plant hormones known for encouraging rooting. There are other forms of Auxins, but I have seen the results of this product first hand and the gel formulation adheres to the plants well allowing for enough contact time for the hormone to be effective.
A small paint brush is used to simply apply a drop on both the top and bottom side of the vine where the root will soon form. This gel can help encourage rooting even before the initial root is even seen and it can also help encourage branching of the roots once formed to increase the roots surface area for water and nutrient absorption.
|
|
�
|
|
Sunday, June 16
|
View Page
|
 |
Laying the Vine in the Trench
Here the vine is being placed into the trench and held there before the soil is placed on top. I do this with my left hand and this is the hand that I also do not have a glove on because this is my detail task hand. This is the hand that I apply the rooting hormone with, pinch off tertiary vines and also flowers (depending if I have a pollination set or not), all tasks that require precision.
You can clearly see that the tendrils are kept intact and while some may break, I do not intentionally remove them as they help stabilize the vine and can act as a great early indicator of plant stress to allow for quick action to be taken before a problem is shown in the vine on a larger scale.
|
|
�
|
|
Sunday, June 16
|
View Page
|
 |
Covering the Vine
Here I use my right hand which has a very basic �Brown Jersey Landscaping/Material Handling/General Construction� glove that I use to push the soil over the vine. I wear the glove only on this hand as this does the actual soil contact and it helps keep my hand a little cleaner.
Again, as in my previous post my ungloved left hand is used for the detail work (pinching, pruning, applying rooting hormone) and my gloved right hand is used for the bulk soil moving and more general tasks. I got this idea from an American (Maine) Lobster which has a pincher claw for detail work and a crusher claw for the more difficult tasks.
However, I do run into a lot of worn out right hand gloves and brand new left hand gloves at the end of the season;-)
|
|
�
|
|
Sunday, June 16
|
View Page
|
 |
Properly Buried Vine
This shows the final product of a process that needs to be done quickly as the vines are always growing and there are a lot of vines to do on a plant. Looking towards the tip the last 6� or so is not buried because this vine still has to elongate and is not ready for rooting just yet. However, in only about 3 days the process just described will need to be carried out for this new to develop section of vine.
|
|
�
|
|
Wednesday, June 26
|
View Page
|
 |
Potassium (K) Deficiency
This is a great image showing a potassium deficiency. With the recent vine/stem splits that I have been noticing I decided to cut back on water and fertilizer. This is a fine line to play as now my plant is showing a potassium deficiency. This is something that is more typical later in the season so it is a little odd to see it now. However, this is before the main stress of fruit load so this is good to know to ensure I increase my feeding of potassium to help reduce the chance of running into a problem during the growth of the fruit.
Specifically what you are looking for is the yellowing of the leaf margins (edges). While adding potassium will not necessarily cause these leaves to fully green-up you will know you are feeding and preventing a continued deficiency if the newer leaves do not show the same pattern of yellowing. Potassium sulfate is a staple potassium fertilizer since it is 0-0-50, but there are other options. In my case I am also seeing some need for nitrogen since it is mid-season so a product that contains potassium nitrate will be used in my particular case. However, I will be sure to keep potassium sulfate on hand to ensure if the plant needs a potassium boost I can be sure to supply sufficient amounts to prevent a continued deficiency.
|
|
�
|
|
Wednesday, June 26
|
View Page
|
 |
Rooting Hormone Field Test
This image was taken back in July of 2014 when my patch started to have a virus infection spread which ultimately ended my season early. Due to this, I stopped applying rooting hormone (specifically CloneX gel) to the leaf nodes. However, it took me a while to get to actually pulling the vines out and when I did I noticed something very interesting. There was a clear distinction between where rooting hormone was and was not applied. While many vines showed the same pattern, pictures were taken of a representative sample vine that clearly shows the roots removed from the soil.
Node 1
Rooting hormone (CloneX gel) applied
Node 2
Rooting hormone (CloneX gel) applied
Node 3
No rooting hormone applied
This vine in the image did have time to mature and I have conducted similar tests of rooting hormone (CloneX gel) vs no rooting hormone vs other rooting hormone gel brands vs other rooting hormone substances in a hydroponic setting. A hydroponic setting was chosen to try and reduce the amount of variables as water conditions (ppm, temperature and pH) could be continually monitored. Giant pumpkin plants were used which were clone cuttings from a greenhouse grown plant for the experiments. CloneX rooting hormone had the quickest rooting time and most branching.
This is why I have chosen to use CloneX gel when I bury my vines.
|
|
�
|
|
Wednesday, June 26
|
View Page
|
 |
Node 1: Rooting Hormone Applied
This is the oldest (but not by much) of the three nodes shown which has had CloneX gel applied. Notice not only the strong main tap root, but also the high degree of lateral roots that are formed. This creates a high surface area which can help increase nutrient and water absorption.
It is the fine root hairs that are the most efficient at absorption so the high degree of branching helps provide more fine roots that can lead to more root hairs to help make the plant more efficient.
|
|
�
|
|
Wednesday, June 26
|
View Page
|
 |
Node 2: Rooting Hormone Applied
This is the next node down from the previous image (~8 inches or so) and this shows that no main tap root has formed, but there are many different lead roots growing as a result of the application of rooting hormone (CloneX gel).
The key factor to this image is the branching from each lead root that is already occurring even at this early stage of development. This maximized surface area from the start allowing the plant quick access to nutrients and water in the surrounding soil.
|
|
�
|
|
Wednesday, June 26
|
View Page
|
 |
Node 3: No Rooting Hormone (Control)
This node did not have rooting hormone applied and despite only being about 8 inches away from the previous image there is a dramatic difference in the appearance of this root. There is only a single tap root visible and there is minimal branching at best. This root will help provide nutrients and water to the plant while also anchoring it, but the amount of soil contact is far less than either of the previous two images.
This demonstrates the impact that external applications of rooting hormone can have on the morphology of the plant and also the ability for the plant to have access to nutrients which can ultimately impact the degree of plant efficiency.
|
|
�
|
|
Wednesday, June 26
|
View Page
|
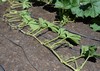 |
Can You Tell Where Rooting Hormone Was Applied?
This image shows a vine that was just ripped out and placed in the sun for the picture. It shows the clear distinction of where rooting hormone was and was not applied.
Counting from the right hand side the 3 nodes all have only a single tap root, while the following 4+ all have aggressive branching and were treated with rooting hormone at the time of burying.
Seeing this abrupt change is what alerted me to the potential impact that simply applying a drop of CloneX rooting hormone gel can have on the development of the subsequent roots.
*Disclaimer: I have no personal connection or affiliation with the producers of CloneX.
|
|
�
|
|
Wednesday, June 26
|
View Page
|
 |
Crown Protection
Keeping the initial plant site dry helps reduce the chance of rotting, especially since there are over head misters running for cooling. This is a PVC structure that supports a clear glass sheet that is held in place by bungee cords. The clear glass not only allows for easy inspection it also provides sunlight penetration which can also help reduce the chance of issues.
While one is placed at the crown it is good to have a few back-ups/extras in case there is an area that would benefit from being kept dry.
This image is looking from the initial plant site down the main vine of my Outdoor 1989.5 dmg Daletas �17 with the pumpkin in the distance, but I have the same set-up for my Indoor plant.
|
|
�
|
|
Wednesday, June 26
|
View Page
|
 |
Outdoor 1989.5 dmg Daletas �17 (x Sibb: Indoor 1989.5 dmg Daletas �17)
Pollination Date June 9th, 2019
5 Lobes
Lobe Symmetry Rating: 8 out of 10
Distance out on the main vine = 17.5ft.
Total number of secondary vines behind the pumpkin = 11 left and 10 right = 21 total
Day 14
(No measurements taken� yet)
This shows my Outdoor 1989.5 dmg Daletas �17 which has been prepared for the season. The umbrella has been up since before it was pollinated, but what I have put the time into recently is the under pumpkin protection.
While the sand and mill fabric are visible there has been special care taken to what is below what is visible in addition to ensuring the proper position of the pumpkin. Note the mill fabric is not fabric, but is actually a plastic belting material that allows water to pass through but is tough enough to prevent mice from eating through.
|
|
�
|
|
Wednesday, June 26
|
View Page
|
 |
Proper Pumpkin Positioning
There has been great care taken from the moment the pumpkin laid down to ensure there was proper positioning in anticipation for the growing pumpkin. Maintaining the perpendicular position and pulling the pumpkin back helps create this space between the pumpkin and the vine. The vine has had minimal tension on it which is evident with the horizontal position of the stem.
Some growers will put a curve in the vine that will make it looks like the letter �S� or �C�, but this is not necessarily required. The goal is to prevent the pumpkin from braking itself off the vine and if there is careful placement of the pumpkin in the early stages of growth the main goal can be obtained. The problem I have with the dramatic vine curves is I may want to go with a second or their pumpkin further down the vine and implementing a vine curve may require readjustments or poor positioning. This is why I simply focus on the pumpkin position as it keeps the vine in a generally straight line which allows the selection of the �best� pumpkin with no need to continually adjust the vine position and risk damage to the vine or the roots.
Looking at the top of the stem there is a stem tear that has developed, but this is only superficial so it has not required any treatment and does not have me worried.
|
|
�
|
|
Wednesday, June 26
|
View Page
|
 |
Mill Fabric x2 then Plywood then Mill Fabric then Pumpkin
Well under the pumpkin in direct contact with the ground are two layers of mil fabric. The reason for the double layer is to create a surface that can easily move in the future if the pumpkin needs to be repositioned.
Then there is a piece of �� thick plywood with dimensions of 4ft. x 5ft. that has been painted white to reduce the amount of water it can absorb and to help create a smooth surface. There is a slot cut in a corner, which is where a strap will be placed to pull the pumpkin if needed later in the season. The rectangular piece of plywood is place with the corner under the stem to allow for the maximum width to be in the mid section of the pumpkin. (I got this tip from Joe Jutras.)
On top of the plywood another layer of mil fabric is placed and this is what the pumpkin actually sits on and this is what I am lifting up in the image. This mil fabric is about a 5ft x 5ft square, so this is why the plywood is smaller than the mil fabric.
Then there is a thin layer of sand that the pumpkin sits on. All of this is to minimize the contact chances the pumpkin has with the soil and to create a situation that will make moving the pumpkin to maintain near ideal stem to vine position as easy as possible.
|
|
�
|
|
Wednesday, June 26
|
View Page
|
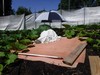 |
Complete Set-Up
Here is the full system put in action. With the under pumpkin protection this will provide an even surface for the pumpkin to grow on and also makes it easy to move the pumpkin to ensure proper positioning as it grows. The pumpkin itself is covered with a simple white sheet to shade it from the sun. I do try and keep the leaf that comes out of the stem to vine juncture as this helps shade the pumpkin, holds the sheet and provides a short distance for newly formed sugars to travel to the ever growing storage organ.
Now, it is a waiting game to see how long it will take for the pumpkin to start to touch the umbrella.
|
|
�
|
|
Wednesday, June 26
|
View Page
|
 |
Indoor 1989.5 dmg Daletas �17 (Pollination #3)
With stem splitting seeming to be an issue with my indoor pumpkins I have chosen to be preventative with this third pollination and take the time to carefully roll the vine and block it up shortly after pollination.
There is a fan running and the 2x4 pieces of wood and pool noodle are both being used to help position the vine.
Under the pumpkin is a pile of sand to help ensure the pumpkin comes into contact with some support soon to reduce the stress on the vine to hopefully prevent splitting that I have seen on the other pollinations.
There is also a small piece of mil fabric under this pumpkin to again provide some early protection and also give the sand a little base.
|
|
�
|
|
Wednesday, June 26
|
View Page
|
 |
Keeper? (Indoor 1989.5 dmg Daletas �17 Pollination #3)
Here is the third pollination that is 6 days old and may end-up being my keeper even though it is 31ft out on the main vine. The clothespin is for size comparison to the next posted image, but what I like about this pumpkin is there is currently no stem splitting.
The previous two pollinations all seemed to develop early (prior to day 8) splits, so if this one remains split free for the next two days I am going to make this my keeper despite the feet out on the main. Having a problem free pumpkin early can allow it to handle the rapid growth phase which is where issues normally will start to show.
|
|
�
|
|
Wednesday, June 26
|
View Page
|
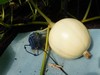 |
Pumpkin Looks Good� But Not the Stem
While this pumpkin looks great, it is the stem that I am concerned with. There are some splits that have developed that seem to be getting worse each day. However, this is my second pollination on the plant, so the pumpkin is much larger than the third pollination (see previous image and clothespin) for comparison.
However, I need to make a decision soon, because this pumpkin is the strongest sink and could cause the third pumpkin to abort soon.
Decisions, decisions�
|
|
�
|
|
Thursday, June 27
|
View Page
|
 |
Concerning Stem Splits
Looks like pitch two is another strike since these splits seem to be getting worse and there are currently three of them. Seeing this I am going to make the difficult decision to remove this bigger pumpkin in hopes that the smaller third pollination will not only set, but out grow this one in the long term.
|
|
�
|
|
Friday, June 28
|
View Page
|
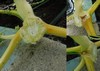 |
Did I Make the Right Decision?
After seeing the splits which looked deep and concerning (see previous post) after I removed the pumpkin and looked at the cut away of the stem I am wondering if I made the correct decision. As you can see in the image the stem cross section does not look like there was that much restricting the flow from the splits.
While there is no way to tell if I made the best decision or not, I can say that early stem splits are less of a concern to me in the future based on what I have seen with this pumpkin.
There is something to learn each year.
|
|
�
|
|
Friday, June 28
|
View Page
|
 |
The Three Pitches
Here you can see the three pollinations I have had on my Indoor 1989.5 dmg Daletas �17. It is always a hard decision to cull a larger pumpkin for a smaller one that you hope will be bigger in the end.
While the first two pumpkins developed stem splits and were culled (translated to strikes) the third pitch I am hoping is a home run, but time will tell�
|
|
�
|
|
Friday, June 28
|
View Page
|
 |
Indoor 1989.5 dmg Daletas �17 (x self)
Pollination Date June 20th, 2019
5 Lobes
Lobe Symmetry Rating: 9 out of 10
Distance out on the main vine = 31ft.
Total number of secondary vines behind the pumpkin = 15 left and 16 right = 31 total
Day 8
(No measurements taken� yet)
While typically I prefer to outcross pumpkins, since this plant is outperforming all my others over the last 19 years of growing, I decided to self it. The intention here is to try and contain what could be very special genetics as I have not seen such aggressive growth or rooting before. While I agree the carbon dioxide enrichment is probably helping these traits, the change is so dramatic, I am thinking it is more than just the environment, I think it is also the genetics and this is why a self cross was chosen.
This pumpkin seems to have a very barrel like shape to it, while the previous two pollinations (and my outdoor plant which is the same seed) all have more of a round spherical shape to them. There is nothing wrong with this, but this longer shape seems not to be the most common shape with this seed.
The pumpkin is currently covered with a 5-gallon paint strainer filter. This allows for air circulation and easy inspections. The clothespins add some extra weight to hold the paint strainer in place since there are fans running for air circulation.
Now that this is the chosen pumpkin I will begin moving the vines to get ready for the under pumpkin protection system that is set-up for the outdoor pumpkin already since it is older.
|
|
�
|
|
Friday, June 28
|
View Page
|
 |
Oudoor 1989.5 dmg Daletas �17 (x Sibb)
Again, selfing and sibbing are not typical crosses for me, but when I see a plant performing so much better than others I have had in the past 19 years of growing, I wanted to try and carry these genetics over to the next generation. This is why I selected to take pollen from my indoor 1989.5 dmg Daletas �17 and cross it with my outdoor 1989.5 dmg Daletas �17.
This pumpkin is like most of the pumpkin shapes I have seen on this seed line which includes my indoor plant and other growers.
|
|
�
|
|
Saturday, June 29
|
View Page
|
 |
Temperature and CO2 Level
The fog to the image is because the misters were on for cooling but I wanted to provide a cloudy, but warm days temperature and CO2 level in the indoor structure.
Inside the structure it is 87.4F and outside it is 85.6F at the present time. I can say that my ventilation system is just about to turn on since I do not want it getting much over 88F can cause unnecessary heat stress can occur and even a reduce the net photosynthetic rate. However, with CO2 enrichment the data does suggest that the peak efficiency temperature for photosynthesis can be increased from 78F (normal 400ppm CO2) to over 87F (enriched CO2 of 1400ppm).
However with pumpkin plants there leaves are very large and supplementing CO2 causes the stomata (small pores on the under sides of the leaves responsible for gas and water exchange), to be closed for a greater duration. This reduces the plants ability to transpire (loose water, like sweat) and causes the plant to not to be able to cool itself as efficiently. This is in part why adding my mist system to the indoor plant is so important and why I have the ventilation system come on around 86-88F.
The displayed CO2 level of 775ppm is with-in the 50ppm of my set target of 800ppm. This is a great check to make sure things are operating as set and the increase in temperature should help increase growth. However, especially when it comes to photosynthesis we need to consider the amount of light that hits our plants and this is something that is not often measured by growers so look at my next two postings for some insight into light energy�
|
|
�
|
|
Saturday, June 29
|
View Page
|
 |
Cloudy Day PAR Reading
What is PAR? PAR (Photosynthetic Active Radiation)- Measures the amount of light (400-700nm) a plant needs to grow.
About the meter� This is a Sun System PAR meter which has a sun and grow light mode. It is very easy to use and automatically turns off to conserve batter power. It reacts/updates fast and allows the grower to get quick readings, however, the downfall is the cost.
Measuring Light Video Lecture: https://www.youtube.com/watch?v=r7yTiUOtSHo
What is the PAR target? The goal is to provide plants with�
PAR of 600 umol/m2/s in 400ppm of CO2
PAR of 900 umol/m2/s in 800ppm of CO2
PAR of 1100 umol/m2/s in 1400ppm of CO2
Link to Data: http://fluence.science/wp-content/uploads/2016/09/High-PPFD-Cultivation-Guide-9.27.16.pdf
*Due to cloud thickness continually changing this also changes the exact amount of PAR. So, many pictures were taken and the median reading is shown in the below images.
Indoor Structure = PAR 288
Outdoor = PAR 440
The Indoor plant is receiving 65.5% of the PAR the outdoor plant which is due to the 6mil greenhouse grade plastic acting as a filter.
|
|
�
|
|
Thursday, July 4
|
View Page
|
 |
Sunny Day PAR Readings
The photosynthetic rate can be limited by the ppm of CO2 that is present (assuming temperature is optimum). Note: Ps = Photosynthesis
For example setting the theoretical Ps rate at 100% under ideal conditions (temperature being consistent, and the amount of carbon dioxide and light intensity changing) presented here is a summary of when CO2 concentration increases so does the light intensity to maximize Ps activity�
400ppm CO2: Ps peaks at around 20% of the theoretical maximum @ 450 umoles/m2/s
800ppm CO2: Ps peaks at around 60% of the theoretical maximum @ 850 umoles/m2/s
1400 ppm CO2: Ps peaks at around 95% of the theoretical maximum @ 1050 umoles/m2/s
*However, levels of CO2 above 1200ppm are considered to offer little benefit overall despite what this data may suggest related to relative Ps %
Link to Data (see Figure 5 on page 8): http://fluence.science/wp-content/uploads/2016/09/High-PPFD-Cultivation-Guide-9.27.16.pdf
Even on what looks like a fully sunny day there can be continually change the exact amount of PAR, so median readings are shown in the images. There is a large difference to the cloudy day, and while the plant can not necessarily use all of this energy it is interesting seeing the difference the weather and 6mil plastic can make.
Indoor Structure = PAR 1464
Outdoor = PAR 1831
The Indoor plant is receiving 80% of the PAR the outdoor plant is. However, both readings indicate an excessive amount of light energy which is more than the plant can use/process.
|
|
�
|
|
Thursday, July 4
|
View Page
|
 |
Ever wonder how much light lower leaves get?
This demonstrates the importance to not have leaves on top of and shading other leaves simply because the amount of light energy those lower leaves receive is minimal. Here in the shade of a leaf the PAR reading is only 188 while in the sun the reading was 1464 so that means a shaded leaf is only receiving about 12% of the light energy that the top leaf is getting.
In addition to the lack of light there is also the increase chance of disease forming (particularly powdery mildew) so this is why it is important to prune out under growth and to properly train vines for an even canopy to maximize light absorption.
What does all of this PAR data mean? This is just to provide greater information into light intensity which is something most growers do not have a way to accurately measure or may not even consider.
|
|
�
|
|
Thursday, July 4
|
View Page
|
 |
Outdoor 1989.5 dmg Daletas �17 (x Sibb)
The Outdoor 1989 is touching the umbrella so it only took 8 days for the pumpkin to grow this tall. It is a good sign when the umbrella has to be reset higher;-) However, this is a particularly tall pumpkin so the shape of the pumpkin impacts the timing of this.
|
|
�
|
|
Sunday, July 7
|
View Page
|
 |
Blocking Up The Main Vine
Since this pumpkin is getting so tall I need to start blocking up the main vine early to reduce the stem stress. I put bamboo stakes in an �X� pattern to help support the vine in addition to plastic flower pots to help provide support and a little upward pressure on the vine.
The positioning of the pumpkin from the vine is still good which is due to the earlier set-up when the pumpkin was smaller. With giant pumpkins it is important to try and think and plan ahead to try and reduce the potential for some problems. Often this comes with years of experience but reading diaries and making notes can help speed any growers learning curve along with taking notes and reviewing them.
|
|
�
|
|
Sunday, July 7
|
View Page
|
 |
Outdoor 1989.5 dmg Daletas �17 (x sibling (indoor plant))
*Anthesis Treated*
Day: 28
OTT: 259�
Est. Weight: 388 pounds
Overall this pumpkin looks like it is going to be tall in shape. The plant seems to have stopped growing now that the pumpkin is becoming the main sink. However, I plan on trying to push a little more vine growth so the plant will have some younger leaves as the ones currently present age. This is a fine line to play, push some growth but not so much that the pumpkin splits.
|
|
�
|
|
Sunday, July 7
|
View Page
|
 |
Indoor 1989.5 dmg Daletas �17 (x self)
*Anthesis Treated*
Day: 17
OTT: 139�
Est. Weight: 64 pounds
There is a lot of plant to hopefully push this pumpkin. The pumpkin is much smaller than the traditionally grown outdoor pumpkin, but keep in-mind that it is 11 days younger. It will be interesting to see how the season develops from here, but I am lucky to have two plants and two pumpkins. The indoor pumpkin selection was a bit of a challenge, but now everything is set and what happens, happens.
|
|
�
|
|
Sunday, July 7
|
View Page
|
 |
Indoor 1989.5 dmg Daletas �17 (x self)
Overall this plant has just about completely filled the indoor space with a few more secondaries nearing the edges of the structure. The small round black tubing that is seen making a right angle turn is where the carbon dioxide is injected through. The tubing forms a large rectangle with a 100ft perimeter that contains small laser drilled holes that allow for even distribution of the CO2 under and throughout the plant.
There are fans that run all day and night to help mix the air so it is not stagnate which is good for the plant and also helps continually mix the carbon dioxide around the plant and structure. The leaves are wet due to the mist cooling system that is in place which has been doing a great job helping prevent plant stress and leaf burn.
|
|
�
|
|
Sunday, July 14
|
View Page
|
 |
Outdoor 1989.5 dmg Daletas �17 (x sibling (indoor plant))+
*Anthesis Treated*
Day: 35
OTT: 304.5�
Est. Weight: 620 pounds
The pumpkin is growing and keeping is general shape and color. Some of the secondary vines look like they want to grow, but no real progress on actual length as of yet. The leaves that are present appear to be in great shape and will hopefully keep this pumpkin growing.
|
|
�
|
|
Sunday, July 14
|
View Page
|
 |
Indoor 1989.5 dmg Daletas �17 (x self)
*Anthesis Treated*
Day: 24
OTT: 216�
Est. Weight: 229 pounds
This pumpkin is on a slight hill and as it grows it is sliding toward the stem. This has required some pulling it back to maintain the ever important pumpkin to vine distance to avoid stress. Overall, there seems to be enough distance but from this point forward mechanical assist will have to be implemented to move the pumpkin, which is a good sign;-)
|
|
�
|
|
Sunday, July 21
|
View Page
|
 |
Hot Today (98+F or 36.5+C)
This image was taken during the day showing the air temperature in the shade, so needless to say it was very hot today. Ventilation fans were turning on early in the day and allowed to run until sunset. Other than air conditioning it is very hard to keep the plants cool, but misters were running to try and keep as much evaporative cooling as possible going, which is a challenge when the humidity is also high.
|
|
�
|
|
Sunday, July 21
|
View Page
|
 |
Misting Systems
*There are two systems because one is for the outdoor plant and the other is for the indoor plant.
Outdoor Plant: DIG 710A
This could have a rain sensor attached, but since it does not apply that much water it is not a major concern and it is easy to simply turn off, if the conditions to not justify the addition of a mist for cooling. In general this runs for 15min. on the hour from 11am to 3pm (so 5 times a day at 15min. each time).
Indoor Plant: DIG 710AP
This timer has a propagation mode which is well suited for the continual need to cool the indoor structure. This means that an on and off time can be set with duration of misting and an �off� interval. The timer will simply cycle between the preset times which has made maintaining the cooling of the plant simple and reliable. I only run the misters for 4min. every 20min. from 10am to 5pm on the hottest days and on the less intense days I keep the interval the same, but only run it from 10am to 3pm and may turn one of the two misters off. In the structure there is a concern of humidity so while the water does help the evaporative cooling process, if the humidity is already high this is my attempt to reduce the total water volume added to the structure.
|
|
�
|
|
Sunday, July 21
|
View Page
|
 |
Outdoor 1989.5 dmg Daletas �17 (x sibling (indoor plant))
*Anthesis Treated*
Day: 42
OTT: 332.5�
Est. Weight: 799.5 pounds
Overall this pumpkin continues to hold a symmetrical shape. The leaves are small and low and the wide and tall shape to the pumpkin makes it look impressive despite the smaller than anticipated numbers. The plant looks great (as will be shown in the next couple postings) so the less than expected growth is a bit of a mystery, but it is growing.
|
|
�
|
|
Sunday, July 21
|
View Page
|
 |
Outdoor 1989.5 dmg Daletas �17 (x sibling (indoor plant))
Before Pumpkin Plant Material
This is the older growth, but it is aging very well with minimal damage or signs of aging. This plant went in the ground back on April 21st, so the overall health is impressive. The longer the leaves can be kept in this good health the longer the plant can push the pumpkin.
|
|
�
|
|
Sunday, July 21
|
View Page
|
 |
Outdoor 1989.5 dmg Daletas �17 (x sibling (indoor plant))
After Pumpkin Plant Material
This material looks good, but it has been slow to progress. However, with the addition of some fertilizers the vine tips look like they may be getting a second round of growth as they have become darker green and are starting to grow to the point that it looks like they will require some vine burying in the near future.
|
|
�
|
|
Sunday, July 21
|
View Page
|
 |
Indoor 1989.5 dmg Daletas �17 (x self)
*Anthesis Treated*
Day: 31
OTT: 268.5�
Est. Weight: 430.5 pounds
Despite some quick die back to some of the older leaves the rest of the plant is looking quite good. The main vine continues to grow which must be around 50ft by now. I have trained it with a few bends to keep it going even though it is in an enclosed space. The pumpkin growth has not been as robust as the vine growth even though I have been maintaining elevated CO2 levels which is a bit perplexing.
|
|
�
|
|
Sunday, July 21
|
View Page
|
 |
Indoor Plant Issue
What looked like heat damage due to the timing of the onset turned out to be the blooming of a crown rot. Upon further investigation it seems to be Fusarium crown rot which is going to be a battle to try and control and slow the progression of for the rest of the season. On a slightly positive side it does not seem to be taking out all the vines and the side vines are only showing it in sections. Also, the plant is very large (over 1,000sq.ft.) so some sections can easily be removed.
|
|
�
|
|
Saturday, July 27
|
View Page
|
 |
Importance of Calibrating CO2 Sensor
The CO2 levels in my structure seemed to be a bit off (below expected values), so I decided to recalibrate soon after adding a new bottle. Well, I was correct, and for some reason my sensor calibration was off causing the reading to be lower than actual levels. While the manufacturer states the calibration should be good for three years growers may want to go through the recalibration process (takes under 10min. to do) a few weeks after everything is established to ensure accurate readings.
The sensor does need to be place in a natural CO2 environment (400ppm) during the calibration process. However, once calibrated (mine took only about 5min.) it was placed back in its original location it read a little over 1000ppm. So the previous setting of 800ppm was in actuality 200ppm lower than the actual. Knowing this I made some adjustments which I will go over in the following postings�
|
|
�
|
|
Saturday, July 27
|
View Page
|
 |
CO2 ppm Setting
The target CO2 level in the structure is set at 1050ppm. (Due to a sensor calibration error, this was the actual CO2 level that has been running the entire time.) This is right at the top of the economical maximum and this results in going through a 50lb CO2 bottle about every 10 days or so depending on the weather pattern. This seems to be a decent rate that matches close to my predictions and makes bottle changes frequent but not excessive, so this is the setting that will be continued.
|
|
�
|
|
Saturday, July 27
|
View Page
|
 |
CO2 Dead-Band
This is the amount the system will tolerate to be over or under the pre-set level. So, since the level is set at 1050ppm the CO2 levels in the structure should be maintained in the 1000ppm to 1100ppm range. The Fuzzy Logic processor is great at pulsing the dosing of carbon dioxide which makes for an efficient delivery and minimal waste. Even though the controller may cost more initially, it can certainly save cost on carbon dioxide in season.
|
|
�
|
|
Saturday, July 27
|
View Page
|
 |
Why Two Systems?
One is dedicated to enriching the structure with CO2 up to 1050ppm and another to help ensure the levels do not drop below normal atmospheric levels of 400ppm.
Atlas 8 (CO2 Enrichment- Target Level: 1050ppm)
This system that has been the focus up to this point (Atlas 8) and is set to maintain the conditions in the structure at 1050ppm (+/- 50ppm). Based on random checks, this system has been functioning properly. However, this system automatically stops dosing CO2 when the vent fan comes on (which is on a thermostat to come on at 86F+ temperature) to help ensure the CO2 is not simply vented out of the structure.
During the heat of the day the CO2 levels were dropping below the normal atmospheric levels of 400ppm despite continual venting. How is this possible when the outside air contains 400ppm of CO2? My theory is, during times of high light intensity photosynthesis is most active meaning the plant is consuming CO2 in the greatest quantities. Even though outside air is being pulled through the structure is not enough to replenish the rate at which the CO2 is being taken up by the plant. This situation is causing the levels of CO2 to drop below normal atmospheric levels, which can potentially lead to plant stunting. Since my Atlas 8 is off during times of venting I decided to implement another system to correct this daytime CO2 depletion issue.
Atlas 9 (CO2 Supplementation- Target Level 400ppm)
The smaller controller in the lower right of the image (Atlas 9) has a simple but important task of maintain CO2 levels of only 400ppm which is the atmospheric level. This system is not connected to the venting system, but the sensor does have a photocell, so it will only dose during daylight hours. So, even if the Atlas 8 controller is off due to venting this system (Atlas 9) will help ensure the plant never experiences CO2 levels that are below atmospheric levels even if the plant is actively consuming CO2 at a high rate.
|
|
�
|
|
Saturday, July 27
|
View Page
|
 |
Double Bottle System
Since there are two controllers each has a dedicated regulator and 50lb compressed CO2 bottle. This allows for system isolation, easy tracking and to some degree a redundancy. As expected the system maintaining atmospheric conditions at 400ppm is going through minimal CO2 and the system enriching to 1050ppm is going through more CO2 on a relative basis as expected.
However, the overall rate of CO2 consumed by the enriching system seems to be about the same now as before when the supplementation system was not in place. There is a possible slight extension in required bottle change intervals, but this could be due in part to the weather and heat.
Also, having an identical redundancy in bottles and regulators is a good thing as if needed, this would allow for a quick change in regulator power sources to ensure the structure is being enriched with CO2.
|
|
�
|
|
Saturday, July 27
|
View Page
|
 |
CO2 ppm Set Point (CO2 Supplementation)
This is set at the lowest level of 400ppm which is normal atmospheric conditions. The reason for this system and setting, is to ensure that even during times of venting and high plant metabolism the plants is still being exposed to normal atmospheric levels of CO2. The issue that may have been occurring is due to the dense leaf canopy the plant could have been using up the CO2 faster than it was being replenished in the structure. This would result in carbon starving which could reduce yields.
The intention of this system is to ensure the plant has the same access to carbon dioxide as the outdoor plant despite is plastic enclosure. This controller also has a Fuzzy Logic mode which is a great feature and can be used because of the compressed air bottle based system being used.
|
|
�
|
|
Saturday, July 27
|
View Page
|
 |
Deadband Set at 50ppm (CO2 Supplementation)
This is the level of tolerance the controller maintains from the set point. This means the controller will maintain CO2 levels 50ppm above or below the set point. As noted previous for this system the set-point is 400ppm which is normal atmospheric conditions.
|
|
�
|
|
Saturday, July 27
|
View Page
|
 |
Sensor �Live� Reading Comparison
On this random check both sensors are reading CO2 levels with-in acceptable tolerances.
Note: The sensors may not read the exact same current CO2 levels, but both have been calibrated.
|
|
�
|
|
Sunday, July 28
|
View Page
|
 |
Disease Progression
Looking at the secondary vines that are yellowing and ultimately turning brown, I decided to inspect the main vine with greater scrutiny. One oddity is the pattering of the leaf burn, since it does not appear to be completely running down the vine. There are some leaves on the vine that are still mostly green, while others are showing advanced aging and burning in a short period of time.
|
|
�
|
|
Sunday, July 28
|
View Page
|
 |
Main Vine Internal Rot Issues
Initial inspection of the main vine was good, where the issues were developing was on the underside at the points that had some ground contact. So aggressive action was taken by splitting the vine and then put a cover in hopes that it will dry out.
Since the outside of the vine was green and hard, the hope is to stop progression of the internal rot by drying out the inside of the vine.
|
|
�
|
|
Sunday, July 28
|
View Page
|
 |
Fusarium Inside the Main Vine
This shows what the inside of the main vine looks like. The brown coloration is characteristic of Fusarium which is a soil born disease. It infects the roots and then progresses internally in the plant clogging the internal (xylem) structures preventing water movement.
If performing a grower in-field diagnosis you want to look for brown/tan coloration in the leaf stalks and/or the vines. While the leaf stalks on this plant were clean, the main vine had the characteristic browning. The vine was cut with a knife down the center and then I put a bamboo stake to ensure the vine stays separate to ensure that no water can accumulate in the main vine.
|
|
�
|
|
Sunday, August 4
|
View Page
|
 |
Outdoor 1989.5 dmg Daletas �17 (x sibling (indoor plant)) Starting to Vine (again)
After trying to encourage some more vine growth with fertilizer applications the vines past the pumpkin are now starting to grow to the point that I am back to vine burying. The challenge has been adding fertilizer, but not over adding to the point that the plant becomes brittle and bloated.
As far as fertilizer goes, I was adding a blend of different fertilizers being careful how much nitrogen and phosphorus was added. It is best to favor on the low side and do repeated applications to slowing bring up the total values. If you over add there are more negative results than positive ones. Weather and soil conditions are variable, and it can be hard to predict how things will react, so reduced but repeated applications with close inspections of the plants reactions are important to ensure maximum benefits with minimum risks.
|
|
�
|
|
Sunday, August 4
|
View Page
|
 |
New and Older Leaves of the Outdoor 1989.5 dmg Daletas �17 (x sibling (indoor plant))
This image shows the older leaves along the main vine on the left hand side of the image. Then there are some greener leaves which matches where the newer growth is occurring. I have been back to training and burring to keep everything in order. It is nice to see the plant fill-in and this could be a great benefit in the long run as I am getting some new leaves during this first week of August which will be in their prime as other parts of the plant naturally ages.
|
|
�
|
|
Sunday, August 4
|
View Page
|
 |
Indoor 1989.5 dmg Daletas �17 (x self)
Despite this plant having Fusarium the leaves that are showing infection are toward the base with the area around the pumpkin itself looking great. Only issue is the rate of pumpkin growth is not what I was expecting so I am going to hold off an taping and wait until weigh-off time, (if the pumpkin makes it).
The hope is to prevent the disease progression before it reaches the pumpkin causing it to rot. However, it is still well over a month before the weigh-off season and a lot can still happen.
|
|
�
|
|
Monday, August 5
|
View Page
|
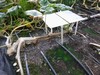 |
Indoor 1989.5 dmg Daletas �17 (x self) Main Vine Not Looking Good
It seems the rot is advancing quicker than I would like to see and as a result there is not much water flow through the vine going to the actual pumpkin. Even though there is a glass cover it seems not to be doing much good due to the advanced stage of the disease progression.
I did remove some of the side vines, but it seems the rot originated in the main vine and worked its way out to the secondary vines. At some point I feel I will need to literally �cut my losses� and just remove a portion of the plant that is exhibiting the most advanced symptoms.
|
|
�
|
|
Monday, August 5
|
View Page
|
 |
Mine Vine Connection?
While the main vine on the indoor 1989.5 dmg Daletas �17 does not look to be in good shape, due to the aggressive rooting of the side vines the leaves are not showing advanced decline as much as they would if the vines were dependent on the main vine for growth.
The worst looking side vines were removed but it seems to have done little to prevent or even slow the progression of the vine rot. However, on the positive side there is still a good area of healthy looking green leaves in the younger portion of the plant, which is closer to the pumpkin.
|
|
�
|
|
Monday, August 5
|
View Page
|
 |
Lack of Connection
If you look closely, the main vine is no longer attached to the main crown on the indoor 1989.5 dmg Daletas �17. This was after testing the connection which resulted in an easy detachment, which simply confirms what I knew was true already� Advanced Vine Rot.
The tan/orange coloration is consistent with Fusarium fungus for which there is really no great cure for, so my goal is to try and minimize the negative impact on the plant and pumpkin for the rest of the season.
|
|
�
|
|
Monday, August 5
|
View Page
|
 |
Where Does The Rot Stop?
Without cutting into the vine and doing great physical damage I wanted to have a way to determine where the rot stopped along the main vine. Looking closely at the image you can see holes drilled with a cordless drill in the center of the main vine. As I was drilling I was feeling for the degree the vine was solid and if there was evidence of soft tissue in the inside and if water/liquid poured out.
At each leaf node along the main vine, I would drill a hole until I found consistently hard tissue. It took a few holes, but eventually I found what I was looking/feeling for.
|
|
�
|
|
Monday, August 5
|
View Page
|
 |
Internal Rot = Fusarium
This is a cross section of the main vine and this is a classic sign of Fusarium. In the image the outside of the vine appears to be healthy, however seeing the internal issues it will only be a matter of time before this problem surfaces. When an area of the vine is exhibiting these symptoms cutting sections of the vine until both the outside and inside look clean is important to reduce the chance of rot running down the entire vine causing full plant (and also pumpkin) loss.
|
|
�
|
|
Monday, August 5
|
View Page
|
 |
Site of Main Vine Cut
After drilling holes in the main vine there was a section that was determined to be hard all the way through. The vine was cut at this location and some degree of internal rot, so I went one more node and all looked good. After a day the area healed over nicely as can be seen in the image.
|
|
�
|
|
Monday, August 5
|
View Page
|
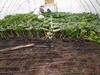 |
Pruned Main Vine: Indoor 1989.5 dmg Daletas �17 (x self)
The indoor plant does look a little odd, but the entire infected plant portion has been removed, so now it will be interesting to see if the Fusarium rot progresses any more. This is an aggressive approach but sometimes growers have to do extreme things in order to save the pumpkin. Time will tell if this was the correct decision.
|
|
�
|
|
Tuesday, August 6
|
View Page
|
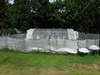 |
Shade Cloth Addition to Structure
After the hottest July on record (records kept since 1905) I wanted to try and add an addition method of structure cooling. The two large high-velocity intake vents and one exhaust vent (All same model: Dayton 48� Backdraft Damper model # 4FZJ2) in addition to the misters have been working out well since indoor temperatures have been only 5-7degress F above outside temperature. However, I still looked into potential options to try and reduce the heat inside the structure.
Shade netting was the only feasible option and then it became a matter of what percentage to purchase. Online recommendations offer a good starting point, but I like to have actual data to support my decision. By taking PAR readings under different conditions (ex. full sun, mostly sunny, cloudy) and knowing the inside environment was carbon dioxide enriched 30% shade netting was chosen.
When adding CO2 it increases the light use efficiency of the plant so at 30% shade, I am essentially not limiting the plant and only blocking light that is basically excessive. As a result even when shading the plant it should not restrict the plant growth. If I was not enriching with CO2 than 40% or even 50% would essentially allow the plant to still receive the maximum amount of usable light it can process through photosynthesis.
|
|
�
|
|
Tuesday, August 6
|
View Page
|
 |
Shade Cloth Hold-Down
Since the heat is greatest on days of full sun I wanted to make it easy to pull over and also remove the shade netting. This shows the simplicity of the hold-down system implemented. The large plastic containers with rope in them are there for organization and when the shade cloth is pulled back over the rope easily come out of the containers in an organized fashion. This reduces frustration and creates a situation that makes it easy to pull over and remove which means it will actually be done on a regular basis.
As a test I did let the netting get rain and tried to move it can still easily be moved by one person so this helps ensure that I can make a judgment call and not feel like the weather limits my opportunity to apply or remove the netting even though it is on the outside of the structure.
|
|
�
|
|
Tuesday, August 6
|
View Page
|
 |
Shade Cloth Set-Up Details
Here are the details of the products used to make my shade cloth set-up. It is easy to pull over the structure if the day is going to be full sun, but I can also easily remove the netting on days of less light intensity to maximize the light received by the plant while limiting the unneeded heat.
The rope is smooth, so the plastic on the structure is not damaged and it is also easy to manually pull without the need for gloves. The green stakes are pounded in the ground on an angle and are purposely installed upside down so the wide stabilizing plate is exposed which makes the rope difficult to slip off even during times of wind.
Product Details:
Shad Cloth = 30% and 48ft. x 32ft. with brass gourmets along perimeter
Rope = 3/8in x 100ft polypropylene with a 244lb working load limit
|
|
�
|
|
Friday, August 9
|
View Page
|
 |
Reduced Fusarium Progression!
It seems the aggressive plant removal was worth it as the disease progression seems to have completely stopped. You can still see some of the potassium deficiency leaves, which just illustrates that some visual damage is permanent for the season. The plant now has sufficient potassium but this will not retroactively correct the yellow margins of the leaves that developed during the time of plant potassium deficiency.
The only down side to the aggressive plant removal is, based on some quick pumpkin taping the growth has slowed quite a bit after the main vine removal. However, I will gladly take a slow growing pumpkin over a pumpkin that rots due to Fusarium running down the main vine.
|
|
�
|
|
Saturday, August 10
|
View Page
|
 |
CYVD (Cucurbit Yellow Vine Decline)
Do you see those fait green colored leaves toward the center of the image? This is a sad sight to see, because this is characteristic CYVD which basically means the end of any pumpkin growth.
As I was doing a routine plant inspection and I noticed this issue and immediately after seeing it, identifying it, and taking this picture, the infected vine was removed. Since this was the first sign of the disease I hoped by being aggressive I could save the rest of the plant. However, this was not the case:-(
Cucurbit Yellow Vine Decline (CYVD) I feel is a bigger problem than is being currently recognized in New England. I am seeing it on multiple farms in addition to giant pumpkin growers. However, I have noticed it seems to be initially occurring at times of heat waves and growers are misdiagnosing the issue as heat related. Since blossom drop is common with high heat this is also a characteristic of CYVD (commonly seen on summer squash).
Needless to say, my pumpkin has completely stopped growing so the hope is that it will make it to the first weigh-off in the area the Woodstock Fair. However, approaching this problem from a scientific stand point I had the states head plant pathologist and lab diagnostician come out to collect leaves, vines and fruit samples to take back to the lab. While a specific bacterial species diagnosis was not able to be determined the likely agent was connected with CYVD.
Also, importantly for growers in the area, this issue was documented formally in the lab in hopes of generating the potential for future studies. One issue with grower only field diagnosis is that it does not become formally documented and without this formal documentation it is not counted as a potential problem. By initiating a conversation the hope is that there could be studies to better understand this disease in addition to increased awareness between scientist and extension agents in the area.
|
|
�
|
|
Friday, August 23
|
View Page
|
 |
CYVD (Cucurbit Yellow Vine Decline) Leaf Comparison
This images shows a clear comparison between an infected leaf (on right) compared to a normal leaf (on left). When identified early there can be this great difference visually between adjacent leaves before it runs down the vine.
CYVD is caused by a bacteria (Serratia marcescens) which is stated to be vectored by the squash bug (Anasa tristis) which I agree with. However, due to the wide spread of the disease and the seemingly fast speed of travel I am finding it hard to believe this disease is only spread by this squash bug.
This bacteria proliferates in the phloem of the plant (tissue responsible for sugar transport, unlike Fusarium which is mainly found in the water conducting tissue called the xylem). The reason I mention this is aphids are phloem feeders and while they may not currently be connected to CYVD, they do feed on the same conductive tissue the bacteria is known to reside. In contrast, cucumber beetles are known to be carries of bacterial wilt, but this is typically found in the xylem tissue.
|
|
�
|
|
Friday, August 23
|
View Page
|
 |
CYVD (Cucurbit Yellow Vine Decline) Leaf Comparison
Here the coloration difference is a bit more subtle. I am holding a normal looking leaf on the left side for comparison to the infected leaf on the right.
-Why am I showing this?
Because this is the level of detection that can come with experience and when a grower can better understand the �normal� plant it can allow them to spot issues early and make adjustments that newer growers may not catch until much later.
I include this to stress the importance of understanding your plants and being able to know the normal is. Once this is established the abnormal can be identified early and details associated with the change can provide clues for implementing a procedure for correction.
In this case, there is nothing that could be done, but knowing this, I shifted plans for this pumpkin to an early weigh-off and not wasting any additional resources allows for the greatest chance at getting the pumpkin to the scale.
|
|
�
|
|
Friday, August 23
|
View Page
|
 |
CYVD (Cucurbit Yellow Vine Decline) Leaf Comparison
Here is a close-up of the normal leaf (on the left) and infected leaf (on the right).
Attention to detail is key when growing giant pumpkins. While the posted image may not exactly replicate what is seen in the field, it is important to realize that attention to detail is important.
For example, even though I am showing the difference between a normal and CYVD infected leaf, if you look closely at the normal leaf in the 12 o�clock position you will see some evidence of slight potassium deficiency. While early detection is important so are proactive and quick adjustments to prevent further progression. You will also notice that this potassium deficiency issue is isolated to this region, indicating a quick in-season adjustment to prevent continued progression.
|
|
�
|
|
Friday, August 23
|
View Page
|
 |
Outdoor 1989.5 dmg Daletas �17 (x sibling (indoor plant))
Due to CYVD the plant was removed early since the pumpkin growth completely stopped, which is characteristic of this disease. Leaving a pumpkin outside in the elements typically leads to only bad things, so this is why I decided to harvest it well in advance of the actual weigh-off date, so that I could store it a protected area.
After all the work and seeing the plant and pumpkin responding to the adjustments I was making during the season, it is sad to see the growth get cut short of its true potential. However, I believe that a pumpkin at the scale is an accomplishment, no matter the size, so as long as it does not rot, I will be loading it up for the Woodstock Fair.
|
|
�
|
|
Friday, August 23
|
View Page
|
 |
Outdoor 1989.5 dmg Daletas �17
In an effort to reduce the local areas inoculum of CYVD, I decided the load the entire plant up in the trailer (5ft x 8ft or about 2+cubic yards) and take it off site. While the 25+mile drive may be a bit excessive, this is where I have permission to add some pumpkin plant debris. Also, the dump trailer body makes the unloading process very quick and easy. Once back home the trailer was rinsed out and it was ready for the loading of the actual pumpkin.
|
|
�
|
|
Thursday, August 29
|
View Page
|
 |
1353 DeBacco �19 (F: Outdoor 1989.5 dmg Daletas �17 x sibling (indoor plant)) 19% heavy
Official weigh-off OTT = 375.5�
Team-Pumpkin estimated weight = 1137.5 pounds
Team-Pumpkin Enhanced Estimated weight range = 1038-1235.5 pounds
It is hard to believe I had this same exact weight back in 2008 and it was the Connecticut State Record. This pumpkin had a tall shape and the final weight was reduced due to the plant becoming infected with YVD (Yellow Vine Decline). However, I am happy to get it to the scale and very happy that it went so heavy to chart.
Also, when considering how heavy a pumpkin is to chart is one thing, I think is important to realize is what the general normal expected weight range is for any size pumpkin. This is why I have included the Team-Pumpkin estimated weight range for a pumpkin with an OTT of 375.5�. To see the actual weight 9.5% over the upped expected weight range is an important factor to realize and also provide some context for just how dense this pumpkin was.
|
|
�
|
|
Sunday, September 1
|
View Page
|
 |
1353 DeBacco �19 (F: Outdoor 1989.5 dmg Daletas �17 x sibling (indoor plant)) 19% heavy
This shows the pumpkin after it was carved for display at the Woodstock Fair. This was another popular, well attended and supported event. Many thanks to all who make this weigh-off a great success!
It was great to see the final product and the pumpkin was also in great shape all the way through. The tall shape and smooth surface made it an ideal canvas for the carving. This year the Woodstock Fair was acknowledging the 50th year anniversary of the famous Woodstock Music Festival.
|
|
�
|
|
Sunday, September 15
|
View Page
|
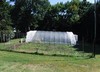 |
Season Extender 2019 Season Wrap-up
This shows the final set-up of the season extender with the outdoor plant removed to provide a clearer picture of the structure. Overall, from a functional and mechanical stand point I was very happy with how my plan came together this year. In the next few posts I am going to highlight some of the structural components that were used.
To give an idea of the general size this structure is 40ft. long, 32ft wide and about 12ft. tall with 6mil clear single layer plastic.
The shade netting is 30% and is 48ft x 32ft.
|
|
�
|
|
Sunday, September 15
|
View Page
|
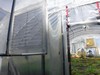 |
Entrance Door View
Here the plant has just been removed along with the carbon dioxide enrichment systems, as I start clearing things out to get ready for the pumpkin harvest.
The Door = ZipDoor�
To get in and out of the structure while still having the option to �seal� the doorway required some innovation. I settled on getting a ZipDoor� Standard Door Kit for each side of the structure. It fits the requirements well, but the actual zipper needs some tape reinforcement to hold it in place.
Insect Netting over Vent = Protek Net Insect Netting in the 25 gr model
This is Protek Net Insect Netting in the 25 gr model. Some of the specifications are that it has 0.35mm x 0.35mm mesh size with 62% porosity, 90% light transmission, and a 2-3 year stated lifespan. This fine mesh was selected to provide a physical barrier to small insects such as aphids, thrips, white flies and mites but required the special boxes to not restrict overall air flow.
HAV Fan (top of structure)
This Atlas HAV (Horizontal Air Flow) 18� and 1/10hp, 1 amp fan moves 1790 CFM (Cubic Feet per Minute) at 1600 RPM (Revolutions Per Minute) which, will run 24-hours a day so even when the large yellow exhaust fan is off, so the air will continually be mixed.
Venting Fan (large yellow)
The large yellow fan is a Dayton outdoor mobile air circulator that has 42� diameter blades and has two speeds of 9,000cfm and 15,000cfm.
CO2 mixing fan (black fan on ground)
Under the scaffolding is a black 20� Hurricane Pro Heavy Duty Orbital wall/floor fan that is rated at 4,500cfm and a max 1,400rpm. This fan is pointed at the plant and is intended to help mix the carbon dioxide that will be supplemented. This fan oscillates inside the protective wire cage which is a nice feature.
|
|
�
|
|
Sunday, September 15
|
View Page
|
 |
Venting Intake: 48� aluminum high velocity shutter vent (Specifically: Dayton 48� Backdraft Damper model # 4FZJ2)
Motorized Shutter Kit for 12-60 in. shutters, #1260 Motor, with cord
This shows the final set-up for my outside air venting system. If you look in the middle on the lower side of the shutter, you will notice an electric motor. This was connected to a thermostat that would engage the motor when the temperature reached about 85F. While there was no fan to assist the air coming in when the thermostat was engaged there were two vents opening at the same time as the upper vent and the exhaust fan would come on at the same time. This created a flow through of air that allowed for efficient cooling with minimal loss of CO2 that was being added to the environment below the pumpkin leaf canopy.
|
|
�
|
|
Sunday, September 15
|
View Page
|
 |
Open Vent Intake
This is a high flow vent and looking through it the protective box with insect netting can be seen. By having this set-up it allowed for air to move in without the threat of insects. I also used the Protek Net Insect Netting in the 25 gr model which is fine enough to prevent aphids from getting through. However, to compensate for this fine mesh the area of insect netting was increased over the standard opening to help ensure the air flow was not being restricted.
Considering my outside plant became infected with YVD and the indoor plant did not, this support the effectiveness of the insect barriers that were put in place.
The shutter and motor combination both worked flawlessly for the season and the details for each are:
Venting Intake: 48� aluminum high velocity shutter vent exhaust vent (Specifically: Dayton 48� Backdraft Damper model # 4FZJ2)
Motorized Shutter Kit for 12-60 in. shutters, #1260 Motor, with cord.
|
|
�
|
|
Sunday, September 15
|
View Page
|
 |
Inside Looking Out
The important note in this image is the curtain of insect netting which is (hard to see but) located between the door opening and the vent. This was always kept covering to door except for entering it was on a hinge and swung away when I entered and then immediately came back in place to act as a physical barrier between the outside and inside. Since the door actually has zippers it �sealed� but the addition of the insect netting helped ensure a barrier to insects as I may be entering and exiting so there was even less chance of an unwanted insect sneaking in;-)
Misting system inside the structure was just the two in the image that have been taken down already. Both of these seems to work out well to maintain the inside temperature close to the outside even during the heat of a sunny day.
Mister Specifics:
The white vertical PVC (polyvinyl chloride) pipes have Senninger Upright mini-Wobbler� outfitted with the #4 nozzle light blue (1/16�) which has a flow rate of 0.50 gpm (gallons per minute) and an approximate 32ft. diameter of coverage since I am running them at 20psi. These are intended to provide a cooling mist and not irrigate the plant. (Drip tapes are the intended irrigation source.) Adjustments were made over the course of the season, but a run time of 5min. every 15min. form 10am to 5pm was the starting base line.
|
|
�
|
|
Sunday, September 15
|
View Page
|
 |
Dual Intakes (Specifically: Dayton 48� Backdraft Damper model # 4FZJ2)
To help ensure that sufficient air was taken in duel intakes were utilized. While it may appear each is on a completely different level this is a bit of an optical illusion. The ground is not level so this is what is causing the vents to seem like they are vastly different heights. This system worked out great for the entire season.
In the middle of the structure toward the top, an HAV (Specifically: Atlas HAV (Horizontal Air Flow) 18� and 1/10hp, 1 amp) fan can be seen which ran 24-hr a day every day (with no issues) to help keep the air continually mixing and reducing the potential for thermal stratification in the structure.
Also, the 30% shade netting is over the structure and the impact on the light penetration even with carbon dioxide enrichment is not hindering plant growth. However, the added benefit is reduction in the heat that needs to be exhausted which is intended to lessen the plant stress so the misters put in place can be more effective.
|
|
�
|
|
Sunday, September 15
|
View Page
|
 |
Exhaust Fan (42� Dayton outdoor mobile air circulator)
This fan could move a lot of air and worked well all season. It has two settings which allowed some flexibility. The low setting (9,000cfm) was the default and the high setting (15,000cfm) was used when temperatures were predicted to be 85+F for daytime highs to help move as much air through the structure as possible.
Fan Specifics:
The large yellow fan is a Dayton outdoor mobile air circulator that has 42� diameter blades and two speeds. On low it will it will run 9,000cfm at 4.6 Amps and on high 15,000cfm at 5.3 Amps. This is an industrial air circulator that has a water-resistant motor which is important because of the mist cooling system I have installed will result in a consistently high humid environment.
|
|
�
|
|
Sunday, September 15
|
View Page
|
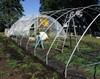 |
6mil Clear Plastic Is Down
It is getting to be close to being able to remove the pumpkin. Almost all of the preparation work has been completed and once the 18� Atlas HAV fan is taken down then the hoops will be removed, so I can set the tripod up and then drive the trailer in. This is one of the advantages of having a cold frame, because it is not a permanent structure and can be completely remove from the field. The process may take a little time, but part of the challenge of design and set-up has been to have a fully functional structure while still maintaining portability.
After this image things got busy as I was trying to get everything done before the sun set so the next entry will be the pumpkin on the scale after its 4 hour drive north.
|
|
�
|
|
Saturday, September 21
|
View Page
|
 |
1412 DeBacco �19 (F: Indoor 1989.5 dmg Daletas �17 x self) 25% heavy
Official weigh-off OTT = 374.5�
Team-Pumpkin estimated weight = 1128.5 pounds
Team-Pumpkin Enhanced Estimated weight range = 1030-1226 pounds
Wow, what a surprise on the scale! This pumpkin was actually one inch smaller than my outdoor grown pumpkin (same seed) but ended up 59 pounds greater, even though my other pumpkin was also very heavy to chart. Also, looking at the Team-Pumpkin enhanced chart and how much this pumpkin is over the upper expected range (15%) of the estimated chart.
I took this pumpkin on a four hour drive (and two left turns) to the Vermont weigh-off because of the supportive group they are. Their winter meetings are always a great time and they get a lot of entries which is great to see. New to veteran growers are all in attendance so it also provides time to get to talk with other growers.
The question I get asked is� �Did the CO2 make the high percentage heavy to chart?� I am not sure, but I can say that it did not hurt the pumpkins density. Even though both pumpkins full potential was cut short by various diseases, the fact that they both ended up with-in one inch OTT of each other is very interesting. So, while the seed was the same and the relative size/estimated volume was almost identical it is an interesting note that the CO2 enriched pumpkin was so noticeably heavier to chart.
Now, this is only a sample size of one, but if nothing else it is interesting that the estimated growth rates of the indoor and outdoor pumpkins were similar (and not that impressive), but there is the possibility of increased density with the indoor grown pumpkin. Enriching with CO2 should create more biomass (in theory) and it certainly made the plant grow like I have not seen before, but this rapid plant growth did not translate into rapid pumpkin growth. However, it is possible that the overall mass was influenced by the elevated CO2 levels.
|
|
�
|
|
Wednesday, September 25
|
View Page
|
 |
1412 DeBacco �19 (F: Indoor 1989.5 dmg Daletas �17 (x self)) 25% heavy
This is one of the displays the pumpkin went to after the weigh-off which was a local farmers market. Sharing the pumpkin with others is another fun aspect of pumpkin growing. Even though this was not a very orange pumpkin there seems to be a shift in some of the public�s opinion that the all white coloration is �in�. I personally, still like the traditional orange coloration the best, but regardless I was very happy with the weight of this pumpkin.
|
|
�
|
|
Friday, September 27
|
View Page
|
 |
One of the goals of Team-Pumpkin is to educate people about what it takes to grow a giant pumpkin. At the fairs, to reduce repeat questions from visitors large (4ft x 8ft) custom outdoor grade vinyl signs with gourmets were created and have proven very effective and well received. The quality photos and short descriptions help people understand some of the main points of the growing season. Also, having the large images helps to show people some key aspects of the growing phases and this is something I would recommend any group invest in that has public interaction.
This entry shows one of the signs used along with some of the story behind the image that pumpkin growers may appreciate.
Specifics of This Sign Are�
This sign actually shows the 2009 Wallace seed that grew my 220 DeBacco �13 �Snowball� as it was taken around Thanksgiving and the posters were made in the off-season.
*I make a good hand model;-)
|
|
�
|
|
Friday, September 27
|
View Page
|
 |
One of the goals of Team-Pumpkin is to educate people about what it takes to grow a giant pumpkin. At the fairs, to reduce repeat questions from visitors large (4ft x 8ft) custom outdoor grade vinyl signs with gourmets were created and have proven very effective and well received. The quality photos and short descriptions help people understand some of the main points of the growing season. Also, having the large images helps to show people some key aspects of the growing phases and this is something I would recommend any group invest in that has public interaction.
This entry shows one of the signs used along with some of the story behind the image that pumpkin growers may appreciate.
Specifics of This Sign Are�
Here an easy to construct cold frame is pictured which follows the directions provided in this video: https://www.youtube.com/watch?v=2y_9s9AQqYc
|
|
�
|
|
Friday, September 27
|
View Page
|
 |
One of the goals of Team-Pumpkin is to educate people about what it takes to grow a giant pumpkin. At the fairs, to reduce repeat questions from visitors large (4ft x 8ft) custom outdoor grade vinyl signs with gourmets were created and have proven very effective and well received. The quality photos and short descriptions help people understand some of the main points of the growing season. Also, having the large images helps to show people some key aspects of the growing phases and this is something I would recommend any group invest in that has public interaction.
This entry shows one of the signs used along with some of the story behind the image that pumpkin growers may appreciate.
Specifics of This Sign Are�
This image is important to point out the direction that the vine will start to run. The water bottles are there for absorbing the heat of the day and help reduce temperature extremes to the plant.
The seedling was one of the 1385 Jutras �07 seeds I have been fortunate to grow which seemed to always produce nice looking plants that were easy to mange and yielded problem free pumpkins.
|
|
�
|
|
Friday, September 27
|
View Page
|
 |
One of the goals of Team-Pumpkin is to educate people about what it takes to grow a giant pumpkin. At the fairs, to reduce repeat questions from visitors large (4ft x 8ft) custom outdoor grade vinyl signs with gourmets were created and have proven very effective and well received. The quality photos and short descriptions help people understand some of the main points of the growing season. Also, having the large images helps to show people some key aspects of the growing phases and this is something I would recommend any group invest in that has public interaction.
This entry shows one of the signs used along with some of the story behind the image that pumpkin growers may appreciate.
Specifics of This Sign Are�
In this image there is a SVB (Squash Vine Borer) trap that is properly placed along with drip irrigation (the black lines). In addition the plant is exhibiting initial signs of water stress and has been vine buried. All of these little details can be selectively pointed out depending on the person you are talking with.
|
|
�
|
|
Friday, September 27
|
View Page
|
 |
One of the goals of Team-Pumpkin is to educate people about what it takes to grow a giant pumpkin. At the fairs, to reduce repeat questions from visitors large (4ft x 8ft) custom outdoor grade vinyl signs with gourmets were created and have proven very effective and well received. The quality photos and short descriptions help people understand some of the main points of the growing season. Also, having the large images helps to show people some key aspects of the growing phases and this is something I would recommend any group invest in that has public interaction.
This entry shows one of the signs used along with some of the story behind the image that pumpkin growers may appreciate.
Specifics of This Sign Are�
At the Durham Fair the name of the giant pumpkin competition is �Queen of the Pumpkin Patch� (formally named �King of the Pumpkin Patch�) so a common question from the public is where is the King? Educating people that all pumpkins are female is helpful with a visual aid comparing male and female flowers that are shown on this poster. There are two angles; one is what the flowers look like on the inside and the other shows the exterior which makes for easy identification as soon as the flower is formed.
|
|
�
|
|
Friday, September 27
|
View Page
|
 |
One of the goals of Team-Pumpkin is to educate people about what it takes to grow a giant pumpkin. At the fairs, to reduce repeat questions from visitors large (4ft x 8ft) custom outdoor grade vinyl signs with gourmets were created and have proven very effective and well received. The quality photos and short descriptions help people understand some of the main points of the growing season. Also, having the large images helps to show people some key aspects of the growing phases and this is something I would recommend any group invest in that has public interaction.
This entry shows one of the signs used along with some of the story behind the image that pumpkin growers may appreciate.
Specifics of This Sign Are�
Giving people an idea of how fast these pumpkins can grow is important because some think it takes years to grow a giant pumpkin. This shows just how big a pumpkin can be in July.
Also, the umbrella is the source of some questions since many people want to know, why is it there? I use the umbrella to help keep the stem dry. In addition the umbrella also serves as a relative size comparison to the next growing season progression image.
|
|
�
|
|
Friday, September 27
|
View Page
|
 |
One of the goals of Team-Pumpkin is to educate people about what it takes to grow a giant pumpkin. At the fairs, to reduce repeat questions from visitors large (4ft x 8ft) custom outdoor grade vinyl signs with gourmets were created and have proven very effective and well received. The quality photos and short descriptions help people understand some of the main points of the growing season. Also, having the large images helps to show people some key aspects of the growing phases and this is something I would recommend any group invest in that has public interaction.
This entry shows one of the signs used along with some of the story behind the image that pumpkin growers may appreciate.
Specifics of This Sign Are�
A common quote restated by people viewing this sign is �pumpkins can grow over 1 pound every hour!� Now this is only 24 pounds a day but it helps provide better context for people regarding just how fast the pumpkins can grow. Also, having the same umbrella as the previous image helps give some idea of how big the pumpkin has gotten over the last month.
|
|
�
|
|
Friday, September 27
|
View Page
|
 |
One of the goals of Team-Pumpkin is to educate people about what it takes to grow a giant pumpkin. At the fairs, to reduce repeat questions from visitors large (4ft x 8ft) custom outdoor grade vinyl signs with gourmets were created and have proven very effective and well received. The quality photos and short descriptions help people understand some of the main points of the growing season. Also, having the large images helps to show people some key aspects of the growing phases and this is something I would recommend any group invest in that has public interaction.
This entry shows one of the signs used along with some of the story behind the image that pumpkin growers may appreciate.
Specifics of This Sign Are�
�How do you lift the pumpkins?� This is another common question that can be difficult to describe, but with a picture it can help the explanation process quite a bit.
|
|
�
|
|
Friday, September 27
|
View Page
|
 |
One of the goals of Team-Pumpkin is to educate people about what it takes to grow a giant pumpkin. At the fairs, to reduce repeat questions from visitors large (4ft x 8ft) custom outdoor grade vinyl signs with gourmets were created and have proven very effective and well received. The quality photos and short descriptions help people understand some of the main points of the growing season. Also, having the large images helps to show people some key aspects of the growing phases and this is something I would recommend any group invest in that has public interaction.
This entry shows one of the signs used along with some of the story behind the image that pumpkin growers may appreciate.
Specifics of This Sign Are�
Pumpkin boats may be told to people, but some think you are not telling the truth, so a picture provides some proof. This may be a little extreme, so there is also an image of a pumpkin carved to demonstrate the special possibilities due to the thickness of the pumpkin flesh.
|
|
�
|
|
Friday, September 27
|
View Page
|
 |
One of the goals of Team-Pumpkin is to educate people about what it takes to grow a giant pumpkin. At the fairs, to reduce repeat questions from visitors large (4ft x 8ft) custom outdoor grade vinyl signs with gourmets were created and have proven very effective and well received. The quality photos and short descriptions help people understand some of the main points of the growing season. Also, having the large images helps to show people some key aspects of the growing phases and this is something I would recommend any group invest in that has public interaction.
This entry shows one of the signs used along with some of the story behind the image that pumpkin growers may appreciate.
Specifics of This Sign Are�
In an effort to show all the places around the world Team-Pumpkin has been there have been a few traveling signs made. This simple �Team-Pumpkin� sign has been photographed in a few easily recognizable places to show that we are everywhere there are growers.
|
|
�
|
|
Friday, September 27
|
View Page
|
 |
One of the goals of Team-Pumpkin is to educate people about what it takes to grow a giant pumpkin. At the fairs, to reduce repeat questions from visitors large (4ft x 8ft) custom outdoor grade vinyl signs with gourmets were created and have proven very effective and well received. The quality photos and short descriptions help people understand some of the main points of the growing season. Also, having the large images helps to show people some key aspects of the growing phases and this is something I would recommend any group invest in that has public interaction.
This entry shows one of the signs used along with some of the story behind the image that pumpkin growers may appreciate.
Specifics of This Sign Are�
Even if you do not want to grow pumpkins, Team-Pumpkin supports the production of other crops.
|
|
�
|
|
Friday, September 27
|
View Page
|
 |
One of the goals of Team-Pumpkin is to educate people about what it takes to grow a giant pumpkin. At the fairs, to reduce repeat questions from visitors large (4ft x 8ft) custom outdoor grade vinyl signs with gourmets were created and have proven very effective and well received. The quality photos and short descriptions help people understand some of the main points of the growing season. Also, having the large images helps to show people some key aspects of the growing phases and this is something I would recommend any group invest in that has public interaction.
This entry shows one of the signs used along with some of the story behind the image that pumpkin growers may appreciate.
Specifics of This Sign Are�
If you have helped out answering questions next to giant pumpkins, odds are very good that you have been asked, �do you inject it with milk?� This poster attempts to provide a beneficial use for milk which is as an organic product for the suppression of powdery mildew. It provides the dilution rate and also clearly states that milk is NOT injected into the vines because it causes them to rot. I can say, this has helped reduce the amount of times I have been asked this question, but it took repeated years of having this sign up before any reduction in milk related questions was noticed;-)
|
|
�
|
|
Friday, September 27
|
View Page
|
 |
One of the goals of Team-Pumpkin is to educate people about what it takes to grow a giant pumpkin. At the fairs, to reduce repeat questions from visitors large (4ft x 8ft) custom outdoor grade vinyl signs with gourmets were created and have proven very effective and well received. The quality photos and short descriptions help people understand some of the main points of the growing season. Also, having the large images helps to show people some key aspects of the growing phases and this is something I would recommend any group invest in that has public interaction.
This entry shows one of the signs used along with some of the story behind the image that pumpkin growers may appreciate.
Specifics of This Sign Are�
This just provides some general growing giant pumpkin tips. A few unique images that provide some general tips to help someone who wants to get started growing giant pumpkins.
|
|
�
|
|
Friday, October 4
|
View Page
|
 |
New Connecticut State Record the 2,294.5 pounds!
Congratulations to Alex Noel who won the Topsfield Fair and set a new Connecticut State Record! This a picture of the pumpkin where it will be on display in the Topsfield Fair box of honor.
|
|
�
|
|
Saturday, October 5
|
View Page
|
 |
Roy Moore Lobster Co. in Rockport, Massachusetts
After the Topsfield Fair it has become tradition to have a three lobster breakfast on Saturday morning at Roy Moore Lobster Co. This year Holly and Dan were able to join me which was a great time.
|
|
�
|
|
Saturday, October 5
|
View Page
|
 |
Team-Pumpkin at Roy Moore Lobster Co. in Rockport, Massachusetts
If you stop by Roy Moore�s check out the wall for the Team-Pumpkin patch! Also, if you are a member of police fire or military and have a patch of your own bring it by, I am sure they would like to display it for you.
|
|
�
|
|
Saturday, October 26
|
View Page
|
 |
New York Botanical Gardens
It is another year at the New York Botanical Gardens where the big pumpkins from the year are displayed. This is one of the plastic pumpkins that are on display in the display area gardens.
|
|
�
|
|
Saturday, October 26
|
View Page
|
 |
New York Botanical Gardens: Paint with Water
Here is Dan taking advantage of the lack of kids competing for the �paint with water� station early in the morning. When we came by later in the day this was a very popular activity.
|
|
�
|
|
Saturday, October 26
|
View Page
|
 |
New York Botanical Gardens: Seed Harvesting
This is a great image!
Here you can see Kenia Pittman from the New York Botanical Gardens who had seen the seed harvest process before but wanted a more active role this year, Woody Lancaster on top of his pumpkin and myself. This is a quality image, with some quality pumpkin seeds.
|
|
�
|
|
Saturday, October 26
|
View Page
|
 |
New York Botanical Gardens: Seed Harvesting Public Viewing
While the close-up image may be popular, I like this image as it shows just how popular this event it for the public. Thanks to Dan and Holly for the image� I was a little busy at the moment.
|
|
�
|
|
Saturday, October 26
|
View Page
|
 |
New York Botanical Gardens Group Shot
Names listed from left to right�
Leonardo Urena, Gary Grande (The Wiz and GPC President), Dan Boyce, Joe Jutras, Matt DeBacco, Holly Boyce, Wood Lancaster, Todd Kline
Front and Center = Mario Van Geel (all the way from Kasterlee Belgium)
|
|
�
|
|
Tuesday, December 31
|
View Page
|
 |
2019 Growing Season Summary
Indoor High Tunnel Grown Pumpkin with Carbon Dioxide Enrichment (700ppm-1000ppm)
1412 DeBacco �19 (F: Indoor 1989.5 dmg Daletas �17 (x self)) 25% heavy
Traditional Outdoor Grown Pumpkin
1353 DeBacco �19 (F: Outdoor 1989.5 dmg Daletas �17 x sibling (indoor plant)) 19% heavy
|
|
�
|
