| |
|
Click on a thumbnail picture below to see the full size version.
|
53 Entries.
|
|
Tuesday, March 15
|
View Page
|
 |
Anthesis (Cucurbit Maxus)
I want to thank everyone for their support of the product I have developed to help increase the rate and duration of cell division. I have been very happy to see the positive results come in from growers from last year. In one case, to see a 13% increase in final weight when compared to two control (no Anthesis applied) pumpkins in the same grower’s patch was similar to the result that the data suggested. I think many growers were shocked by the very small amount of product that can cause such a large effect on growth.
One of the difficult concepts to get growers to understand is that pumpkins that have been treated with Anthesis are smaller during the first 35-40 days than an untreated pumpkin. This is because of the delay in cell expansion due to the increased rate and duration of cell division. At the end of the season, there are more cells that will allow for improved end of season growth.
To finally see all of the research that I have done pay off with improved growth is very rewarding.
|
|
|
|
Tuesday, March 15
|
View Page
|
 |
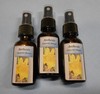
Anthesis Storage, Mixing and Applying
Proper storage of plant hormones is very important in order to maintain their effectiveness. Since the degree of precision is so exact, it is important to make sure there is an active ingredient that has not degraded. The shelf life can be drastically reduced depending on the conditions it is stored in. When dealing with the cell signaling, these small details are very important to be sure to get the proper effect. I have researched to determine the proper concentration and timing to target the specific cell signaling related to cell division.
The packaging that I use makes the mixing procedure very easy. All you need to do is get distilled water, and add all of the contents from both the brown and the blue vials. The final volume should be 30mL or 1oz. This mix should be done right before you plan on using it. Once the contents are mixed, you should apply them because they are breaking down, which is what is needed to influence the cellular process. The application timing should be 48-hours after pollination to allow for the maximum effectiveness.
|
|
|
|
Tuesday, April 19
|
View Page
|
 |
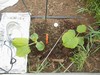
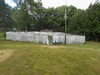
Patch Ready
After many hours of work, the patch is now ready for the plants. I added my amendments, tilled them in, installed heating cables, put out the drip irrigation, then the cold frames along with heat lamps and spike irrigation, and after this, power and water lines were run to make everything operational. I put the reptile heat lamps on a timer that has them automatically come on at sunset and turn off at sunrise. (Automation is a great thing.) I also put down weed block in the area that I had tilled to keep the weed pressure down
|
|
|
|
Tuesday, April 19
|
View Page
|
 |
2016 Seed Line-Up
1998.5 Jutras ’15 (F: 1317 Clementz ’13 x M: 1916 Barron ’14)
1945.5 Daletas ’15 dmg (F: 1554 Mathison ’11 x M: 1744.5 Fulk ’13)
1744.5 Fulk ’13 (F: 220.3 DeBacco ’13 “Snowball” x M: 1789 Wallace ’11 est)
1676.5 Daletas ’12 (F: 1381 Checkon ’10 x M: 1495 Stelts ’10)
1662.0 DeBacco ’15 (F: 1916 Barron ’14 x M: 1676.5 Daletas ’12)
823 House ’15 est (F: 811 Gerhardt ’11 x M: 359 Foss ’13)
|
|
|
|
Sunday, May 1
|
View Page
|
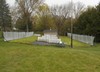 |
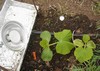
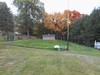
May 1st Patch Overview
The pumpkin patch is slowly coming together for the 2016 season. It seems there is always something to do, but I think I am staying on top of all of the required tasks. There have been some cold nights, but my heaters are doing their job.
|
|
|
|
Sunday, May 1
|
View Page
|
 |
1998.5 Jutras ’15 (F: 1317 Clementz ’13 x M: 1916 Barron ’14)
After seeing this pumpkin and the resulting pollinating pumpkin, I think this has a great chance for orange color and percent heavy. Both pumpkins had a longer shape to them, and the color was also great on both of them. It is always interesting to select an unproven seed that, based on what I have seen in person and on paper, should have some of the qualities I am interested in.
|
|
|
|
Sunday, May 1
|
View Page
|
 |
1945.5 Daletas ’15 dmg (F: 1554 Mathison ’11 x M: 1744.5 Fulk ’13)
This is my “take a chance” seed pick. I am fortunate to be able to grow six pumpkin plants, so when I talked with Steve himself, I learned that this was a pumpkin that split early in the season and was still able to achieve this size, so I wanted to give it a chance. As growers, we are trying to push the limits, and this one is very close to the thin grow vs. split line, so it will be interesting to see how it performs in the patch. I am hoping the pollinator may stabilize the growth and ensure a uniform shape, but this is the excitement of trying an unproven seed.
|
|
|
|
Sunday, May 1
|
View Page
|
 |
1744.5 Fulk ’13 (F: 220.3 DeBacco ’13 “Snowball” x M: 1789 Wallace ’11 est)
I decided to give this seed another chance since last year it grew my “biggest” (based on measurements) pumpkin, but it developed a small rot spot just before the weigh-off and was never officially weighed. The shape tends to be very uniform, and the color should be white, based on the 220.3 DeBacco “Snowball” genetics it has in its immediate background. It is fun to grow a seed that has your own genetics in the lineage that someone else has been breeding with.
|
|
|
|
Sunday, May 1
|
View Page
|
 |
1676.5 Daletas ’12 (F: 1381 Checkon ’10 x M: 1495 Stelts ’10)
Looking at the past, this seed has always performed well for me; even in a heavily virus-infected year, I was still able to get a pumpkin from this seed to the scale. Also, when a seed grows your personal best and your second heaviest fruit to date, it is hard not to plant it. This seed has produced consistent percent heavy for me as well, which has been a nice surprise at the scales.
|
|
|
|
Sunday, May 1
|
View Page
|
 |
1662.0 DeBacco ’15 (F: 1916 Barron ’14 x M: 1676.5 Daletas ’12)
This is my selection from my last year’s crop. I like the fact that it went 13% heavy, and I really like the fact that the pollinator was 19% heavy. This is one of those crosses that I had planned out during the off-season, and it was nice to see the plan work out in the end.
|
|
|
|
Sunday, May 1
|
View Page
|
 |
823 House ’15 est (F: 811 Gerhardt ’11 x M: 359 Foss ’13)
Based on the background of this seed, I think it has some great “big and orange” genetics. When you are targeting consistent orange color, it is typically advised to plant a seed that you can see some offspring from, but someone has to take the chance. Personally, I think the odds are strongly in my favor for bright orange color.
|
|
|
|
Sunday, June 12
|
View Page
|
 |
Annual Patch Update…
Typically, this is the time of year where the plants are just starting to get going and the season is underway with excitement for what they year will bring. However, for me this year it has been with great disappointment and frustration. While I have been growing for the last 16 years each year has had a set of challenges and list of ways I could have made improvements. Sometimes problems are simply out of your control and this is what I feel this year is going to result in.
My plants were off to a slower than normal pace, but everything was looking ok with no reason for concern. I set-up my insect netting and have been spraying garlic barrier and releasing my Green Lacewing beneficial insects to combat the early season aphid issues I have had in the past. However, it seems my problem this year is more macroscopic, because there is a squirrel in the area that has developed a liking for pumpkin plants. This is very odd as I have always had a few squirrels around and if anything this year there are fewer than normal.
With the reflective insect netting up (in addition to the metal fencing and chicken wire) I have not had any issues with woodchucks and squirrels in the patch, at least up to this point. I originally thought I had chipmunks doing the damage but one day I caught a squirrel right on top of one of my main vines. Also the extent of the damage is too large for a chipmunk.
Not sure what to do at this point other than making sure all of my fishing equipment is in good order as it looks like it will be getting used with greater frequency than last year.
|
|
|
|
Sunday, June 12
|
View Page
|
 |
1998.5 Jutras ’15 (F: 1317 Clementz ’13 x M: 1916 Barron ’14)
This plan was a little slow to get going but was starting to show signs of life until the squirrel ate the main vine tip along with three of the leading secondary vines. This is certainly frustrating especially considering I have not experienced a problem like this before.
While it seems the standard for comparison this time of year is main vine length, I have had plants in the past that grow a great main vine but do not ‘fill-in’, so I developed the idea of Leaf Area Estimation which is basically the area of a triangle. (This works best for the standard Christmas Tree style of pruning.) All you have to do is measure the width of the plant and the length of the main vine. Then it is simply (1/2)*(width of the plant)*(main vine length) = Leaf Area Estimation.
Leaf Area Estimation= 33 square feet
Main Vine Length= 11 feet
|
|
|
|
Sunday, June 12
|
View Page
|
 |
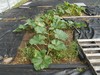
1945.5 Daletas ’15 dmg (F: 1554 Mathison ’11 x M: 1744.5 Fulk ’13)
One of the more aggressive plants in the patch, there are only two side vines that currently still have their growing meristems intact. Very sad to see, as I even tried to put aluminum foil by the main to deter further damage but this did not help, and there is currently no main vine.
While it seems the standard for comparison this time of year is main vine length, I have had plants in the past that grow a great main vine but do not ‘fill-in’, so I developed the idea of Leaf Area Estimation which is basically the area of a triangle. (This works best for the standard Christmas Tree style of pruning.) All you have to do is measure the width of the plant and the length of the main vine. Then it is simply (1/2)*(width of the plant)*(main vine length) = Leaf Area Estimation.
Leaf Area Estimation= 42 square feet
Main Vine Length= 12 feet
|
|
|
|
Sunday, June 12
|
View Page
|
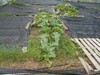 |
1744.5 Fulk ’13 (F: 220.3 DeBacco ’13 “Snowball” x M: 1789 Wallace ’11 est)
This plant is behaving very “220.3 DeBacco Snowball”-like with it slow to develop pattern but once the second half of June kicks in the plants typically are very aggressive to the season’s end. The only positive is this is the only plant (as of today) that has its main vine intact. I am not sure how long this will last but at least it is able to keep putting on vine length.
While it seems the standard for comparison this time of year is main vine length, I have had plants in the past that grow a great main vine but do not ‘fill-in’, so I developed the idea of Leaf Area Estimation which is basically the area of a triangle. (This works best for the standard Christmas Tree style of pruning.) All you have to do is measure the width of the plant and the length of the main vine. Then it is simply (1/2)*(width of the plant)*(main vine length) = Leaf Area Estimation.
Leaf Area Estimation= 32.5 square feet
Main Vine Length= 13 feet
|
|
|
|
Sunday, June 12
|
View Page
|
 |
1676.5 Daletas ’12 (F: 1381 Checkon ’10 x M: 1495 Stelts ’10)
Very hard hit plant with squirrel damage as every side vine has damage and the main vine has been eaten down about two feet with damage continuing even on the leaf stalks.
While it seems the standard for comparison this time of year is main vine length, I have had plants in the past that grow a great main vine but do not ‘fill-in’, so I developed the idea of Leaf Area Estimation which is basically the area of a triangle. (This works best for the standard Christmas Tree style of pruning.) All you have to do is measure the width of the plant and the length of the main vine. Then it is simply (1/2)*(width of the plant)*(main vine length) = Leaf Area Estimation.
Leaf Area Estimation= 40.25 square feet
Main Vine Length= 11.5 feet
|
|
|
|
Sunday, June 12
|
View Page
|
 |
1676.5 Daletas ’12 (F: 1381 Checkon ’10 x M: 1495 Stelts ’10)
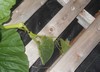
This is an image of the main vine tip area with severe squirrel damage. As you can see even the side vine that I was hoping to use as a replacement the main vine tip has had the main vine downstream of it chewed heavily. In this image you can also see the damage to the leaf stalks as well as the other shorter secondary vine tip.
|
|
|
|
Sunday, June 12
|
View Page
|
 |
1662.0 DeBacco ’15 (F: 1916 Barron ’14 x M: 1676.5 Daletas ’12)
This was one pace for one of my most aggressive plants as it was in competition with the 1945.5 Daletas dmg. However, this is also missing main vine tip along with seven secondary vine tips from the hungry squirrel.
While it seems the standard for comparison this time of year is main vine length, I have had plants in the past that grow a great main vine but do not ‘fill-in’, so I developed the idea of Leaf Area Estimation which is basically the area of a triangle. (This works best for the standard Christmas Tree style of pruning.) All you have to do is measure the width of the plant and the length of the main vine. Then it is simply (1/2)*(width of the plant)*(main vine length) = Leaf Area Estimation.
Leaf Area Estimation= 48 square feet
Main Vine Length= 12 feet
|
|
|
|
Sunday, June 12
|
View Page
|
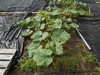 |
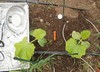
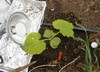
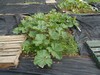
823 House ’15 est (F: 811 Gerhardt ’11 x M: 359 Foss ’13)
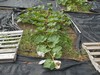
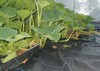
In this picture what you see is the size of the entire plant and the size it is going to remain for at least the next week since every possible vine tip as been chewed off by a squirrel on this plant. I was very excited to see what this plant was going to do and now I know it will not have a chance to reach its full potential given its current state.
While it seems the standard for comparison this time of year is main vine length, I have had plants in the past that grow a great main vine but do not ‘fill-in’, so I developed the idea of Leaf Area Estimation which is basically the area of a triangle. (This works best for the standard Christmas Tree style of pruning.) All you have to do is measure the width of the plant and the length of the main vine. Then it is simply (1/2)*(width of the plant)*(main vine length) = Leaf Area Estimation.
Leaf Area Estimation= 42.75 square feet
Main Vine Length= 9.5 feet
|
|
|
|
Sunday, June 12
|
View Page
|
 |
Current Patch Status: June 12th, 2016
Still not sure what to do, I have traps out and have caught some varmints and have taken them away but the damage is so sever and wide spread that I simply getting a pumpkin to the scale this year will be an accomplishment.
On the bright side at least this happened now rather than after most of the hard work as been put in. This will allow me time to plan some more fishing trips over the growing season.
|
|
|
|
Wednesday, June 15
|
View Page
|
 |
Annual Patch Update…
Typically, this is the time of year where the plants are just starting to get going and the season is underway with excitement for what they year will bring. However, for me this year it has been with great disappointment and frustration. While I have been growing for the last 16 years each year has had a set of challenges and list of ways I could have made improvements. Sometimes problems are simply out of your control and this is what I feel this year is going to result in.
My plants were off to a slower than normal pace, but everything was looking ok with no reason for concern. I set-up my insect netting and have been spraying garlic barrier and releasing my Green Lacewing beneficial insects to combat the early season aphid issues I have had in the past. However, it seems my problem this year is more macroscopic, because there is a squirrel in the area that has developed a liking for pumpkin plants. This is very odd as I have always had a few squirrels around and if anything this year there are fewer than normal.
With the reflective insect netting up (in addition to the metal fencing and chicken wire) I have not had any issues with woodchucks and squirrels in the patch, at least up to this point. I originally thought I had chipmunks doing the damage but one day I caught a squirrel right on top of one of my main vines. Also the extent of the damage is too large for a chipmunk.
Not sure what to do at this point other than making sure all of my fishing equipment is in good order as it looks like it will be getting used with greater frequency than last year.
|
|
|
|
Thursday, July 7
|
View Page
|
 |
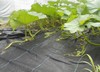
Since my patch is not going to turn out well, I went on a patch tour to see how one of the seeds I mailed out was doing;-) It was not a local grower but nice to get to a patch that I had not seen before. This is my 1662.5 DeBacco ’15 that is growing in Chad New’s screen house in Colorado.
Thanks for the tour, Chad.
|
|
|
|
Thursday, July 7
|
View Page
|
 |
The traveling Team-Pumpkin sign continues its random appearances. Here I am at Chad New’s patch. The screen house has multiple functions, as it provides a barrier to the insects, protects from hail, and also increases the humidity, which in Colorado is a good thing.
|
|
|
|
Sunday, July 10
|
View Page
|
 |
I was told it was going to be warm in Colorado, and it was (Potentially record breaking). Here is the temperature reading on my rental car. However, it was a different heat than in New England, since the humidity was only about 16%.
|
|
|
|
Monday, July 11
|
View Page
|
 |
Upon my return to my patch, I was greeted with more bad news. The squirrel must have known I was away for a few days, and came in and ate down every single vine tip! In my 16 years of growing, I have never seen this extensive damage before. What is also odd is that the squirrel has to get through/over my woodchuck fence that is wrapped with chicken wire and then crawl under my insect/shade netting to get into the patch.
|
|
|
|
Monday, July 11
|
View Page
|
 |
Where are all the vine tips? Not a single one was missed by the squirrel while I was out of town for only a few days. Considering I grow six plants, this is quite a lot of heavy feeding.
|
|
|
|
Monday, July 11
|
View Page
|
 |
The hope was to have some vine burring to do when I came back, but it looks like the squirrel ate back all of the growing tips, so there are no longer any vines to bury.
|
|
|
|
Monday, July 11
|
View Page
|
 |
This is a close-up of the damage. My only guess is the squirrel must be eating the vines for the water that is inside them. It has been dry here, and pumpkin plants in general do not taste all that good.
|
|
|
|
Monday, July 11
|
View Page
|
 |
When the squirrel ran out of vine tips, the next thing to go after must have been the flowers. This was a hopeful pumpkin that is no more. Even male flowers were eaten so aggressively that I was unable to even get pollen from two of my plants.
|
|
|
|
Monday, July 18
|
View Page
|
 |
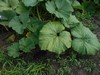
The poor pumpkin is trying to heal itself from earlier damage. I was removing some vines and came across this pumpkin. I know it will not produce much, but it is the only pumpkin on this plant, so I want to just see what happens. Scar tissue should not stretch as well as normal flesh, so it should tear as the pumpkin grows. On a year like this I might as well gain some more experience with some of the unique properties of the pumpkin’s flesh.
|
|
|
|
Tuesday, July 19
|
View Page
|
 |
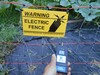
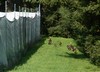
After, seeing repeated and aggressive damage from squirrels, I did some research and decided to add a fourth (yes, that is correct, FOURTH) fence around my pumpkin plants. You can see in this image there is chicken wire, heavier gauge woodchuck fence, and also insect/60% shade Aluminet netting, and now I have added electric netting.
This is a Kencove Low-Impedance Electric Fence Energizer rated at 4.0 Joule output. I have AC power nearby, so I have the 110V plug-in model. In this image you can see all the lights are on (which I had to time the picture to capture this, as it pulses about every second or so), indicating it is supplying a full charge. This amount of power is overkill, since the recommend rate is 0.25J per fence, and I only have two fences, but I figure in this case more is better. Also, I have a positive/negative fence which is recommended for arid regions or for those that want ultimate control. The basics of this type are that the squirrel can complete the circuit through the net, as it only needs to touch two of the wires. The more common type of electric fence/net requires the animal to touch both the fence and the ground at the same time, since the fence only has a positive charge.
|
|
|
|
Tuesday, July 19
|
View Page
|
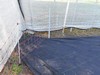 |
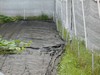
With any electric fence/net, you want to eliminate the weeds/grass that may touch the fence and cause a short. I have been able to, in some areas, run it over my weed block which will help reduce the area I have to keep an eye on.
If you look carefully you will notice a horizontal black “wire” at the bottom. This is an uncharged string. The gray vertical lines are also plastic and uncharged.
Then you will notice a horizontal green wire; this is the negative or ground/non-electric line, and the bright orange-colored horizontal wires are the positive hot wires.
The fence is only 28” tall, as I am looking to control more ground-based varmints. The vertical spacing of the line is a consistent 3.5” and the horizontal spacing is 3” except for the very top where it is 4”. There are 10 total horizontal lines made out of 304 stainless-steel conductors.
|
|
|
|
Tuesday, July 19
|
View Page
|
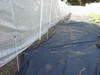 |
The plants should have filled just about the entire area by now, but the squirrel pruning has prevented this from happening. This shows how I have the pos./neg. electric netting set up in my patch. The actual installation process was fairly easy, even though this was my first time doing it. I will note that while the spikes given were very helpful, I did need to add some additional supports to prevent sagging. You can NOT use metal or wood; I used PVC conduit pipe cut into about 4 ft. lengths and used a tie wrap to help support the netting where needed.
|
|
|
|
Tuesday, July 19
|
View Page
|
 |
As the sun was just about to set, I had completed my final inspection and was ready to plug everything in and close the switch. Once everything was plugged in and I heard the pulsating click, I took my digital voltmeter to the furthest point from the charger and tested each line. All of the positive (hot) lines came up with a read of 9,200 volts, which is right where it should be. (My goal was 9,000v, so a little over initially is good by me.)
This should keep the squirrel and most other varmints out of the patch. Sadly, I am protecting mainly pumpkin plants/leaves, but I want to train the problem squirrel so the word can be passed on to stay away and hopefully prevent this problem in years to come. Of all the ways to ruin a season, this is a new one for me, but I can say that my time fishing has certainly increased.
|
|
|
|
Monday, July 25
|
View Page
|
 |
This is Yellow Vine Decline (or Yellow Vine Disease) abbreviated YVD
What makes this unique is that there will be a yellowing to lime green color in the leaves that typically travels down a vine. The plant will not set any pumpkins and if there are any growing pumpkin on the plant they will abort. It is transmitted by squash bugs and even though I have only seen two the entire season and no evidence of any egg masses with a good spray program you can still contract this disease. My recommendation is to pull the plant and hope it does not spread to any others in the patch. So, my 1998.5 Jutras plant is no more.
Seems like the hits keep coming this year in my patch, but I am still hopeful to get a pumpkin (no matter the size) to a scale this year.
On a positive note I am seeing the return of newly growing vine tips! I am taking this as a sign that my newly installed electric netting is working. Time will tell for sure, but at least there is some hope that I will have some bigger plants in the near future.
|
|
|
|
Saturday, August 20
|
View Page
|
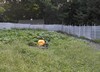 |
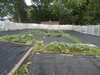
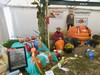
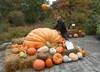
Well here is what my patch looks like. Even though squirrels basically ruined my season earlier in the year I still have two pumpkins going. While there is nothing impressive, I believe that if you grow a pumpkin you should bring it to a weigh-off no matter the size. I can say that no matter the final weight, I will bring these two pumpkins to a weigh-off. (The biggest one is pictured;-)
|
|
|
|
Saturday, August 20
|
View Page
|
 |
Even after setting up the electric fence the squirrel I have been battling still came in and ate some more vine tips, so I decided to set-up a game camera to catch the time of the crime. However, I think it took the squirrel a while to learn to stay away from the electric fence (or the squirrel is simply camera shy), because once I set the camera up I did not lose another vine tip for the rest of the growing season.
|
|
|
|
Thursday, August 25
|
View Page
|
 |
Had a spy tour today, but they behaved themselves and stayed on the outside of the fence and only looked in at the pumpkins. This is a good thing because after setting up my fourth fence this year I did not want to also have to install a roof to guard against potential attacks from the air.
|
|
|
|
Thursday, September 1
|
View Page
|
 |
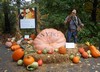
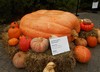
297.5 DeBacco ’16 (F: 1662.0 DeBacco x open) 27% heavy
Woodstock, CT Weigh-In night
Even though this seed came from my white pumpkin last year it has shown some of its pollinator orange color (1676.5 Daletas). I have seen other pumpkins from this same seed that are very pale and white in color.
However, the one consistency is percent heavy which is the reason I made the 1916 Barron x 1676.5 Daletas (and reverse) cross last year. It is nice to see the results of an initial plan work out as intended!
It looks like the grower behind me is looking to get in on the excitement. If you grow it, show it no matter the size.
Not pictured is my also very orange 130.0 DeBacco ’16 (F: 1662.0 DeBacco x open) 20% heavy
|
|
|
|
Thursday, September 1
|
View Page
|
 |
Woodstock Fair, CT Display
Here is our main fall display at the Woodstock Fair that turned out to have quite the variety. The Howard Dill winner grown by Norm got the prime spot this year and Randy (the living statue) was back in the tent for another year. It was another great weekend at the fair with many amazed people in attendance.
Note: You can see my 130.0 DeBacco ’16 (F: 1662.0 DeBacco x open) directly in front of Randy (the gold guy). I was shocked at the bright orange color that it produced so even though color is a little bit of a wild card with this seed, there is a chance at good orange color.
|
|
|
|
Sunday, September 4
|
View Page
|
 |
Well I weighed all the pumpkins at the Woodstock Fair so my chosen cover crop this year is grass seed. There are so many different types but this seems to fit my geographic location well. One very important step for getting this seed to establish is water. This year we have had very little so I made sure to have my irrigation going otherwise the seed would just sit there.
|
|
|
|
Sunday, September 4
|
View Page
|
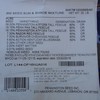 |
I just wanted to provide the label for seed varieties that my bag contained. There are always changes year to year but I have been happy with this general blend so far.
|
|
|
|
Monday, September 12
|
View Page
|
 |
I am impressed with the amount of germination only 8 days after initial seeding. Water has been the key ingredient as we have had a consistent North wind (due to a weak tropical storm off the coast) and as a result my overhead irrigation water was missing a part on the North end of my patch. The seed that received less frequent water has not germinated (yet) despite all other conditions being equal. The grass seed will continue to fill-in but considering the bag said 7-14 days for germination I think I am off to a great start. Adequate available water in addition to amended pumpkin patch soil I am sure is helping;-)
|
|
|
|
Monday, October 17
|
View Page
|
 |
Patch Update…
I have been keeping my overhead irrigation system running to allow time for the grass seed to establish and so far it has been growing well. I have gone through multiple times and removed some of the weed species (Pigweed, Galinsoga, Horseradish) and now that the grass is getting tall it will be receiving its first mowing. Luckily, this was timed with the soon to drop leaves so it can be a multiple purpose mowing.
|
|
|
|
Monday, October 17
|
View Page
|
 |
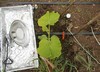
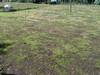
Grass Establishment Close-Up
It is important not to just mow the grass, but to ensure some of the common weeds are removed because Pigweed (or Redroot) can branch aggressively if it is mowed. As a result I go through and remove the single stalk plants as they are easier to see and remove at this stage of development. My patch is not weed free, but I have at least been through it multiple times to remove the weeds that are on the top of my “do not want to see” list which consists of Pigweed, Galinsoga, and Horseradish.
|
|
|
|
Saturday, October 22
|
View Page
|
 |
New York Botanical Gardens
I was fortunate to be able to make the trip to the New York Botanical Gardens to get a chance to meet with the growers and see the giant pumpkins first hand. It was a cool day with periods of rain but it was still nice to be a part of this event.
|
|
|
|
Saturday, October 22
|
View Page
|
 |
2,252.3 Patton ’16 (F: 1975 Wallace x 1789 Zywiec)
This was the first pumpkin on the seed harvest list. It was a very low and long pumpkin with great orange color. It was also great to know that this pumpkin had traveled all the way “Across the Pond” to be here.
|
|
|
|
Saturday, October 22
|
View Page
|
 |
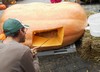
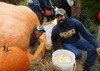
2,252.3 Patton ’16 (F: 1975 Wallace x 1789 Zywiec)
Here is Andy Wolf making the initial cut into the pumpkin. Even though it was a cool day, for Andy it was getting warmer as he was tiring to cut the opening as this was a very thick pumpkin. We had some discussion on the best location and there was no clear ideal spot, so this one was selected.
|
|
|
|
Saturday, October 22
|
View Page
|
 |
2,252.3 Patton ’16 (F: 1975 Wallace x 1789 Zywiec)
Here I am making the opening a little larger so that I can actually fit in to reach the six total feet over to the other side to ensure that no seed was left behind. It was great to have Ian and Stuart there during the process.
|
|
|
|
Saturday, October 22
|
View Page
|
 |
2,252.3 Patton ’16 (F: 1975 Wallace x 1789 Zywiec)
Made the opening just big enough;-)
This pumpkin was noticeably warm inside which was interesting. I also appreciated the work that went into making it possible for this pumpkin to be present in New York City. The traveling this pumpkin had done was more extensive than any other pumpkin that has previously made it to the Gardens.
|
|
|
|
Saturday, October 22
|
View Page
|
 |
2,106 Schmit ’16 (F: 1385.5 Howell/Jolivette x open)
Mike’s pumpkin was next on the seed harvest list. I am not sure if this picture does the pumpkin justice, but this was a very impressive pumpkin. It was tall and wide and also had great orange color. What I have heard a few growers refer to the orange speckles as “Calai Speckling” which is in honor of the late Fred Calai who was known for orange pumpkins. This was a very impressive pumpkin and made for a great display.
|
|
|
|
Saturday, October 22
|
View Page
|
 |
2,106 Schmit ’16 (F: 1385.5 Howell/Jolivette x open)
Here I am giving Mike the “inside scoop” about his pumpkin;-)
It was nice to have some more space in this pumpkin which speed up the process which was a good thing because it was staring to rain at this point in the day. It is great to see a grower spend an entire year researching giant pumpkin and then committing to growing them the following year. Even during the season some of the decisions that Mike made were geared to maximum potential. To see this from a first year grower (who also set a new Wisconsin watermelon record) is very impressive. Congratulations Mike!
|
|
|
|
Saturday, October 22
|
View Page
|
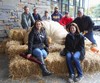 |
New York Botanical Gardens Group Shot
Under the protection of the overhang it was great to get one group picture around the 2,261 Wallace ‘16 before everyone departed for the rest of the day. Even with the rain and wind it was still an enjoyable time with everyone.
|
|
|
|
|
