| |
|
Click on a thumbnail picture below to see the full size version.
|
40 Entries.
|
|
Sunday, March 27
|
View Page
|
 |
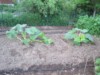
A starting point...
|
|
�
|
|
Wednesday, April 6
|
View Page
|
 |
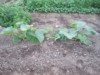
...and some progress, at last.
|
|
�
|
|
Wednesday, April 6
|
View Page
|
 |
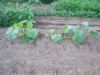
:) tomorrow...
|
|
�
|
|
Wednesday, April 13
|
View Page
|
 |
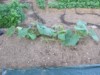
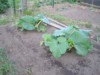
All started on 7th April, and yesterday (on 12th April) all seedlings were up. 100% success, so far...
|
|
�
|
|
Friday, April 15
|
View Page
|
|
A somewhat sort of slightly sad day has it been today. Until yesterday morning, all of my AG seedlings showed more or less the same development. Yesterday evening (and even more pronounced today in the morning) the favorite one (the race horse, so to say), the 1007.5* seedling which germinated first, slowed down. A couple hours later it was easy to see that the hypocotyl had some brownish color to it. Hence, I inspected the seedling and the potting mix. Mix was fine (fluffy and damp, not wet), roots were fine (excellent, I would say), but the base of the hypocotyl was weak and brownish and lost the bunch of roots as I touched it. I can only guess that there must have been some little injury (a tiny crack maybe) and an infection with whatever thing that caused a problem then.
|
|
�
|
|
Friday, April 15
|
View Page
|
 |
A somewhat sort of slightly sad day has it been today. Until yesterday morning, all of my AG seedlings showed more or less the same development. Yesterday evening (and even more pronounced today in the morning) the favorite one (the race horse, so to say), the 1007.5* seedling which germinated first, slowed down. A couple hours later it was easy to see that the hypocotyl had some brownish color to it. Hence, I inspected the seedling and the potting mix. Mix was fine (fluffy and damp, not wet), roots were fine (excellent, I would say), but the base of the hypocotyl was weak and brownish and lost the bunch of roots as I touched it. I can only guess that there must have been some little injury (a tiny crack maybe) and an infection with whatever thing that caused a problem then.
|
|
�
|
|
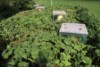
Wednesday, May 25
|
View Page
|
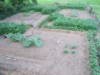 |
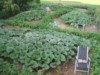
Any strategy?...Looks like wilderness (sort of), but the strategy behind this pattern is a rim of potato plants around the individual plant sites, and there are some flowers (Phacelia flowers with some additional patches of yellow...by mustard plants) on the parts which won�t be claimed by the pumpkin plants before mid June (good to feed the bees, to suppress weeds and to add some root mass organic matter to the soil in the interim) :)
|
|
�
|
|
Friday, May 27
|
View Page
|
 |
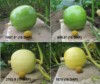
As I haven�t posted pics of the AG plants for a while, it�s time to do so now. Here are the 1007.5* Wagler plants, it is hard to make a final decision, but it has to be made soon (don�t look at the leaves, it has been windy lately).
|
|
�
|
|
Friday, May 27
|
View Page
|
 |
989.3* Wagler plants, same troubles with making a decent decision... :(
|
|
�
|
|
Friday, May 27
|
View Page
|
 |
2702.9 Cutrupi (the plant which actually produces a nice main vine) looks so much better than the backup plant (1434 Wuersching)...easy decision, I guess ;)
|
|
�
|
|
Friday, May 27
|
View Page
|
 |
1875 Mendi, once again the one out of two plants which is growing a decent vine, again many inches ahead of the 1434 backup plant.
|
|
�
|
|
Friday, May 27
|
View Page
|
 |
A story with (hopefully) a happy end for the 1434 Wuersching: My kids� 1434 plants, looks like they picked the best two plants out of that bunch, they actually grow length-wise (fingers crossed the secondaries will join in soon).
|
|
�
|
|
Sunday, July 3
|
View Page
|
 |
...and so here we go again. Patch view today :)
|
|
�
|
|
Sunday, July 3
|
View Page
|
 |
:) The kids� 1434 Wuersching plant, a picture book plant again this year, I�m jealous...
|
|
�
|
|
Sunday, July 3
|
View Page
|
 |
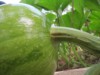
A shiny little baby is hiding there in the shade of the 1434 Wuersching�s canopy :) Awesome shape and color. The cross is 1434 Wuersching x 1875 Mendi. Fingers crossed it will keep on growing (and will keep on developing its great shape and turning into a dark shiny orange beauty).
|
|
�
|
|
Wednesday, July 6
|
View Page
|
 |
:)
|
|
�
|
|
Thursday, July 14
|
View Page
|
 |
:) Looks like pollinations have been successful.
:( Discovered a bad split in the stem of one of my greenies (at the red arrow)
|
|
�
|
|
Thursday, July 14
|
View Page
|
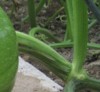 |
A split!!! :( Will build a roof over the fruit soon, will keep it dry and let�s see what happens.
|
|
�
|
|
Friday, July 15
|
View Page
|
 |
A somewhat more detailed view of this bad split...oh well...
|
|
�
|
|
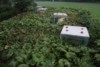
Thursday, July 28
|
View Page
|
 |
Patch today...
|
|
�
|
|
Thursday, July 28
|
View Page
|
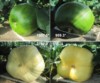 |
:) The squashies are doing fine, I�m happy with their shape, color and daily gains. The other two...oh well...daily gains are fine, but both the 2702 and the 1875 decided to become wheels (or birdbaths maybe), not good for the health of their blossom ends.
|
|
�
|
|
Thursday, September 1
|
View Page
|
 |
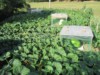
:) Patch today... the plants are looking better than they did around end of July in some of the past years.
|
|
�
|
|
Wednesday, September 7
|
View Page
|
 |
A shocking view of the patch today :( That�s what it looks like after an inch of rain and some heavy gusts yesterday followed by another inch of rain spiced with a good load of hail today.
|
|
�
|
|
Wednesday, September 14
|
View Page
|
 |
:) (...because in spite of the combination of hail damage, occasional further rain, cooler temperatures, cloudy weather, increasing disease pressure etc. THE BABIES KEEP ON GROWING!)
|
|
�
|
|
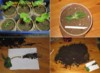
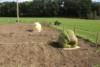
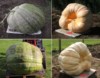
Friday, September 16
|
View Page
|
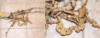 |
Anybody have an idea what this is? Today we picked the kids� pumpkin...and upon excavation the roots around the stump seemed to offer an explanation as to why the kids� fruit was a bit slow (daily gains had been only half as much as we had expected from that seed and in the context with the past years� experience of pumpkin growth in their patch (which used to be surprisingly great).
|
|
�
|
|
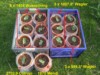
Friday, September 16
|
View Page
|
 |
From my four babies the 989.3* Wagler and the 1875 Mendi have been picked today. They will enjoy a two hours journey to the weigh-off on Sunday.
|
|
�
|
|
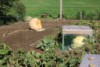
Wednesday, September 21
|
View Page
|
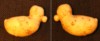 |
If you think that pumpkins (only) are fun, look here: Today, while digging up some potatos, I "duck" up this special specimen :)
|
|
�
|
|
Friday, September 23
|
View Page
|
 |
Picking the other two babies today...they are looking nice without their shelter :)
|
|
�
|
|
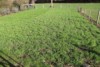
Saturday, October 29
|
View Page
|
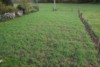 |
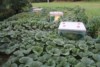
:) Patch today :) Rye is growing nicely.
|
|
�
|
|
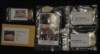
Saturday, October 29
|
View Page
|
 |
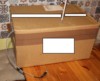
Here (in this and the following couple of my diary entries) is a brief explanation of a simple incubator I had made 3 years ago, I�m pretty happy with the way it works and want to share this suggestion with those growers who might be interested in trying something similar. No, I�m not going to detail all the dimensions of the things I�ve used, everyone will have different things available and they need to find their own way of creating something like that.
What we need (what I have used actually): a cardboard box (corrugated cardboard, for good stability and moderate insulation), some zip-lock plastic bags of sufficient size, sand, water, a silicone-coated heating cable (I�m using an 80 W cable), a timer (I�m using a rather simple timer with half hour increments of on/off switches), a thermometer.
|
|
�
|
|
Saturday, October 29
|
View Page
|
 |
Step 1: You fill some zip-lock bags with wet sand, close them properly (the moisture definitely needs to stay inside!) in a way that the sandbag is able to form an evenly flat panel (something like half inch or up to one inch thick). Try to get rid of most of the air inside the sand bag before closing the last bit of the zip-lock for good. The size of the bags will depend on the size of the cardboard box. Why? You will see on the next pic.
|
|
�
|
|
Saturday, October 29
|
View Page
|
 |
Step 2: You place one or more of those sandbags on the bottom of the cardboard box (one layer of sandbags required, the number of sandbags simply depends on how many you need to cover the bottom of the box), and then you place the heater cable on this first layer of sandbags�in an even manner (at least I tried). Then (see right side of the pic) you place another layer of sandbags on top of the cable. The non-heating end of the cable and the plug should be outside the box.
|
|
�
|
|
Saturday, October 29
|
View Page
|
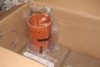 |
Step 3: You place the prepared seed starting pots on top of this top layer of sandbags.
|
|
�
|
|
Saturday, October 29
|
View Page
|
 |
Step 4: You close the box, you plug-in the heater (the plug should be connected to a timer, the on/off frequency will determine the final temperature inside the box) and monitor the temperature with a thermometer. Important advice: Before you start with starting seeds, your incubator box should be tested with some empty pots inside, which contain some seed starting mix (or other soil) but not the precious seeds. Turn on the heater and maybe set the timer at a frequency which allows for 50% on and 50% off (half hour on, half hour off�something like that)�wait for a couple of hours, monitor the temperature development inside the box. It will take a while before the sandbag bottom and the inside of the box will have adjusted to an equilibrium temperature. It should be reached within a couple of hours (maybe after half a day). If it�s too warm inside, then adjust the timer to more off rather than on (half hour on, one hour off, for example), and if it�s too cool inside even after one day, then adjust the other way (like one hour on, half hour off). The wet sand and the rather low wattage of the heating cable are required for releasing the heat into the box in an even manner, the warm sand will heat the box even when the cable is off, and the wet sand will take up the heat from the cable as soon as it is switched on again, thus prevents formation of hot spots. Important: The equilibrium temperature inside the box will depend on the room temperature of the room where this box is kept. In a cooler room the inside-the-box equilibrium temperature will be lower, in a warm room it will be higher. The on/off pattern of the timer needs to be adjusted as soon as room temperature around the box changes noticeably! (Hence, I keep my incubator box in my kitchen where there is a pretty constant room temperature.)
|
|
�
|
|
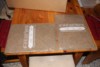
Saturday, October 29
|
View Page
|
 |
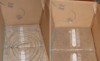
Just in case... Because the description "corrugated cardboard" could be misleading (as a wobbly single-layer corrugated cardboard thing isn�t stable at all), here is a cross-section view of the cardboard of my incubator box.
|
|
�
|
|
Saturday, October 29
|
View Page
|
 |
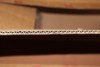
Here�s a pic of the timer I�m using in conjunction with my incubator box. It basically consists of 48 switches (on/off in half hour increments)...with an example explained in the pic.
|
|
�
|
|
Friday, November 4
|
View Page
|
|
Just an additional (but probably important) comment in the context of my incubator box: The silicone coated heating cable of the setup shown above is a heating device which is designed for use in (yes, also inside) terrariums, where it can be in close contact with flammable materials such as coir, bark, wood. Whenever anyone attempts to create anything similar, only use heating devices which have been designed for safe indoor use even in case of contact with flammable materials.
|
|
�
|
|
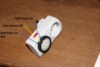
Tuesday, November 8
|
View Page
|
 |
Yes, there�s pumpkin (AG actually) inside :) Can�t wait for the day when it will be outside (of there) and again inside (...inside a wine glass) ;)
|
|
�
|
|
Saturday, November 12
|
View Page
|
 |
Been mowing the rye cover crop today (never done that before in fall). Weather has been so mild the past couple of weeks, the rye seemed to get too tall (and at risk of simply collapsing under the first snow flakes...which may appear sooner or later). Forecast predicts some mild and sunny weather for the next few days, too. May the rye get stronger, may it hammer some strong roots into the ground.
|
|
�
|
|
Saturday, December 31
|
View Page
|
 |
This is to conclude my 2022 pumpkin season. Basically a good year, three new PBs out of four plants:
1083.6* Wagler 22 (1007.5* Wagler 21 x 989.3* Wagler 21); 1078.1 Wagler 22 (2702.9 Cutrupi 21 x 1434.1 Wuersching 19); 1066 Wagler 22 (1875 Mendi 17 x 1434.1 Wuersching 19) and, last but not least, 783.4* Wagler 22 (989.3* Wagler 21 x 1007.5* Wagler 22).
|
|
�
|
|
|
