|
Friday, January 1
|
View Page
|
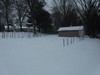 |
Snow On the Ground… December 20th, 2020
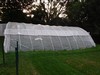
It is a cold winters day in December, despite the warmer the typical start to winter it seems the more typical winter weather is setting in. So far this is to be expected and was planned for since the plastic for the cold frame was set up and buried while the soil was still able to be dug. This will make assembly much easier due to the early start that is planned for 2021.
Also, the cold-frame has been moved to a new growing site that has not been grown in for about three years. This will be the only plant site that will be grown in for the 2021 season so it will a high-risk season.
|
|
|
|
Wednesday, February 24
|
View Page
|
 |
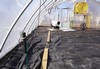
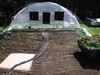
Season Will be Starting Soon
The initial grow site has some snow cleared just to get an idea of the depth. The trench on the left-hand side can be seen as this is where the plastic for the structure will go. If the ground is frozen then wood can be placed to help hold it in place for the structure and then as the soil thaws it can be added to help secure the plastic.
|
|
|
|
Thursday, March 11
|
View Page
|
 |
Seed Starting Day: March 11th, 2021
Growing only one plant this year seed selection was extra difficult. The final selection was decided to be the 2294.5 Noel ’19 (F: 2114 Wallace x M: 1938 Sperry). This pumpkin is the current Connecticut State and was the Topsfield Fair winner in 2019 and looked great. The goal now is to see what offspring it may produce.
|
|
|
|
Thursday, March 11
|
View Page
|
 |
Seed Starting Heat Mat
This heat mat is added to the bottom of a cooler to help regulate the temperature while in the basement to avoid quick temperature changes. The insulation of the cooler helps the digital thermometer keep the temperature consistent which is important during the germination process.
There are two blocks of aluminum placed on the heat mat to allow the tray that will contain the seeds to not be sitting directly on the heat mat. This small (about one inch) gap of air helps avoid direct contact to the mat so that there is no chance of the seeds sitting on a hot or cold spot.
|
|
|
|
Thursday, March 11
|
View Page
|
 |
Seed Starting Tray and Towel
The seed tray has been added and a towel place in the tray. This again helps to ensure consistency of temperature and less of a chance of a hot or cold spot causing in consistent germination rates. When there is a limited number of seeds the goal is to do everything possible to increase the odds of germination that the grower has control over.
|
|
|
|
Thursday, March 11
|
View Page
|
 |
Seed Starting Set-Up
Here is the full set-up ready to receive the plastic bag containing the chosen seeds. It is important to have this ready to go before starting the seeds so if there are any issues, they can be corrected without of setting the germination process of the seeds.
|
|
|
|
Thursday, March 11
|
View Page
|
 |
Seeds Added to Germination Chamber
There are two bags in the image, the top one (that is unlabeled) is the test bag, which means it is set up exactly like the bag that contains the seeds, but simply does not have any seeds in it. This allows for the full system to be tested ahead of time to ensure all systems are a “go”.
Once the seeds are ready the test bag is changed out for the “real” bag and the conditions the seeds will be exposed to will be exactly in the target ranges predetermined.
Note: The seeds before reaching this stage are removed from the freezer for 2 hours. Then the edges are filed and are placed in room temperature water for a 2-hour soak. After this time the seeds are placed in paper towels that have been soaked in water and then rung out so that no water drips from them but they are moist. This is then placed in a snack sized plastic bag and it is sealed and placed in the germination chamber.
Seeds are placed in the chamber typically around 10pm and then are first checked 36 hours later and then every 12 hours and are removed once a root is seen.
|
|
|
|
Thursday, March 11
|
View Page
|
 |
Target Temperature
For the germination process the sensor is placed directly under the germination bag and on top of the towel. It is set to 86F (30.5C) and this digital thermostat keeps the temperature right around the 84-87F range which is ideal for giant pumpkin seed germination.
|
|
|
|
Friday, March 12
|
View Page
|
 |
Plastic Is Up
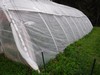
The plastic was put up on March 3rd, 2021 so as of this image it has been up for nine days. Since this was a calm day in the afternoon by time it was up there was no opportunity for pictures, and it did not look much different than it does in this image.
The goal was to start the soil heating process early. While the soil was still frozen in some places since everything was prepared in the fall only one long edge of the big plastic piece was only partially buried and is held down with boards. All other sides were already buried and clips hold the plastic in position.
Overall, things are going to plan with a few weather-related delays but nothing that is not to be expected.
|
|
|
|
Friday, March 12
|
View Page
|
 |
Peat Moss Added
To the growing area which is a little over 1,000sq.ft. 30 cubic yards (10 bags) of peat moss is added. This helps increase the aeration of the soil and also the water holding capacity. It also spreads easily and has noticeable changes to the physical properties of the soil, as it reduces compaction. Getting this extra aeration property is important for good root development.
While the material may have a slight acidic tendency at the rates used here it should only drop the pH by about 0.2 pH points. If you are concerned about this change simply add one 50lb bag of lime at the time of application and there should be no net change in pH of the soil.
|
|
|
|
Friday, March 12
|
View Page
|
 |
Premier Sphagnum Peat Moss
This is simply a closeup of the bag showing the exact product that was applied to the growing space for those interested.
|
|
|
|
Friday, March 12
|
View Page
|
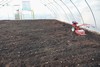 |
Tilling Growing Area
*Plastic was added on March 3rd, 2021 So it has been up for nine days prior to this image.
Overall, the amount of soil amendments was reduced compared to years past. The idea is to focus more on in season spoon feeding and the soil test report confirmed that not much was needed.
It is important to note that about 12 cubic yards of leaf compost was added to this 32ft x 40ft. (1280sq.ft.) growing area in the fall so this needed to be incorporated into the soil profile along with the peat moss added.
There was only one pass made with the tiller and with the compost and peat moss the process was quite easy. Also, the end result looks great since everything was able to mix in well since the plastic was up for about a week or so to help heat the soil up which took some time but eventually it thawed. Outside the structure it is hard to dig any soil in places never mind try and till it.
|
|
|
|
Saturday, March 13
|
View Page
|
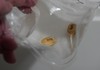 |
Roots in 48 hours!
Both seeds have a radicle forming and are ready for the next part of the process. Overall, both seem aggressive and are looking great!
Consistent conditions in the target range is important for a quick germination process, so taking the time to set everything up ahead of time is important.
|
|
|
|
Saturday, March 13
|
View Page
|
 |
Planting the Seed
Pro-mix is used as the soilless growing substrate. This is the plain Pro-Mix BX no special additives by the company or by the grower here. The seedling will not be in here long so the goal is to just provide a supportive environment to get a seedling indoors before transplanting outdoors.
|
|
|
|
Saturday, March 13
|
View Page
|
 |
Heating Cable Installed
With the area recently tilled the heating cable is next to add. Some portions are covered up but the pattern is so the thermostat can be between two heating elements to allow for an accurate reading.
Typically, it takes about three days to get the soil to 72F (22.2C) which is the target root zone temperature.
|
|
|
|
Saturday, March 13
|
View Page
|
 |
Heating Cables Covered
Now that the heat cable is set and covered, it is now time to work on organizing the drip tape that can be seen above. While it looks like a mess, it does take a little time to get each line in the proper order and parallel to each other. However, time spent now is well worth it in the season.
Drip irrigation offers some of the most consistent watering in the soil profile and the ability to automate it and add fertilizer makes it a must for giant pumpkin growing. Also, being in structure limits to natural rain so irrigation is even more important.
Each line has a shut off valve to allow for even more control over the irrigation during the growing season. For those who want to know the details…
Total of 48 lines each 31ft. long to cover my 40ft x 32ft single plant area
Drip Tape Thickness: 15mil.
Emitter Spacing in Tape: 8 inches
Flow Rate per 100ft @ 8psi: 20 GPH (or 0.34 GPM)
Space between Drip Tapes: 9 inches
Run Time: Daily for 30-60min. (*This will depend on the season and plant stage of development as I can also control the flow to each line individually, so I may select to have two 30min. irrigation events per day during peak growth and heat.)
Estimated Water Usage: 150 gallons per 30min. irrigation over 1,280 sq.ft.
|
|
|
|
Monday, March 15
|
View Page
|
 |
Under The Glow From the High Pressure Sodium (HPS) Light
Here are the two seedlings of the 2294.5 Noel ’19 (F: 2114 Wallace x M: 1938 Sperry). Both produced roots at the same time and both are emerging for the soil at the same time. It is great to see consistency and this will make the decision process a little more challenging, but at the current time both options look equally good.
|
|
|
|
Saturday, March 20
|
View Page
|
 |
Seedling Progress
Here are the 2294.5 Noel ’19 (F: 2114 Wallace x M: 1938 Sperry) seedlings five days after their initial emergence. While both do not have any flaws the one on the left just seems to be a little more aggressive and since today is planting day it will be selected to make it to the prepared growing location.
The special preparations made for this seedling will be presented in the following postings…
|
|
|
|
Saturday, March 20
|
View Page
|
 |
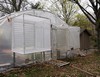
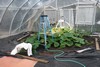
Cold Frame (with heating and cooling)
This is not a greenhouse, but it does look like one. It is 32ft wide and 40ft long and about 12ft high at the peak. It is covered in a single layer of 6mil clear polyethylene. It has been up for 17 days so the soil has had a chance to dry out and also warm up.
However, if you look inside, you will notice that there is more going on than a simply poly tunnel… ;-)
|
|
|
|
Saturday, March 20
|
View Page
|
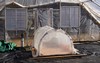 |
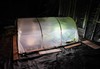
Small Cold Frame Inside the Larger One
Despite having the large cold frame there is also the small sized one on the inside. This structure is made from PVC pipes and measures about 5ft wide and 9ft long and is about 4ft tall at the peak. It is covered in a single layer of 6mil clear polyethylene just like the larger structure.
Grower may wonder why have a small cold frame when there is the larger one already in place? Well, the reason is to reduce the size of the area that needs to be heated. This smaller area is easier to warm up and with the nights of March being quite cold reducing the heating area offers energy savings. There are multiple nights of frost/freeze conditions so this smaller area can still be maintained around 75F despite the below freezing temperatures outside.
Heat is added to the small structure via multiple 100watt ceramic Reptile heat lamps that generate no light but do produce heat for the plant. The reason for the no light is so the photo-period can be dialed in without giving the plants 24-hours of light when all they need at night is heat.
|
|
|
|
Saturday, March 20
|
View Page
|
 |
Large Structure Indirect Heater
Knowing the pumpkin plant will likely break out of the smaller cold frame when there is still a danger of a frost, there needs to be a heat source for the entire structure. There are a few options that exist but the easiest is an indirect heater.
While this may look like a traditional torpedo heater, look at the metal exhaust stack that goes vertically out of frame. This is where all of the waste gases go result in “clean” hot air entering the grow space.
A torpedo heat will help add CO2, but the other exhaust gases make it hazardous to be in the growing space as a grower and also the other by products lead to phytotoxicity of the pumpkin leaves. So, while an indirect heater does cost more, the benefits justify its inclusion and use.
Also, this heater runs on diesel fuel so it is easy to get and because it is inside the structure there is no threat of it gelling in the tank so this is why an indirect heater was selected as the heat source for the structure.
|
|
|
|
Saturday, March 20
|
View Page
|
 |
Heaters Thermostat Placement
An additional feature of the indirect heater is that there is a thermoset option. So, it was placed out of the main path of the heated air and on the lower side of the structure since cold air tends to sink. There are two fans (black on in the image and a white horizontal air flow fan) running 24-hours a day to help continually mix the air so that there are limited cold or hot areas within the structure.
The thermostat is checked against an independent digital thermometer and is set for 52F. This is the lowest setting used to help ensure that the plant growth is not damaged by cold weather. Growth may be slowed at this temperature, but with the outside temperatures potentially being below freezing it can be a challenge for this heater to keep the area at maximum growing temperature.
Also, since the temperature never goes below this setting in the morning the area inside the structure is quick to heat up, which is why a large exhaust fan can be seen in the background.
|
|
|
|
Saturday, March 20
|
View Page
|
 |
Heating and Cooling Systems
Heating: Heat Wagon HVF 110 Indirect Heater
This is used as the main heat source for the structure and it can keep the interior environment up to 25-degress F above the outside temperature burning under 1-gallon a diesel an hour of actual running making it very efficient. Also, the exhaust ducting has been increased in length to help ensure that as the hot exhaust gases are directed out and away from the growing environment some of the heat is given back to the structure to help increase efficiency even more.
Cooling: 42” Dayton Outdoor Mobile Air Circulator
This fan is on a thermostat that comes on when the temperature inside reaches about 85F. The vents are on motors and they also open to allow for a lot of air movement through the structure. On cool spring days the system is able to keep the inside temperature at the optimum level which aids in plant growth and increasing soil temperature as well.
|
|
|
|
Saturday, March 20
|
View Page
|
 |
Exhaust Fan Specifics
As growers we know the plants need heat in the early part of the season. However, it is also important to consider the other end of the temperature curve and ensure there are methods of cooling the plant environment.
The fan utilized in the structure is a 42” Dayton outdoor mobile air circulator. It has two settings which allowed some flexibility. The low setting (9,000cfm) was the default and the high setting (15,000cfm) was used when temperatures were predicted to be 85+F for daytime highs to help move as much air through the structure as possible.
Fan Specifications:
The large yellow fan is a Dayton outdoor mobile air circulator that has 42” diameter blades and two speeds. On low it will it will run 9,000cfm at 4.6 Amps and on high 15,000cfm at 5.3 Amps. This is an industrial air circulator that has a water-resistant motor which is important because of the mist cooling system I have installed will result in a consistently high humid environment.
|
|
|
|
Saturday, March 20
|
View Page
|
 |
Planting the Seedling 2294.5 Noel ’19 (F: 2114 Wallace x M: 1938 Sperry)
Here is the chosen 2294.5 Noel ’19 just before it goes in the ground. Overall, things are looking good and the other seedling is still inside under the HPS light to provide a back-up “just in case”. However, all systems have been installed and have been checked ahead of time so all that is needed is to add the actual plant.
Temperatures and general environment are all able to maintain plant target ranges despite the cold weather so it is time to add the plant.
|
|
|
|
Saturday, March 20
|
View Page
|
 |
Root Structure of the 2294.5 Noel ’19 (F: 2114 Wallace x M: 1938 Sperry)
It was a little bit of a challenge to get the image when you are the only one planting the seedling, but this plant only emerged from the soil five days ago so it just goes to show how quick the roots can grow. This also shows the importance of having all of the equipment and environment set up ahead of time so when the plant is ready it can be transferred to the next step.
There can always be equipment issues or delays and these should be taken care of and checked ahead of time to ensure the plant sets the pace. This does not mean things can still not go wrong, but at least a good baseline is established for the plant.
|
|
|
|
Saturday, March 20
|
View Page
|
 |
Seedling is In The Ground 2294.5 Noel ’19 (F: 2114 Wallace x M: 1938 Sperry)
This shows some of the extras for the seedling that are provided. What can be seen is the four 100-watt reptile heat lamps that generate heat but no light to allow for proper photoperiod regulation of the plant.
There are also three thermometers to check the soil temperature all around the seedling, in addition to a digital readout (white area near the fan) the bottom number is the external probe and is the most accurate. The other number reads the units temperature and while this may work well for an indoor house environment in the outside environment the sun is absorbed by the plastic causing it to typically read higher than the actual.
There is a soil moisture probe and a CO2 sensor. There is an added fan to help circulate the air and what can not be seen is there is a 315watt CMH (Ceramic Metal Halide) grow light over the plant to help increase the day length to represent summer.
|
|
|
|
Saturday, March 20
|
View Page
|
 |
Carbon Dioxide Enrichment 20lb Bottle
In the cold frame there is carbon dioxide enrichment. With the small area of the cold frame a 20-pound bottle of carbon dioxide is used early. This makes for easier changes and less hassle. Even for its small size the bottle is still affix it to a stake to prevent the chance of it tipping over.
In addition to the bottle there are other pieces of equipment that are needed. There is a regulator and also a controller with a sensor to make the system work. The reading on the controller was not picked up by the camera, but it provides a “live” readout of the current concentration of carbon dioxide. Further postings down will show some more of the details…
|
|
|
|
Saturday, March 20
|
View Page
|
 |
Carbon Dioxide Regulator
The bottle contains pressurized carbon dioxide, so it needs to be regulated during delivery. Attached to the bottle is the regulator which has a readout of the current pressure which is initially about 700 psi and about 5000kPa of pressure. This is a new bottle and is what is expected with a fully pressurized bottle. However, depending on the temperature this can increase or decrease the pressures that are shown. What is presented is the “normal” or room temperature levels for comparison.
Another important aspect of the regulator is to control the flow of the carbon dioxide during delivery. If you look close above the pressure gauge a green plastic ball can be seen. The carbon dioxide is flowing and it is set at a rate of 5 cubic feet. The key is to keep this below 10 as any higher and the regulator will actually freeze due to the cooling effect of carbon dioxide as it goes from the high to low pressure state.
The flow rate is adjusted by the black knob that can be seen on the left side. This requires fine adjustments moving it a little bit can massively change the flow rate so be sure to check the flow rate to avoid freezing up the regulator valve.
|
|
|
|
Saturday, March 20
|
View Page
|
 |
Target Carbon Dioxide Range
While the exact target level of carbon dioxide can be debated if the goal is to maximize yield and minimize excess than typically aiming for around 1000ppm should be the goal. Atmospheric levels are about 400ppm so anything above this would be beneficial for the plant. However, going over 1500ppm is considered to be a waste.
Keep in mind that it is not until levels reach 5000ppm does the environment become hazardous to humans.
The controller is set to be around 1000ppm but due to the small space the level will typically be in the 950-1150 range. This controller has a feature called Fuzzy logic, which allows the controller to learn over time how the dosing time impacts the levels of carbon dioxide to reduce the chance of over or under dosing to maximize the efficiency use of the carbon dioxide.
|
|
|
|
Saturday, March 27
|
View Page
|
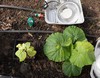 |
Seven Days After Planting 2294.5 Noel ’19 (F: 2114 Wallace x M: 1938 Sperry)
*Same seed, same germination date, same emergence date… Different environment;-)
With all of the additions to the growing environment it can be hard to tell what works. However, after doing independent experiments a complete system was been developed based on those results. The basic components of the system involves, soil heating cables, ceramic heaters, a grow light and carbon dioxide enrichment.
This is a seven-day comparison between the plant that has gotten all of the environmental additions and one that has not. Even though the “control plant” looks a little more yellow in the image there is clearly improved plant growth for the plant that received all of the special environmental modifications.
Seeing this drastic comparison shows that all of the little plant trials and experiments along with data collection has paid off. It is hard to believe these plants looked nearly identical just 7 days ago.
|
|
|
|
Saturday, March 27
|
View Page
|
 |
Warm Day
Today the cooling system is being tested and it has worked out perfectly as expected. It is still early in the season, but these vents will be getting a box put around them that will have insect netting attached to ensure that during the venting process no insects from the outside will be able to enter the grow space. The mesh is very fine to the point that even small aphids should be excluded.
|
|
|
|
Saturday, March 27
|
View Page
|
 |
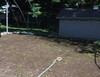
Rest Growing Sites
This attempts to show the two growing sites that were used last year but this year are on rest. The area closest has some winter weeds, but there was grass seed planted in the fall that did germinate, so once the winter weed dies back there should be a good stand of grass.
The area between the green stakes (just in front of the cold frame) in the distance is where the structure was last year so since the pumpkin split so early in the season grass seed was established early and this has a great looking lawn look. Turf grass seed is the cover crop for the area since it holds the soil well and once established it just needs mowing when the rest of the lawn needs it.
|
|
|
|
Monday, March 29
|
View Page
|
 |
Something is Not Right
This image was taken at night as it best shows the yellowing issue with the leaves. Originally this was thought to be a sulfur deficiency which is commonly seen in colder soils, but even after adding Epsom Salts the issue persisted. Turns out the soil heating cable thermostat had failed causing the soil temperature to reach 91F! So, this is likely the result of heat stress on the roots.
An external thermostat has been added and is working out great so while this may look bad now, these leaves will likely later be removed anyway. Since the problem was caught relatively early the overall negative impacts on the plant will hopefully be minimal.
|
|
|
|
Wednesday, March 31
|
View Page
|
 |
Heating System Improvements
In an effort to maximize the heat source efficiency (since cold weather is to be expected) in addition to the long exhaust pipe there have now been reclaimers added to the hottest portion of the exhaust.
Reclaimers are wavy pieces of metal that help radiate the heat off the exhaust pipe. However, the efficiency is improved even more with the addition of air flow between the metal reclaimers so additional flexible ducting was added to the intake portion of the heater. As a result, when the heater comes on the internal fan draws in air that is being pulled over the reclaimers that is already heated.
The improved efficiency comes from the heater having to heat air that has been preheated from the exhaust pipe. Overall, with the cold temperatures outside the heater has been running more than usual so it is hard to put a number on the exact efficiency gained, but it cannot hurt the system with a chance at some benefits so why not implement it.
|
|
|
|
Friday, April 9
|
View Page
|
 |
Cold Frame Lighting
Despite having the larger cold frame, the typical season starter size (5ft wide x 9ft long) is still constructed to provide a smaller area to modify. There are soil heating cables buried and a carbon dioxide enrichment system in place, but because of the early start supplemental lighting has also been added.
Artificial lighting is an industry that is continually changing (improving) so different lights have been compared. While most growers typically think LED’s are the “best” the conditions must be taken into consideration to determine which light is the best fit.
As a result in the cold frame CMH (Ceramic Metal Halide) lights are being used for a number of reasons. One multiple units can be used to ensure even coverage of the long growing area (since pumpkins vine) and also these ballast generate heat. Most growers are against the “heat” generation, but in the early spring some extra heat is a good thing. CMH lights also offer some bulb options which is in part what can be seen with a cool white light on the right side and a warm coloration on the left.
The difference is due to different bulbs being used in different fixtures.
See the next post for an inside look of the cold frame and plant.
|
|
|
|
Friday, April 9
|
View Page
|
 |
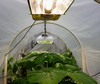
Cold Frame Lighting Inside View of the 2294.5 Noel ’19 (F: 2114 Wallace x M: 1938 Sperry)
This view shows the inside of the cold frame and on the ground retile heaters can be seen to help provide night time warmth which is especially important when the CMH grow lights go off. The entire structure is covered with blankets and a tarp which traps the heat in nicely keeping the temperature in the 70-75F range no matter the outside. It helps that there are 4-5 heaters each at 100 watts around the plant.
Reptile ceramic heaters are used since they just generate heat and not light to keep the plant under the proper photoperiod. Looking at the lights the far light has a more cool white (sunlight replicating) spectrum. The intention was to increase the blue spectrum to reduce the tendency of the leaves to stretch upwards compared to the warmer (more red) spectrum of the light near the growing tip in the image. However, there was no observable difference between the two bulbs so regardless of the spectrum the “best” bulb should be chosen.
In my opinion the Philips MasterColor CMH 315W 4200K Lamp is the “best” option. What is also great is while it is good to have an extra bulb, the Sun System LEC Boss 315 Watt Commercial Fixture has an option to come with this bulb in the same package. This is the fixture and set-up being used in the distant light. In short it works great and can produce enough light to burn the leaves so checking the intensity with a PAR meter is advised.
The main vine is growing on weed block which worked out well last year so it is being implemented again this year. At the leaf nodes a small tear is made to allow the roots to easily penetrate into the soil.
So far things seem to be going as expected or ahead of schedule!
|
|
|
|
Friday, April 9
|
View Page
|
 |
Cold Frame Carbon Dioxide Enrichment
Since the controller has a sensor with a photocell with the addition of grow lights also results in additional hours of carbon dioxide enrichment. For ease of replacement and access the actual controller and bottle are outside of the cold frame. However, this allows for a quick check of the inside environment even if the blankets are on for heat retention.
Overall, the bottle has good pressure so it should be good for at least another week or so. Also, the CO2 levels can be seen which is right in the target range of 1000ppm +/-50ppm (deadband). The target range will differ depending who you may talk to, but in general the 800-1200ppm is the accepted range for maximum yield.
However, to really maximize the benefits of CO2 all other factors need to not be limiting, such as water, temperature and light. This is why official horticulture grow lights with high output bulbs are being used because plants can utilize higher light intensities under carbon dioxide enrichment. This is part of the reason why some bulbs are more expensive than others it often has to do with a combination of the specific spectrum produced, intensity generated and overall quality.
Once these other environmental factors have been optimized, adding CO2 adds considerable growth rates without the fertilizer bloat or other issues when growers “push” plants. With the addition of carbon dioxide a plants that would be at size X at day 30 will be at that same size in less time.
Also, the rooting seems to be more aggressive under carbon dioxide enrichment and while CloneX gel is used to aid in the rooting process the two used in combination seems to have a synergistic impact on the plants which is quite amazing to observe.
|
|
|
|
Monday, April 12
|
View Page
|
 |
Intake Vents
These are passive vents that will open via an automatic system based on a thermostat when the temperature increases over 80F. There is an exhaust fan that is turned on at the same time to help evacuate the hot air. While this intake system may be passive the reason for the large boxes is to put insect netting over them to prevent insects from entering the structure.
The reason for the box design is to increase the surface area and reduce the impact the fine (restrictive) material has on air flow. Having five sides ensures that the air can flow as normal with the advantage of providing a physical barrier to insects.
|
|
|
|
Monday, April 12
|
View Page
|
 |
Insect Netting (Protek Net 25g)
Since this material will be up early and essentially all year the finest mesh was selected as this can even potentially exclude aphids to make for essentially an insect free internal environment.
This is great as there is no need to apply any insecticides which helps reduce inputs and potential damage to the leaves.
|
|
|
|
Monday, April 12
|
View Page
|
 |
CMH Light Experimenting
Here two different CMH lights are being used and compared. Not only are the fixtures different, but so are the stock bulbs to see if there is a difference in plant performance or behavior. It is important to note that the plants are exposed to natural sunlight and these artificial lights are only used to help adjust the photoperiod.
For this situation the Sun System LEC Boss 315 Watt Commercial Fixture with the Philips MasterColor CMH 315W 4200K Lamp is the “best” option. (This is the light in the distance.) While it has a 4200K bulb which should reduce plant stretching this was not observed, the pumpkin leaves grew as normal and stretch to the point of burning themselves due to the extreme light intensity.
The reason why two 315 watt fixtures were preferred over just one 630watt fixture is since pumpkin plants grow in length more than width early on, this system allows for better light coverage of the plant than a single fixture could.
|
|
|
|
Monday, April 12
|
View Page
|
 |
Not How a Main Vine Should Look
Seeing this, was a bit troubling as this is the main vine! This is the only vine to show this stunting and the cause is not known.
|
|
|
|
Monday, April 12
|
View Page
|
 |
Attempt To Do Something
Not knowing what the reason is/was for this main vine to have this development issue, the only remedy was to think it may be light/heat related and shade the main vine top. It seems odd that only the critical mine vine is showing this issue when there are many normal secondaries doing just fine.
|
|
|
|
Monday, April 12
|
View Page
|
 |
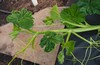
Plant Getting Big
Overall, the plant wants to come out of the 9ft x 5ft structure, but nights are still cold and heating a small area is easier than the larger area so the plant will be held inside for a little longer.
|
|
|
|
Thursday, April 15
|
View Page
|
 |
Plant Wants to Grow!
The plant wants to and continues to grow despite the less-than-ideal general conditions. With the cold nights in an attempt to provide another layer of protection the sides have been rolled up and the end wall removed. This allows for the actively growing vine tips to expand while still providing an upper layer of protection to help hold in some heat closer to the plant.
|
|
|
|
Monday, April 19
|
View Page
|
 |
Main Vine… It Should Not Look Like This
Here the general leaf crinkle issue can be seen on the main vine. The growing tip has self-terminated which is going to cause some issues. The side vines in this area for the most part seem to be normal which makes the issue even more perplexing.
|
|
|
|
Monday, April 19
|
View Page
|
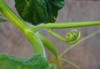 |
Mine Vine Tip… Now a Tendril
Add this to something new… The main vine tip has grown into a tendril at about 9ft out. The tendril looks normal, but it should not be at the end of what should be the actively growing tip of the main vine.
|
|
|
|
Monday, April 19
|
View Page
|
 |
Decision Time
With the main vine terminating on its own and the early start this plant has the option to be pulled and starting over is a viable option because a plant with no main vine is not going to produce much.
|
|
|
|
Monday, April 19
|
View Page
|
 |
Plant Evaluation… What Option Would You Select???
The area near the critical main vine is certainly not normal and the leaves do not seem to be growing out of the issue. However, other parts of the plant seem to be normal, but the main growing tip is critical and starting another plant would essentially put it in the normal growth cycle, so what would you do…?
Option 1: Remove current plant and start with a new plant (same seed genetics)
or
Option 2: Roll the dice on the current plant and hope it corrects itself or can be remedied
|
|
|
|
Saturday, May 1
|
View Page
|
 |
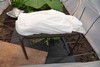
Plant is Kept… 2294.5 Noel ’19 (F: 2114 Wallace x M: 1938 Sperry)
Evaluating the full situation and only growing one plant makes each decision even more challenging. However, the early start was though to outweigh the advantages of restarting. No telling if this was the best or correct decision, but retraining a secondary seems like a viable option so this is the plan going forward.
There are two ladders with a metal pipe connecting them to help increase the light coverage area of the two different 315-watt CMH lights. While portions of the plant have outgrown the coverage area the idea is to help keep the plant in a summer time photoperiod to help maximize the overall plant growth.
The white sheet over the table it to keep the main vines shaded just in-case high heat on the main vine was the reason for the odd termination.
|
|
|
|
Monday, May 10
|
View Page
|
 |
Overhead Misting System Coverage
Initially this may look like just an image of the growing structure, but if you look carefully a foggy to not foggy area can be seen in a semi-circle pattern. There are where you can see the plant is where the overhead mister covers and the areas that have the condensation build-up shows the area that is not covered by the mister.
The area the plant is growing in is covered and this is what is important. However, the goal this year is to better manage humidity levels limiting the amount of potential over spray is an initial first step.
|
|
|
|
Friday, May 21
|
View Page
|
 |
Pollination Day: May 21st, 2021
Cross: 2294.5 Noel ’19 x self
It can be difficult to find pollen in other growers’ patches this early so this was a self-cross. While the pollination date may seem early, the distance out on the main vine is 22 ft out. So, the goal is to have an early and far out pollination with the hope of getting the best of both worlds.
Keep in-mind this does not come easy as the structure is one item, but also the early season supplemental light, carbon dioxide enrichment, and full growing area heat are just the main extras that have been added to make this possible.
|
|
|
|
Friday, May 21
|
View Page
|
 |
Male Flowers for Pollen: 2294.5 Noel ’19 x self
Being the only pumpkin plant in the area that is this old getting flowers have to come in house. With the main vine oddity, it off set some of the flower timing so the fear is there would be a female flower with no males opening on the same day.
Well as can be seen in the image, this was not a concern with seven males used for pollen. This is excessive, but this is one factor that the grower has control over and it can be overdone with no negative side effects. One flower contains more than enough pollen and while three is the target number, since seven were ready the day of, why not use them all.
|
|
|
|
Sunday, May 23
|
View Page
|
 |
Anthesis Application 48hr. After Pollination (2294.5 Noel ’19 x self)
In an effort to maximize all aspects of growing Anthesis is being applied about 48-hours after pollination to help ensure increased duration and rate of cell division at a time the pumpkin is sensitive to the hormone signals.
The pumpkin is shaded and the application is made before sunrise with distilled water to help ensure maximum effectiveness of the Anthesis.
|
|
|
|
Monday, May 31
|
View Page
|
 |
Plant Progression: 2294.5 Noel ’19 x self
Overall, the plant seems to have recovered from its initial issue. For a point of reference, the self-terminating main vine occurred basically where the overhead mister can be seen. Looking closely there is a change in the green coloration of the leaves, and this is in part due to the plant having a stunt to its normal growth patter and the simple age difference of the vines.
The clear umbrella is covering the carbon dioxide sensors as these have a photocell so the system only doses CO2 during light hours. The placement is at plant height and in an average portion of the plant so the dosing is representative of the general plant conditions.
However, at this point in general the decision to keep the plant seems to be the correct one.
|
|
|
|
Monday, May 31
|
View Page
|
 |
Day 10 for the 2294.5 Noel ’19 x self
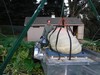
No measurements were taken as at day 10 the risk of damage to the tender flesh is very high so any physical contact with the pumpkin is kept to only what is necessary. What has been done is two layers of mill fabric + ľ” plywood + 2 layers of mill fabric have been added under the pumpkin. In addition, the vine has been trained in try and minimize the chance of stem stress latter in the season.
The stem on this pumpkin is on the short side and it did need to be pulled back two times during the season. The use of the multiple layers of mill fabric and the hitch as a fix point for the come-along did make the moving process of the pumpkin easy when needed.
It is important to note that the pumpkin is covered with a white sheet and is under an umbrella for added shade protection. Both of these are outside of the picture.
|
|
|
|
Monday, May 31
|
View Page
|
 |
Day 10 for the 2294.5 Noel ’19 x self
No measurements were taken as at day 10 the risk of damage to the tender flesh is very high so any physical contact with the pumpkin is kept to only what is necessary. What has been done is two layers of mill fabric + ľ” plywood + 2 layers of mill fabric have been added under the pumpkin. In addition, the vine has been trained in try and minimize the chance of stem stress latter in the season.
The stem on this pumpkin is on the short side and it did need to be pulled back two times during the season. The use of the multiple layers of mill fabric and the hitch as a fix point for the come-along did make the moving process of the pumpkin easy when needed.
It is important to note that the pumpkin is covered with a white sheet and is under an umbrella for added shade protection. Both of these are outside of the picture.
|
|
|
|
Sunday, July 4
|
View Page
|
 |
2294.5 Noel ’19 x self
July 4th, 2021 Update
Day 44
OTT = 339.5
Estimated weight = 849.5 pounds
The plant overall is in great shape. The pumpkin has more of a white color that I was expecting but the shape is very symmetrical. However, it does appear that the blossom end will be sunken in a little bit. Despite the near ideal conditions created that there is no control over the lack of sunny days which may be hindering the overall growth potential of the pumpkin.
The reason for starting early is to help maximize the DLI (daily light integral) which is essentially the total amount of light the plant receives and since during periods of full sun the plant can not maximize the amount of light it is receiving shifting to the having the pumpkin grow during the longest 100 days of the year should help it have access to more usable light.
|
|
|
|
Sunday, July 4
|
View Page
|
 |
2294.5 Noel ’19 x self
Day 44 OTT = 339.5 Estimated weight = 849.5 pounds
This is an image of the vast majority of the plant and pumpkin under a white sheet. In general, there are no complaints at all. Some of the slight leaf margin burn in the 3 o’clock position are from the heater that was running latter in the season than planned and some of the leaves did get a little heat scorch since they grew up and into the edge of the directed heat flow from the indirect heater.
Looking at the plant and 44-day old pumpkin the protocols put in place during the first half of the growing season appear to maximize the plant production as intended.
|
|
|
|
Sunday, July 4
|
View Page
|
 |
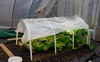
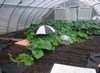
Structure Modification for 2021
In the effort to regulate the humidity it seems that giant pumpkins simply transpire at a very efficient and high rate. Even with two intakes and a large industrial fan that is controlled by a thermostat the temperature and humidity cannot be regulated into what is considered the ideal target ranges.
So, what is pictures is the full plastic cover has been removed and now there is only a plastic covered roof area and both sides (about 8-12ft high) are covered only with insect netting. This netting has is the Protek net 70g which is larger mesh so it is intended to only keep out larger insects. At this point in the season the cucumber beetles, squash vine borers and squash bugs are the main insects of concern and should be large enough to be prevented by this physical barrier.
|
|
|
|
Sunday, July 18
|
View Page
|
 |
Modification Working Well
Even though there is plenty of venting that can occur on the sides the small center horizontal circulation fan is kept on to ensure continual air circulation and prevent stratification of temperatures. The large exhaust fan and vents are still kept on the thermostat so when the temperature reaches about 85F these are turned on to again help prevent the hot air from building in the structure. This is also helpful for maintaining air circulation during times of high heat.
|
|
|
|
Thursday, July 29
|
View Page
|
 |
Spider Mite Damage on Giant Pumpkin Leaf
This is the first that I know of a giant pumpkin to be infected with spider mites and as a result the actual diagnosis was delayed simply because spider mites are not common on the scout list for giant pumpkins. However, once the leaves were inspected two spotted spider mites were clearly present in large numbers.
The initial browning was concentrated on only a few older leaves so this was not initially taken as something out of the ordinary. Early on the browning looking like a fungal disease look but then this stippling was noticed which was the reason for the closer inspection. If you think aphids are small… spider mites make aphids look big;-)
Proper diagnosis is very important and these were specifically identified as two-spotted spider mites.
|
|
|
|
Thursday, July 29
|
View Page
|
 |
Spider Mite Stippling on Giant Pumpkin Leaf
This is a good image of the stippling which essentially has the look like sandpaper was taken to the leaves as they look brown and scratched. This is because the spider mites pierce and suck out essential plant moisture causing the browning and ultimately the desiccation of the leaf.
What the image attempts to show is the area near the main veins of the leaf hold the color the longer in part because these are thicker portions of the leaf and resist the puncturing and feeding of the spider mites better.
However, even though the spider mites are present it is very hard to see them in the image.
|
|
|
|
Thursday, July 29
|
View Page
|
 |
Spider Mite Damage Pattern on Giant Pumpkin Leaf
This image shows the two leaves in the center of the picture with significant spider mite damage, but if the surrounding leaves are inspected the damage is visually minimal. This shows a spider mite hot spot and early stages of plant damage compared to previous images.
It can be difficult to inspect interior portions of the plant without causing physical damage, however if something like this is seen in your pumpkin plant it is worth a very close inspection of the leaves upper and undersides.
On the lower leaf there is almost a lane that can be see where the spider mites likely progressed (in a line) from one leaf to the next because at the power portion of the leaf there is the least amount of damage and this would be the greatest distance for the spider mites to travel.
|
|
|
|
Thursday, July 29
|
View Page
|
 |
Spider Mite Webbing
When spider mite populations get high, they will form clusters and also webbing will be seen. This webbing acts as a protective covering to the spider mites. The webbing is very fine so to aid in the ability to visualize this structure, if a fine mist of water is applied the droplets will cling to the fine fibers. In the image no water was applied and it looks like the mites are just suspended in air, but they are all attached to portions of the webbing.
|
|
|
|
Thursday, July 29
|
View Page
|
 |
Spider Mite Damage Overview
This image is a zoom out from the previous which highlighted the center leaf fold that can be seen. This shows areas where two leaves come into contact with one another the increased amount of damage from the spider mites. They are at high levels and spreading, but portions of a leaf that had greater exposure to air and light were affected later.
Seeing Spider Mites on Giant Pumpkins for the first time brings up the obvious question… Why Spider Mites?
Some possible reasons for seeing them could be increased by the following factors…
-No rainfall on leaves since plant is being grown in a plastic structure
-Warm temperatures can help speed up the reproductive rate
-No natural predators due to the insect netting sealing the plant from the outside environment… at least to larger insects as the mess size is still large enough for spider mites to get through.
-Bad luck…?
|
|
|
|
Thursday, July 29
|
View Page
|
 |
Initial Spider Mite Control
Many growers would think insecticides would be the obvious chose to control spider mites and this is simply not effective. Why?... Spider mites are not insect they are arachnids. So, no insecticides can be used since spider mites are not insects. In fact, imidacloprid (active ingredient in Admire, Merit, Quali-Pro, Premise and Criterion to name a few) can induce females to lay more eggs!
So, since the chemical route has minimal effectiveness what other options exist?
-Enter beneficial insects/mites!
|
|
|
|
Thursday, July 29
|
View Page
|
 |
Initial Spider Mite Control Part 2 of 2
-Enter beneficial insects/mites! These are actual insects/mites that feed on the pest insect/mite as a method of biological warfare. However, for this option to be effective it is not a simple as grab product X and spray on plant, there are some very specific steps that must be completed in order to increase the effectiveness of the beneficials.
1.) Reduce the initial population of spider mites.
-Physical removal is nearly impossible but areas that the spider mites are in particular high densities isopropyl alcohol should be used to physically break the webs and desiccate what mites it does come in contact with. The physical breaking of the webs is a time-consuming challenge, but if the webs are left the beneficials will not be able to reach the spider mites.
-Leaf hot spots were simple cut and removed as a whole as these leaves were basically going to be a total loss. The number of leaves removed was kept to only the worst ones to reduce the number of leaves that would be absent for the rest of the growing season.
2.) Beneficials Ordered
-However, the company only ships them on certain days of the week and they have to be shipped overnight so there may be a delay from the order to the arrival.
3.) Spray Applied
After the physical removal and removal of select leaves there was going to be a few days delayed until the expected arrival of the beneficials so only in the areas of dense populations noticed was a combination of two products (active ingredients Abamectin and Hydrogen Dioxide) were applied. The Abamectin is a known miticide and the hydrogen dioxide may help desiccate the small mites. There would be a few days until the beneficials arrive to the risk to these would be minimal while maybe offering some effectives against the two spotted spider mites.
*More details to come soon...
|
|
|
|
Wednesday, August 4
|
View Page
|
 |
Predatory Mite Release Night
After a six-day span form ordering to arrival it is time to release the army of beneficials. The reason why the image is taken at night is this is when these mite predators are most active so get out the head-lamp.
It is important to realize the actual beneficials are very, very small so what is being spread is fine sawdust like filler material. This does require some patience to carefully sprinkle this material on as many leaves as possible in a thin but even coverage over the entire plant. Also, you want to leave the “empty” containers in the growing area for at least 24-hours. Even though the containers may look empty there can still be beneficials inside (this is just how small these are) so leaving the container sin the grow space allows for them to escape and still be in the area intended.
Looking at all the options available and consulting with the beneficial insect people, the decision was made to purchase two different species of beneficials that would be the “best” for two-spotted spider mites grown in a high tunnel (about 1200sq.ft.) with high plant density during the hot month of August.
Phytoseiulus persimilis- (6000 purchased) A great mite predator for spider mites in humid greenhouses and for dense field crops.
Neoseiulus (= Amblyseius) californicus- (5000 purchased) This mite predator survives low spider mite densities by feeding on pollen and other small arthropods. Survives a wide range of temperatures and can tolerate lower humidity (40%RH).
|
|
|
|
Saturday, August 7
|
View Page
|
 |
Unexplained Rapid Leaf Wilt and Burn
During the morning of August 2nd (5-days ago) leaves were seen wilting/drooping at the margins. Misters were put on “just to see what would happen” and in short there was no visual change. By the end of the day the edges were starting to get dry and by the next morning there was clearly evident burn to the leaves.
The evening the first wilting was noticed, a phosphite fungicide was applied and even though in the morning the wilted portions were burned the rate of progression seemed to have stopped. Now, this did not last forever but progression of the burning has been much slower than expected considering the speed the initial progression only took hours to spread.
At the moment it seems the issue has the rate of spreading characteristics of a phytopthora but has visual signs of Verticillium so it is a bit perplexing at the moment to what is exactly going on.
For those wondering the pumpkin was not measured today, but here at the August 1st numbers and based on the visual diagnosis of the plant, and additional growth will be a bonus…
2294.5 Noel ’19 x self
August 1st, 2021 Day 72
OTT = 406”
Estimated weight = 1426 pounds
|
|
|
|
Saturday, August 7
|
View Page
|
 |
Spider Mite Predators Utilized
Two species were purchased and since there was an outbreak the high-density release rates were used. So, in the about 1,200sq.ft. cold frame growing space the following mites and numbers were purchased…
Phytoseiulus persimilis- 6000 purchased
Neoseiulus (= Amblyseius) californicus- 5000 purchased
Key Points
-Use Isopropyl alcohol to break the protective webs of the spider mites
-Release at night as the mites are active at night
-Distribute/sprinkle as evenly as possible across the entire growing area
-Leave containers in growing space for at least 24-hr post release to allow any mites still inside to ensure the growing space (they are very small!)
|
|
|
|
Saturday, August 7
|
View Page
|
 |
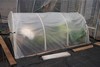
Overview of Plant and Structure
From this view point the plant and structure look to be in good shape, but the plant is continuing to have the progression of the margin burn. While the rate is much less than was initially seen it is still progressing. The determination of the exact cause is hitting many road blocks so a sample will likely be brought to the diagnostic lab for analysis.
|
|
|
|
Saturday, August 7
|
View Page
|
 |
Side Insect Netting
This just shows the side walls that are insect netting and the top that is 6mil. Greenhouse grade plastic. The insect netting is Protek net 70g which is very strong and resilient to tearing. The reason for this addition is to help maximize air circulation while minimizing the chance of insects coming in contact with the plant.
The structure is on a bit of a slanted growing area, but the exposed area of aeration is about 8 to 10 feet and is on both sides of the structure. This really allows for good cross winds and have helped keep the humidity levels much closer to ambient conditions. Fans are still running inside and the large exhaust fan is still on a thermostat so during times of hot weather there is additional air movement. Not sure how much of a true benefit this provides, but it does help ensure there is not a buildup of a pocket of hot air in the structure.
|
|
|
|
Thursday, August 12
|
View Page
|
 |
Odd Plant Burn Pattern (New vs. Old Growth)
When investigating the leaf burn issue, the pattern of progression seems to be a bit odd and inconsistent. This image clearly shows that the newer growth is not “infected” or showing the burning issue. As the image shows the “new growth” is not vine tips just younger leaves that have fully expanded which only adds to the overall complexity.
|
|
|
|
Thursday, August 12
|
View Page
|
 |
Odd Plant Burn Pattern (Some Old Leaves Have Minimal Damage)
Another layer of complexity to the observed issue is that some older leaves seems to be “missed” by the margin leaf burn. Many who look at the leaf burn may agree that it looks like spray damage. However, seeing several older leaves showing minimal damage only adds to the confusion.
In addition to this most spray products are applied from the outer portions of the plant inward which would suggest the leaves near the outside would get more damage than those inside of the structure, but the issue severity is just the opposite.
Also, in general a leaf does not get “missed” so the wide spread, but at the same time in areas spotty appearance of the leaf wilting has led to the causing being inconclusive based on field diagnosis. So, a sample will be brought to a professional lab to see what they may be able to culture.
|
|
|
|
Thursday, August 12
|
View Page
|
 |
General Plant Overview
Clearly not what you want to see with a pumpkin plant but it seems along the main vine has the most damage. This essentially rules out spray damage as most of the spraying is done from outside in so the leaves on the outer most portions of the plant should be the most damaged.
Some may think the pumpkin is simply dehydrating the plant, but the moisture meters in the soil buried at three distinctive plant areas (older growth, near the pumpkin and newer growth) tell a different story and that this has remained consistent over the growing season.
The initial rate matched phytophthora, but what is seen now looks like verticillium wilt. Samples will be collected today and brought to the lab for another opinion and also to see if anything can be cultured from the leaves, vines or roots.
|
|
|
|
Friday, August 13
|
View Page
|
 |
Spider Mites Eliminated!!!!!!!!!!!
After initially visually diagnosing the two spotter spider mites visually and with the aid of a 30x loupe their numbers were high. (See images from July 29th, 2021)
Predatory mites were released on August 4th (at night) and then today August 13th (9 days later) samples were taken to a diagnostic lab for viewing under the scope and no spider mites were observed! Great when a plan comes together, however the other leaf burn issue is still being plated up and process for a diagnosis.
However, this shows the potential benefits of using beneficial insects to control other pests so this continues to warrant consideration by other growers to if nothing else at least consider this option for certain pests as it may be more effective than the traditional chemical option.
|
|
|
|
Monday, August 23
|
View Page
|
 |
Diagnostic Report 8-23-2021 for Giant Pumpkin Plant
The official report is included in the image (and quoted below), but short, only trace pathogens could be detected and it is possible that the control spray eliminated the actual problem.
So, at the time of harvest another sample will be taken and submitted to the lab to see if by this time the issue has had more time to replicate and become detectable.
“Diagnosis/Recommendations
Diagnosis: No pathogen found (Identification Analysis)
Comments: No Pathogen Found
We attempted to isolate the pathogen causing decline using fungal and bacterial culturing. Using this approach, we cultured mostly saprophytic fungi. There was a very small amount of Fusarium sp. cultured from one piece of plated root tissue (one piece out of twelve plated). No other plated root or leaf pieced produced fungal structures of note.
There was a very slight amount of bacterial streaming observed. Bacterial streaking resulted in a low amount of bacterial growth on nutrient agar. Colony shape, size and coloration were inconsistent. Leaf tissue was macerated and tested for presence of Acidovorax citrulli, causal agent of Bacterial fruit blotch, using an Agdia ImmunoStrip. The tissue tested negative for presence of this bacterium.
When tape-mount slides were initially prepared from leaf tissue to observe fungal sporulation, there was a small amount of what was believed to be Verticillium dahliae, though this pathogen was not able to be cultured.
It is possible that the causal fungal pathogen, Verticillium or whatever it may be, was/is being controlled using applied fungicides/bactericides. Applied pesticides may have accelerated the appearance of disease onset - fungi present within plant tissue often causes the tissue it was feeding on to become necrotic when killed. The pesticides applied may also have inhibited the growth of the causal agent in culture, but we have no way to confirm this.”
|
|
|
|
Sunday, August 29
|
View Page
|
 |
Second Round of Giant Pumpkin Plant Material Testing
At the time of pumpkin harvest one last round of plant samples were taken to see if anything could be found by the Diagnostician. After many trials and rounds of attempted culturing only some fusarium was found which based on a section of vines visually diagnosis this may have been present in one area. However, this was unlikely the cause of the plant collapse.
So, after getting this data and general plant/field scout it seems the sudden collapse may either be genetic (which seems unlikely) or is related to the Spider Mite infection (more likely). While the exact causal agent cannot be identified it seems that the Spider Mites were connected to the collapse of the plant. Spider mites are not common in giant pumpkins so there is little evidence to cross compare, but the lack of the lab fining much can rule out many bacterial and fungal potential causes.
The predatory mites certainly did seem to help with the elimination of the spider mites, but the damage may have already been done as plant stress was high with pumpkin growth and hot weather.
So, while this restricted the weight of the pumpkin at least it will be going to an official weigh-off.
|
|
|
|
Tuesday, August 31
|
View Page
|
 |
Pumpkin Ready for Loading
Here the plant does appear to have some nice normal green color, and while it does this is newer growth that was allowed to replace the damaged leaves that were seen earlier in the year. The idea is that this would at least maintain the weight of the pumpkin.
|
|
|
|
Tuesday, August 31
|
View Page
|
 |
Pumpkin on the Trailer
Planning and preparation goes a long way and this is the image all growers hope for at the end of the season. This pumpkin will be heading to the Woodstock Fair Weigh-off that will be during the Woodstock Fair held during Labor Day weekend.
|
|
|
|
Thursday, September 2
|
View Page
|
 |
1761 DeBacco ’21 (F: 2294.5 Noel ’19 x self) OTT: 427” 5% Heavy
There are always a lot of obstacles each year, but this year seemed to especially challenging. There were many days of rain and the days it was not raining it was cloudy. The revisions made to the structure should be helpful at moderating the ever-changing weather.
With the unique issue I had this year, I am very happy to not only get a pumpkin to the scale but one over 1,700 pounds.
|
|
|
|
Saturday, September 4
|
View Page
|
 |
Plant Clean-Up
At the end of the season, it is important to take the time to clear out as much of the plant as possible. Especially, since the possible reason for the leaf collapse was unknown at the time of harvest.
|
|
|
|
Saturday, September 4
|
View Page
|
 |
Plant Removed
Here the entire plant was placed into the green trailer in the right which once compressed the plant took about 2.5 cubic yards and will be transported off-site with grass planted after as a long-term cover crop as this site is not planned to be grown on next year.
|
|
|
|
Saturday, September 4
|
View Page
|
 |
Grass Seed Cover Crop
Many growers will plant mustard as a cover crop, but establishing the soil and not having any major signs of disease issues, regular turf grass was chosen to be planted. Typically, this establishes well, and is easy to mow when the site is having a rest year.
|
|
|
|
Saturday, September 4
|
View Page
|
 |
Grass Seed Blend
It seems the “Sun and Shade” grass seed blend changes from year to year so here is an image of the blend for this year.
|
|
|
|
Monday, September 6
|
View Page
|
 |
Woodstock Fair 2021
Great to be back this year! Despite a rainy year at least the Fair had some nice weather. Thanks to everyone who made this year possible!
|
|
|
|
Monday, September 6
|
View Page
|
 |
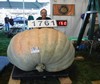
1761 DeBacco ’21 (F: 2294.5 Noel ’19 x self) OTT: 427” 5% Heavy
Here is an image of my pumpkin on display at the Woodstock Fair. It was great for the pumpkin to weigh heavier than expected and to also win first place was another bonus.
|
|
|
|
Saturday, September 11
|
View Page
|
 |
Grass Seed 1-Week After Planting
The key to establishing grass seed is making sure it is consistently watered. Warm weather can also help the process, but it is important to maximize the conditions you have control over.
|
|
|
|
Friday, December 31
|
View Page
|
 |
Grass Seed about 4-months After Planting
Well, there is no snow on the ground and December was a top-3 warmest on record so looking at the growing site you would not be able to tell this is where a pumpkin plant has been grown.
Overall starting with only one plant and getting a pumpkin to the scale was an accomplishment. Having the pumpkin weigh over 1,700 pounds was a bonus.
2021 Growing Season Result:
1761 DeBacco ’21 (F: 2294.5 Noel ’19 x self) OTT: 427” 5% Heavy
|
|
|
