| |
|
Click on a thumbnail picture below to see the full size version.
|
30 Entries.
|
|
Saturday, February 23
|
View Page
|
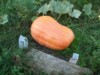 |
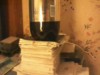
Take a chance on a neat-o cross? here is the 284 (actual weight at harvest)
Gerry '18 - 1585 Werner X 1385 Howell/Jolivette - this cross is not listed on
PumpkinFanatic, and I know the usual route is to prove one's OWN seeds first,
before bestowing them onto the growing public, but, what the heck!
the next pic will be of the pollinator, the 1385 H/J; neither pic does the 284 justice---
it actually filled in and wasn't bad at all about 3 weeks after a dry spell and this shot was taken.
another fruit of about the same size was 5 feet away but i did not request the seeds back from it;
THAT was a better-looking one (1585 X 783 Daletas)---oh, well---email me for a half-doz!
pumpkinpal@msn.com
|
|
Ā
|
|
Saturday, March 2
|
View Page
|
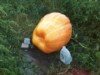 |
here is the 1385 H/J pollinator for the 284.
judging by the heritage of each and the COLOR
as well, 1585 X 1385 (also neat-o numbers) should
be a great cross and they can be gotten for emailing
me at pumpkinpal@msn.com for just a SAS bubble and i'll
most-likely be trying it this year as well.
NO reason not to, huh?
OTHER seeds would accompany this one - Ho, Ho, Ho.
Look at the next page if there is one up yet! eg
|
|
Ā
|
|
Saturday, March 2
|
View Page
|
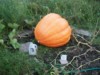 |
here is the result (around 371) of my 301.5 from '05 (677 Catapano X 689.5 Sandercock);
nothing but happiness in donating its eventual same blazing color and near-this-estimated-weight
to a local college for a fund raiser.
seeds available, no problem with sprouting at all---
pumpkinpal@msn.com
|
|
Ā
|
|
Saturday, March 2
|
View Page
|
 |
here is my 540.8 '18, grown from my 188 seed (335 Gerry X 689.5 Sandercock);
it was used to promote a business/restaurant in a local shopping mall, with
great results. the 188 seeds are available. this pumpkin 'grew itself'; i MUST grow it again!
eg
|
|
Ā
|
|
Tuesday, March 26
|
View Page
|
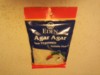 |
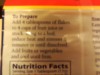
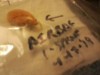
This is the stuff! AGAR! To sprout your seeds in!
This was bought at Wegmans in DeWitt, NY for about $7.49 or so, but I'm sure that almost any grocery store
would have either this or their own, other brand of it for 'thickening of soups or broth' and/or anything of a
gelatinous nature, lol---
WE have OTHER plan(t)s for it...
I'm sure that I'm not the first grower by any means to have tried sprouting seeds in agar, but I did it last winter and
never presented my findings and had intended all of THIS winter to do so; I sure wish I had done so about two MONTHS ago,
but it is what it is!
It is a very NEAT-O weigh to sprout seeds and i hope you try it yourself, posting your results as well---
the first trouble i had (but that made me think i was a pioneer about it!) was that searching 'agar' on BP only showed a million results
for 'Ni(agar)a'! It was exhausting to plod through even just MOST of them.
Well, read on:
|
|
Ā
|
|
Tuesday, March 26
|
View Page
|
 |
you'll need this, of course;
i suppose that if the water is warm, even relatively hot,
that will be helpful, but not necessary;
|
|
Ā
|
|
Tuesday, March 26
|
View Page
|
 |
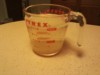
for this brand, the recommended recipe is one tablespoon per cup of water, but,
i defaulted to doubling that right away, so i found that TWO tablespoons per cup is much better,
yielding the consistency of a nice piece of...pumpkin...pie or something---you know...jussst right....
|
|
Ā
|
|
Tuesday, March 26
|
View Page
|
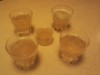 |
These are 1/2 cup (4 oz.) (four-ounce) juice glasses and
a dosing cup for Milk of Magnesia or something---I'm just glad there was a little extra
to put in something else, ya know?
Anyway, I microwave-heated the 2 cups of water alone to about 120 F* and stirred-in the 4 tablespoons
one-at-a-time with the tines of a FORK; this kept the flakes from sticking to what would have
been a spoon otherwise, like, just at the surface---you'll thank me!
Once the flakes were dissolved pretty well, I microwaved the mixture again until it was pretty much
almost about to boil, but NOT quite, with my finger on the STOP button.
I have found that it is NOT necessary to even get near boiling to use this stuff, but completely dissolving
ANYTHING in liquid is always the weigh to go, lol---
OK, with my juice glasses and dosing cup in the sink, i deftly poured the agar solution into the glasses
and dosing cup in the sink and rinsed out the measuring cup with HOT water and set it aside for next time.
I KNEW there'd be a next time. THIS next time, it'll be in about 4 weeks, when i sprout several REAL seeds
in agar for 2019's growing season!
CONTINUED:
|
|
Ā
|
|
Tuesday, March 26
|
View Page
|
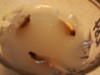 |
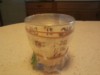
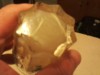
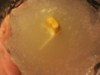
SO, once your little glasses (or plastic cups, to be discussed later) of AGAR have cooled enough to handle
(15-20 minutes), you can then be amazed by how opaque it is, wonder why it couldn't be more CLEAR,
and note that your kitchen smells like spaghetti cooking before the sauce has been opened and added, etc.
oh, yeah, don't forget to turn one upside down and see how hard it is to...well, you don't need a mess
on the countertop - i'll tell ye, it stays in there pretty good!
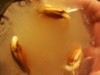
As per the picture, (sorry, it's horrid) what you'll do is NOTHING to your test seeds.
just grab each one with a pair of tweezers so that you can place said each one TIP-UP in the agar at a 45-degree angle;
i found that planting them in the vertical, tip-down fashion does not allow any air to get to the radicle and/or
allow the seed to sprout for me at all.
perhaps YOU will have it happen for you, but not for me on this end, just yet.
SO, do the 45-degree thing, as shown. the tips need to JUST be sticking outta the agar, no worries about SLIGHT
submergence, either, if by accident - it HAS happened:
the seeds WILL try to squeeze out of the agar, so, some jockeying and periodic checking of the
positions will be warranted, for a FEW minutes, anyway----see more>>>!!!
|
|
Ā
|
|
Tuesday, March 26
|
View Page
|
 |
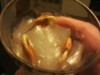
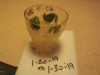
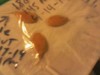
Woo-hoo. Agar-time!
Three little piggies waiting to sprout now.
It is recommended that you cover them as shown for 3 days until they sprout,
labeled as such, etc., as agar does dry out just like pudding, complete with the surface cracks and
shrinkage, and it doesn't need to be in the pool, lol, for it to happen.
the GOOD news is, it is about 99 percent water, so, there'll be no shortage of that for a while.
the OTHER good news is that the nutrients in agar are from SEAWEED, so, your seedlings will be
as green as can be, seem to grow on forever and YOU'LL BE ABLE TO SEE THE ROOTS in all their glory(!).
I intend to have a page later listing things i have NOT done with agar yet concerning seedlings,
that YOU can try and then post your findings about.
OKay, let's see if they sprout in <=72 hours at ROOM temperature>>>
|
|
Ā
|
|
Tuesday, March 26
|
View Page
|
 |
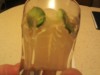
YUP! 72 hrs. NO heat---I'm cheap! probably down to 50F* all day and 77 12 hrs. at night, no real pattern;
the one at the top left appears to be the only one VISIBLY sprouting, but the others
probably are as well, but, who wants to wait for all THREE? Not ME!
|
|
Ā
|
|
Tuesday, March 26
|
View Page
|
 |
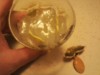
Probably the next day, knowing these anxious little buggers,
284 Gerry '18 (1585 Werner X 1385 Howell/Jolivette);
I wish these were not TEST seeds - they seem rarin' to go patchward!
ahem...
|
|
Ā
|
|
Tuesday, March 26
|
View Page
|
 |
probably even the next day after that---
please notice the drying surface of the agar.
NOT to worry - I just wanna see them pointing skyward before watering them!
|
|
Ā
|
|
Tuesday, March 26
|
View Page
|
 |
SO, whatcha do now is what you would do in any other seed-sprouting medium:
Remove the seed coats.
Shells. Casings. Whatever.
They gotta come off.
I use my tweezers (forceps, actually) that are very high-quality and heavy-duty
to gingerly and deftly (more like CAREFULLY) remove them to the end shown in the picture;
leading up to this, you can gently re-position the seed coats for several days, slowly helping the
ROUNDED ends of the seeds to be ABOVE the surface of the agar, fast-forwarding what will happen
in Nature anyway, and then remove the seed coats to facilitate that the seed leaves are able to unfurl and
become upright in the process...it'll be worth it, I'm sure---->>>
|
|
Ā
|
|
Tuesday, March 26
|
View Page
|
 |
this pic should make you wanna see more...
ROOTS!!!
oh, they'll be right along...i can assure you---and soon!
|
|
Ā
|
|
Thursday, March 28
|
View Page
|
 |
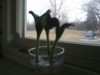
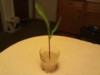
Once the seed coats are removed, of course, things progress nicely as our seedlings begin to
green-up! Again, they had no heat added and I'd Iike to think that they'd grow even faster if they had HAD that luxury;
Lighting for them was just daytime in the living room and about 2 feet away from a couch-end table lamp in the eves;
I purposedly planted them close to the edge of the glass for better viewing of the root system, to be seen better shortly!
|
|
Ā
|
|
Thursday, March 28
|
View Page
|
 |
Looks like a fish skeleton; so I'm thinking of this out in the soil; perhaps the ol' tap root
heads straight downward while these sidewinders traverse the patch outward from it.
I think it's amazing that there are those TWO types of soil navigation. it makes SENSE,
but it's still amazing!
|
|
Ā
|
|
Thursday, March 28
|
View Page
|
 |
ya just can't see enough of pics of roots, lol---
|
|
Ā
|
|
Thursday, March 28
|
View Page
|
 |
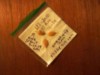
these are shown to be on 2-6-'19, about 6 days since the first pic of them 'greening-up';
thus far, not really any FASTER than in normal seed-starting mix, but, you can SEE the roots
and there IS a HUGE advantage to all this I have found; more later on that! >>>>>>
|
|
Ā
|
|
Thursday, March 28
|
View Page
|
 |
Oh, YEAH, this works on such a thing as CORN, too!
Just lay the seed on top of the agar, smush it in a little bit and
watch for 72 hrs. covered but unheated as Holland's Tall Corn loves this method!
|
|
Ā
|
|
Thursday, March 28
|
View Page
|
 |
a few days' growth; just so happy it's gonna work!
|
|
Ā
|
|
Thursday, March 28
|
View Page
|
 |
although i love the corn, i gotta get back to pics
of the pumpkin seedlings, lol---
|
|
Ā
|
|
Friday, April 19
|
View Page
|
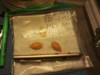 |
Okay, a seed experiment to see which circumstance sprouts better, either with air in the ZipLoc bag or without---
This is my 188 '10 seed, (335 Gerry (746 Snyder X 904 Stelts) X 689.5 Sandercock 869.5 Calai X SELF) which I can't WAIT to plant 'for real' in '19!
Note that this ZL is a little 'puffy';
|
|
Ā
|
|
Friday, April 19
|
View Page
|
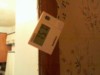 |
Proof of the ambient temperature in my living room, lol---65-75 F* these days, thankfully!
|
|
Ā
|
|
Friday, April 19
|
View Page
|
 |
PS---in my zeal to get another picture in my diary, the previous pic is actually of the
actual temperature of the EVACUATED ZipLoc bag, which is shown HERE under a
2-liter Diet Pepsi bottle to keep it squished out of all of its air;
To get the air outta the bag, I used a triply-folded dishtowel on the kitchen countertop
placed on top of the ZL bag with the seeds in it, pushing down of course and zipping the
bag shut at the same time - nice!!!
Whoa, back up just a minute - each ZL bag has a DISTILLED watered-down paper towel in it,
(make sense?) which was folded in half FIVE times and compressed under a Mason jar in the sink to get
as MUCH water out as possible, opened up to folded just TWICE and placed in its respective ZL bag;
|
|
Ā
|
|
Friday, April 19
|
View Page
|
 |
Sorry if this is the same pic as on the previous page - no running account of what I've sent!
SO, at about the same time, in the late evening of 4-17-'19, SINCE 4-14-'19 @ 1:45 am,
not the magically-delicious 72 hours but more like 4 days' time, shoulda kept better track of it,
I had a sprout occur from each of the test sets of the same Year 2010 seeds(!).
Nice! Remember that this occurred in a range of 65-75 degrees F*;
PS---Lotta PSs with me, lol! :
The 2-liter bottle was on top of a CD case, then a doubly-folded washcloth,
then the seed ZipLoc, then another CD case under it all, a seedwich, if you will!
|
|
Ā
|
|
Friday, April 19
|
View Page
|
 |
Okay, enough about Mr. Squishy-Outy, lol - here's the one sprout that occurred
in the Mr. Puffy ZL bag.
Foreshadowing >>> the root is growing DOWNward, right? hmmm...
|
|
Ā
|
|
Friday, April 19
|
View Page
|
 |
Well, long story short:
This pic is of THREE sprouts in the ZL bag that was squashed of all its air,
one day later!
Wazzup with Mr' Puffy?
No further sprouts.
I have,, however, put the remaining TWO in that bag under the soda bottle/CD cases,
just in case the absence of air can be prorated and after-the-fact! i'm anxious, now...
AND, interestingly, the roots in the airless bag are growing FLAT, along the paper towel,
since they are unable to do otherwise.
the absence of air in the respective bag is pretty constant, as in it still has no 'mobile' air in the ZL bag;
This experiment indicates to ME that perhaps an AIRLESS environment is better-suited to seed-starting than
previously thought----I realize that MORE experimentation needs to be done to support this,
and I of all people will of course try it again as i do seed-starting for my 2019 crop anyway!
There's even another pic!!! >>>
|
|
Ā
|
|
Friday, April 19
|
View Page
|
 |
wait and see what happens to bad little roots that have to be hung out to dry like this!
couple days, probably...wait for it...wait for it...lol-----eg
|
|
Ā
|
|
Friday, April 19
|
View Page
|
 |
Please know that the next day, today, there are two newly-sprouted seeds in what appeared to be a lost cause the day before;
That's them in the pic!
Henceforth, producing the following:
1. a ZipLoc with NO air in it, 1, then 2 more sprouts the next-day and
2. a ZipLoc with SOME air in it that had 1 sprout at the same time
as the one without air in it, and also
3. two more sprouts the next, next day, after transferring the
airy seeds to the airless environment.
Regardless of the 'minute' time frame, in 4 days 2 sprouts, in 5 days 4 sprouts and in 6 days the remaining, transferred 2 sprouted, so,
100% germination AT 65 - 75 DEGREES with a NOTICEABLE accent on airless ZipLoc sprouting---I give it a '!!!'.
try it yourself, people! I know I'll be doing more with it really soon---
eg
|
|
Ā
|
|
|
