|
Tuesday, September 5
|
View Page
|
|
Hello everyone nice to meet you all. I am a new grower this year and look forward to some fun and some giant veggies! I will be growing mostly organic and with rain barrel water so will be setting goals for PB and satisfaction of growing big stuff :) I have been working on a couple of my spring planting locations and have a few pictures to try to explain what has been done so far. I didn't take pictures of the early part of prep work so will just have to describe it.
|
|
Ā
|
|
Wednesday, September 6
|
View Page
|
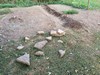 |
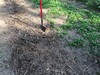
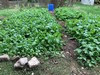
What I have here is a 3ft diameter 2ft deep hole for the primary giant pumpkin planting site connected to a 2ft wide 30ft long 18 inch deep trench filled with compost layers covered with the trench dirt. Above that a normal layered compost mound. The planting area is a first time till area as can be seen by the concrete sidewalk pieces unearthed in the process. The entire 20'x30' area has been fine tilled to a depth of ~12 inches and planted with a cover crop mix.
|
|
Ā
|
|
Wednesday, September 6
|
View Page
|
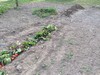 |
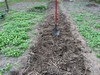
Here you can see all three steps. The back is the 3' pumpkin planting site plus about 10' of completed area. Next a small strip with the compost buried but not covered with the top layer of green material. The front of the picture has the fresh green additions. The picture before this one shows this same area covered with the brown material mix. In a few weeks I will add another green and brown layer.
|
|
Ā
|
|
Thursday, September 7
|
View Page
|
 |
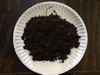
Here is part of the compost brown mix. This area is where I have had my loads of shredded leaves dropped for the past few years. Some very rich leaf mold was added to the compost piles.
|
|
Ā
|
|
Thursday, September 7
|
View Page
|
 |
This is the other source of compost brown material I am using this year. This was a compost pile for the last 1 1/2 years. I raked up the course material and used it in the compost trench as well as on top of the pile. This will provide some great active bacteria for the new trench pile.
|
|
Ā
|
|
Thursday, September 7
|
View Page
|
 |
After raking the course material and removing it from the old compost pile, I added my top secret cover crop mix...lol. I was reading about different cover crops everyone planted and realized I had about everything mentioned plus some in my deer food plot mix. I will use this old compost spot for one of my giant tomato plants next year. Going to experiment with no till in this location since it should be loaded with active bacteria cultures and insect activity I don't want to disturb.
|
|
Ā
|
|
Friday, September 15
|
View Page
|
 |
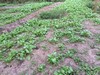
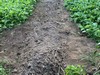
Turned the compost under down the length of the primary vine area. Cover crops are starting to fill in somewhat in the secondary zones. Still some patchy areas though; might need to re-seed in spots.
|
|
Ā
|
|
Friday, September 15
|
View Page
|
 |
Hoping for some rain to mix it all together well after turning with a shovel. After it all settles a bit I will layer some more green/brown layers.
|
|
Ā
|
|
Saturday, September 23
|
View Page
|
 |
Finally got a decent rain about 1.25 inches over two days. Nice slow soaker that brought up the rest of the cover crop seeds to fill in the open patches.
|
|
Ā
|
|
Saturday, September 23
|
View Page
|
 |
Here is the beginning of my giant tomato area for next year. I dug a hole just past the old compost pile down to the clay level. I dug a little way into the gray clay so I could mix it back with the compost destined for that hole.
|
|
Ā
|
|
Sunday, September 24
|
View Page
|
 |
Had a nice rain that brought up the rest of the cover crop seedlings and settled the compost area.
|
|
Ā
|
|
Sunday, September 24
|
View Page
|
 |
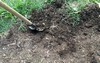
Started working on the giant tomato area near the old compost pile. I dug a planting hole down into the base clay layer. I wanted to mix some of the rich clay soil with the composting material.
|
|
Ā
|
|
Sunday, September 24
|
View Page
|
 |
Here is the hole filled with compost material and some clay for reference.
|
|
Ā
|
|
Sunday, September 24
|
View Page
|
 |
The original dirt added on top of the compost in the hole. This area had tons of earthworm tunnels when I dug it so the worms should be feasting now!
|
|
Ā
|
|
Thursday, September 28
|
View Page
|
 |
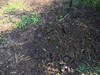
I added some wood ashes to all the compost projects. I mixed the ashes in the pumpkin trench using a shuffle hoe to also take out volunteer veggies from the compost. The recent warm weather has germinated many small plants. I was planning for that next spring and am happy to see it this fall to knock out a lot of them prior to spring. Bonus from the 90+ temps we have had here for the last couple of weeks. Soon I will have my tree leaves to till in and also cover the entire area for the winter.
I have decided to dig a new start location for the giant pumpkin on the east end of the trench. After digging the trench I noticed the east end held a lot more water. We have been in a drought this year and the east side was still damp when I dug the trench. The cover crop grew much better on the east side because of the higher moisture content.
I was wanting to use the west side because it is sheltered behind the garage with a southern exposure. That would have been very useful for an early start. In the long run though I feel the east side will be a better choice. So I built another compost pit on the east side. I will use the west end pit for an early giant tomato.
|
|
Ā
|
|
Monday, October 16
|
View Page
|
 |
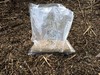
These are the seeds I am going with for the winter tomato growing contest (Thx Qtip!). Pre-soaked one of each for 2 hours in rainwater.
|
|
Ā
|
|
Monday, October 16
|
View Page
|
 |
Planted each in a plastic cup with corresponding number labels and drainage holes in the bottom. Using T8 regular fluorescent with one cool white and one plant growing fluorescent tube. Hoping to get a full spectrum mix that way.
|
|
Ā
|
|
Monday, October 16
|
View Page
|
 |
Here is the soil mix I am using for the tomatoes. It is about 1/5th 2-3 year old leaf mulch, 1/5th last years compost remains, and 3/5ths new till garden soil. Mixed it all together and then heated to around 140 F to kill most seeds and harmful bacteria while keeping many beneficial microbes for the soil. I tested some of my regular tomato seeds in it a few weeks ago and they seemed to do great in this soil.
|
|
Ā
|
|
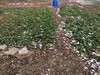
Sunday, November 5
|
View Page
|
 |
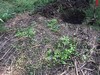
Pumpkin patch cover crop is looking good now. I just planted the same mix down the primary vine lane. I want it there until I plant the pumpkins in May so waited late to plant the cool crop mix for the primary vine. Winter should kill some of the cover crop soon but most will last almost all winter. The mix has at least 15 different plant species in it with the brassica/turnips/radishes showing the most growth currently.
|
|
Ā
|
|
Saturday, November 18
|
View Page
|
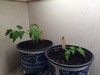 |
Lost the number 2 seedling soon after germination so am left with #1-7.07 Qualley Big Zac and #3-4.86 Q Tip Big Zac. I transplanted them into a larger intermediate container to try to encourage more root development. Added worm castings and mycorrhizal fungi spores during the transplant process. Used commercial organic soil mix since I was out of my mixed soil for the season.
|
|
Ā
|
|
Friday, November 24
|
View Page
|
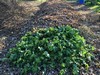 |
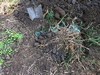
The second confirmed giant pumpkin location for next year. I am going to use a few AG's to re-introduce mycorrhizal fungi to the 40+ year old garden area. All the AG leaf node roots will be used as fungal islands to spread throughout the garden. The cover crop pictured is over last years compost pile location that I was going to use for giant tomatoes but grew tomatoes near there this year so decided to go with another AG instead.
The neighbors had raked a bunch of leaves to the alley so I gladly took them off their hands and relocated them to the new AG planting site. Plan is to attract and hold earthworms to work their magic over the winter. Next spring I plan to add a quick early cover crop over the leaves to pull some deep nutrients up from below.
|
|
Ā
|
|
Monday, December 25
|
View Page
|
 |
Merry Christmas to all! The 7.07 Qualley is morphing into something...stem looked round until today now sort of ribbon like it appears.
|
|
Ā
|
|
Wednesday, December 27
|
View Page
|
 |
Temp dropped to 3F last night. Should be enough to knock out the brassica part of the cover crop. I scattered some daikon radish seeds into the foliage a couple weeks ago so the brassica would cover them when they died back and hopefully they sprout early March. Annual rye and clover should have survived to take over as main cover crop. They have been hanging in the shadows beneath the brassica.
|
|
Ā
|
