|
Friday, January 2
|
View Page
|
 |
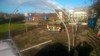
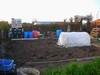
New Years resolution is to be happy, chill a little more and not stress the small stuff. What better way to start the year than seeing all that white stuff melt away
|
|
Ā
|
|
Friday, January 2
|
View Page
|
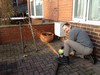 |
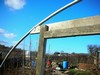
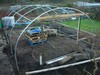
Amongst the many changes being made this year is the addition of a 14'x24' polytunnel (336 sq ft in a 500 sq ft patch). To in backyard garden style its do it yourself time.
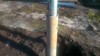
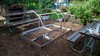
Step 1: salvage enough scaffold tubing to make 10 ground tubes, measure and cut using new christmas present
|
|
Ā
|
|
Friday, January 2
|
View Page
|
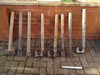 |
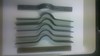
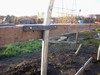
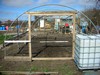
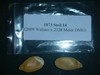
Pictured are eight of ten 27" inch ground tubes. The bar on the floor is 32mm galvanied steel to be used for the five 14' wide hoops, each of which will be comprised of three peices. These are currently being made to order by a local metal worker. The plan is to concrete the pictured tubes to a depth of 18" with 9" above ground for the hoops to slide into. Hoops will be attached to each ground tube with two 6mm thick bolts. A template was made and attached to the top of each tube and two 7mm holes were drilled.
|
|
Ā
|
|
Friday, January 2
|
View Page
|
 |
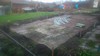
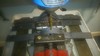
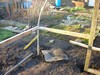
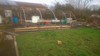
Step 2: Make a brew, admire handy work, wonder what else can be cut with new tool and enjoy watching the snow melting away.
|
|
Ā
|
|
Wednesday, January 7
|
View Page
|
 |
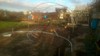
Here's what I'll be growing this year. The 1738 (1730x2009, 20% Heavy) will get the prime spot in the tunnel and will backed up with my 496(1730x854, 19% Heavy) at the other end. Naturally the stronger plant will stay.
Only planned pollination for now is: 623 x 874.8
|
|
Ā
|
|
Thursday, January 15
|
View Page
|
|
My line up just changed and is now FINAL. So excited to be growing these!
1317 Clementz
1738 Barron
1873 Steil
1626 D.Gantner
1662 Stelts
|
|
Ā
|
|
Thursday, January 29
|
View Page
|
 |
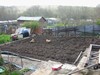
Step 3 - Ground tubes were cemented in 18" deep holes (8" square) to a depth of 12" using postcrete (6 x 20kg bags was ample for the 10 tubes). Tubes were set 6' apart and 14' wide.
|
|
Ā
|
|
Thursday, January 29
|
View Page
|
 |
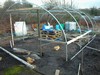
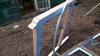
Step 4 - Now this part is best done with two people but can be done with one (as I did with difficulty) providing your ground tubes are in with no chance of moving. As compacted soil is rarely found in a pumpkin patch, the 12" deep concrete around those posts was not enough on 1 of my posts as the leverage created when slipping the hoops in was enough to shift one post.
|
|
Ā
|
|
Thursday, January 29
|
View Page
|
 |
The ground tube circled is the one that was levered out of position and will be corrected (not as obvious in this picture). The hoop is also out of line and needs to be moved in the direction of the arrow. I'm glad I called it a day as it was not so obvious at the time.
|
|
Ā
|
|
Thursday, January 29
|
View Page
|
 |
Step 5 - Secure hoops to ground tubes using 25mm self tapping screws (6mm predrilled holes on ground tubes). Each tube is currently secured with 1 tapping screw (need to get to hardware shop for more).
|
|
Ā
|
|
Thursday, January 29
|
View Page
|
 |
An alternative, and not a tidy one is to pin the hoop with a nail and bend it over. This one is just temporary and will be replaced.
See link for screw used:
http://www.selcobw.com/products/screws-nails-fixings/screws/self-tapping-screws/rawlplug-self-drilling-screws-5-5-x-25mm-pk-100
|
|
Ā
|
|
Thursday, January 29
|
View Page
|
 |
If you scan up to the picture of the ground tubes (2nd Jan) you will notice that some of the tubes are straight at the bottom with nothing to serve as an anchor point to the concrete. These posts are very easy to twist over time and slide out of the concrete. My advise would be to drill through these at the bottom and slide a peice of rebar through to act as an anchor. Since my two of my ground tubes were twisting I had to excavate a a little on one side of the tube so that I could get my drill in parallel to create a hole in the tube with which to place a 6" nail in to serve as an anchor. The hole will be filled more concrete to provide the neccesary strenght. Ideally I wanted to backfill the top 6" of the ground tube holes with soil.
|
|
Ā
|
|
Thursday, January 29
|
View Page
|
 |
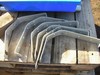
Step 6 - Here I created the fixings to attach the side rail to the hoops. Taking a long pieces of 1" x 0.25" steel I cut out ten 12" strips. You'll need a vice to shape them. First create an incomplete U bend in the middle by centering the 12" lenght over suitable sized tubing, then knock the two ends to create the final shape. Four 6.0mm holes were drilled into each strip to fix it to the side rail (coach screws will be used) and a 5.5mm hole was drilled in the centre for fixing on to the hoop with 5.5 mm x 25 mm tapping screws. Six fixings were made for the 3 internal hoops.
|
|
Ā
|
|
Thursday, January 29
|
View Page
|
 |
From metal strip to finished fixing (x6). It won't take a genius to notice that the flat strip in this picture is not 12"
|
|
Ā
|
|
Tuesday, February 3
|
View Page
|
 |
In addition to Dales great pumpkin at the Summerland Pumpkin Competition in Australia, is this orange beauty that was grown from my 874.8 (1770 Lieber x 1290 Poirier). Pipster has more photos to load up. It was around 553lb but only because the grower had disease in the patch and I hear that growth stopped on all plants. Beautiful colour and was about 15% heavy.
|
|
Ā
|
|
Thursday, February 5
|
View Page
|
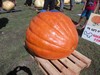 |
Knowing how busy Pipster is, here's another shot of the Australian grown pumpkin from the 874.8
|
|
Ā
|
|
Thursday, February 5
|
View Page
|
 |
Step 7 - Find some thinner (easier to shape) metal to make 4 corner brackets for fixing the side rail to the hoops. Pre-drill holes for fixing. Will need an additional four four the base rail but that is low priority since it will have drop down curtains installed last.
|
|
Ā
|
|
Thursday, February 5
|
View Page
|
 |
I salvaged Ten 8' strips of this metal from the sides of some old shelves and will use these for securing the hoops together. Given that the tunnel is 24' in length I will need 8 (4 per side)
|
|
Ā
|
|
Thursday, February 5
|
View Page
|
 |
Step 8 - After grinding off one edge on each of the end strips, attach to the hoop with a 25mm x 5.5mm steel self tapping screw.
|
|
Ā
|
|
Thursday, February 5
|
View Page
|
 |
..... and simply join with nuts and bolts
|
|
Ā
|
|
Thursday, February 5
|
View Page
|
 |
If like me you are putting your tunnel together by yourself then one or more of these quick grip clamps are essential. The alternative is an Tourette's episode followed by hurling of bits around the patch
|
|
Ā
|
|
Thursday, February 5
|
View Page
|
 |
Step 9 - Door frame. Centre a pre-cut length of timber and fix to the centre of the hoop.
|
|
Ā
|
|
Thursday, February 5
|
View Page
|
 |
Level and attach to hoop with hoop clips. I used 7.5' lengths of pressure treated timber for the frame with around 1' in the ground. Door frame is 6' wide and 6' high
|
|
Ā
|
|
Thursday, February 5
|
View Page
|
 |
Step 10 - Starting with the door end, cut and screw one end on to the frame (use a suitable length of wood to prop the other end up if doing it by yourself and use this all the way round providing you are on flat ground). Attach the shaped bracket to the hoop using 25mm x 5.5 self tapping screws then attach the wood to the bracket with coach screws.
|
|
Ā
|
|
Thursday, February 5
|
View Page
|
 |
The brackets I made couldn't fit any better, sweet! To the left you can see a strip of steel for joining to side bars together. I'll use at least two strips per join.
|
|
Ā
|
|
Thursday, February 5
|
View Page
|
 |
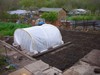
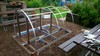
It's coming along nicely. The hoops are not exact as again, doing it with just one person has been a nightmare at times. Also, I just noticed that the tunnel has not followed the natural slope of the patch and hence one side is considerably higher. I would have to shift a load of soil to hide the mistake.
|
|
Ā
|
|
Thursday, February 5
|
View Page
|
 |
Time for a day off
|
|
Ā
|
|
Sunday, February 22
|
View Page
|
 |
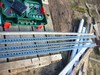
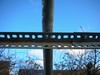
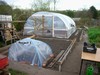
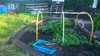
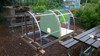
Pretty much there with the polytunnel frame. I have a two batteries for my drill and they determine how much work I can get done. All I need for now is the side rail and two support bars from the 1st to the 2nd hoops to give it neccessary support.
|
|
Ā
|
|
Sunday, February 22
|
View Page
|
 |
Pretty much there with the polytunnel frame. I have a two batteries for my drill and they determine how much work I can get done. All I need for now is the side rail and two support bars from the 1st to the 2nd hoops to give it neccessary support.
|
|
Ā
|
|
Sunday, February 22
|
View Page
|
 |
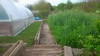
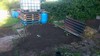
When the batteries are flat I get to start other jobs such as putting in a boundary on the patch. It's raised a little to keep all the leafs from dropping over onto the path. The edging is simply pallet strips, recycled like everything else on this project
|
|
Ā
|
|
Sunday, February 22
|
View Page
|
 |
Sophiana is finishing off some patch signs for for each of the plants. The Mrs thinks these will look more at home is a cemetry.
|
|
Ā
|
|
Monday, March 2
|
View Page
|
 |
One of my favourite patch pictures that just appeals to me. The plant was the 1290 Poirier and was healthy all the way through. The pumpkin was harvested way to early at 86 days and had loads of mileage left in. This patch will never look the same now that it has a tunnel on it. A shame but necessary. The Lace Lady tree to the left has grown and has been pruned to make clearance for the doors to open.
I tell people I have a tunnel as I am tired of growing small pumpkins and they think I'm mad.
|
|
Ā
|
|
Sunday, March 22
|
View Page
|
 |
The tunnel is almost complete and the cover will probably go on in a week or so. Some bad news....this diary will only feature one pumpkin plant (1873 Steil).
The good news...... is after a busy few weeks I have been in discussion with the nutrient company CANNA and have fortunate enough to obtain sponsorship for this year. So..... where I was growing 5 plants I will now only be growing 4 so that I can focus the time I have on giving CANNA a good return for the investment.
Three plants will form the CANNA project, the diary will be called 'Cannatown'
|
|
Ā
|
|
Tuesday, April 7
|
View Page
|
 |
Perfect timing!....the kids are off school for two weeks and the sun is here!
|
|
Ā
|
|
Thursday, April 9
|
View Page
|
 |
1873 Patch - 400 sq ft.
The patch has been tilled and ammended with:
4.4 lbs Sulfur (pH 7.5 down to 7.0).
14 lbs fish, blood & bone (7-7-7).
7 lbs bonemeal.
7 lbs rockdust.
Still to go on:
3 lbs Epsom salts.
0.1 lbs (45g) Boric Acid.
|
|
Ā
|
|
Thursday, April 9
|
View Page
|
 |
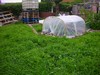
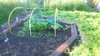
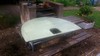
The tunnel is up and a rye/vetch mix has been sowed. However, the water has not been turned on yet so I'll hold wetting the patch until I know I can keep up with watering.
|
|
Ā
|
|
Thursday, April 9
|
View Page
|
 |
2 x 1873's started tonight. One is in for a 6-8 hour soak, the other has a very thin tip so it will recieve a 1h soak and then will be started in cotton wool with the tip sticking out. Having experienced rot to the ends of the cotyledons before I want to be carefull with this one.
|
|
Ā
|
|
Thursday, April 9
|
View Page
|
 |
Clearly didn't need to add any K but will need to build up Mg over time and monitor the pH
|
|
Ā
|
|
Sunday, April 19
|
View Page
|
 |
Seed started 10/4, seedling up 15/4, planted 19/4. Soil temp is not too bad at 18oC.
|
|
Ā
|
|
Friday, April 24
|
View Page
|
 |
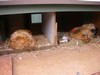
Chicken seem to be treating there food storage container as a giant nosebag.
|
|
Ā
|
|
Tuesday, April 28
|
View Page
|
 |
It's great looking back through the progress in my diary and being able to say it's all finished and to a good standard too. All updates for Projects 1 (1916/1738 Barron) and 2a & B (1626 D.Gantner) will be over in my 'Cannatown' diary.
|
|
Ā
|
|
Tuesday, April 28
|
View Page
|
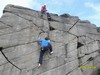 |
Looking back my 2012 diary I can't believe I haven't been climbing since 2012. Time for some fun before the plants kick in.
|
|
Ā
|
|
Friday, May 1
|
View Page
|
 |
While doing a little more reading on line as I'm on top of patch work, I came across this photograph of a garden created in a bomb crater in second world war London. Imagine growing a giant pumpkin out of a bomb crater.
|
|
Ā
|
|
Saturday, May 2
|
View Page
|
 |
So I took Zachary climbing instead and I don't think he cared too much for the 'red line'. Ahh...proud moment for a dad :)
|
|
Ā
|
|
Monday, May 18
|
View Page
|
 |
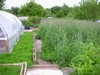
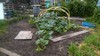
The cover crop (rye/vetch) on the patch being rested this year is almost at 6' and makes an excellent wind break for the 1873 plant.
|
|
Ā
|
|
Monday, May 18
|
View Page
|
 |
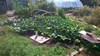
1873 Steil patch will need to be tilled in bit by bit soon
|
|
Ā
|
|
Monday, May 18
|
View Page
|
|
Note: 45g Boric Acid watered over entire patch. Shooting to raise boron in the patch to 3 ppm.
|
|
Ā
|
|
Sunday, May 31
|
View Page
|
 |
The rye/vetch cover crop is at 6' and is starting to creep/collapse onto the path. Definately not looking forward to tackling it.
|
|
Ā
|
|
Sunday, May 31
|
View Page
|
 |
Another job creeping up on me is turning the rye in on the 1873 Steil patch. Today I dug in the area to both sides of the tunnel. Simply cut it to ground level and turned it over in a big square with a spade. This has been my method to date but last year I used the the tiller in this patch and while it was a lot quicker, I ended up tripling the mares tail in my patch as a result of the tiller chopping it up for it all to resprout. I now spend a good 10 minutes every visit pulling the stuff out.
|
|
Ā
|
|
Sunday, May 31
|
View Page
|
 |
The garden has been a quiet place with no sign of the chickens
|
|
Ā
|
|
Sunday, May 31
|
View Page
|
 |
.... and here's why: two broodies sitting on 4 eggs each. Betsy on the right went broody a week ago and has been sitting on 8 eggs. Coco on the left went broody 2 days ago so I split the eggs bewteen them so they both have a little brood at the same time. The eggs are from the schools bantams, same type but from black hens and a white rooster.
This evening was a first for me. Betsy is so dedicated that she doesn't bother to get up for a dump. So I found myself bathing a chickens butt in warm water to get rid of the you know what that was becoming a problem.
|
|
Ā
|
|
Tuesday, June 9
|
View Page
|
 |
So far I am very pleased with the 1873; nice healthy leaves and a nice thick stem/vine. I now have a job on the get the cover crop cut down and turned in and for the first time ever I will be nervously treating around the plant with ROUNDUP to get on top of the weeds.
|
|
Ā
|
|
Tuesday, June 9
|
View Page
|
 |
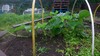
Got some squash in this morning for eating this winter. Planted 1 x Jack be little, 1 x Jarrahdale (both new to me) and 2 x Bon Bon F1 which are absolutely delicious! The aim is to grow these up supports in the same manner growers do with their long gourds
|
|
Ā
|
|
Tuesday, June 9
|
View Page
|
 |
This is the side where the weeds are beating me. The 1873 Steil plant is being treated as per CANNA project plants (i.e CANNA nutrients being used) but does not fall within the CANNA project.
|
|
Ā
|
|
Friday, June 12
|
View Page
|
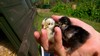 |
These are the schools chicks, about 3 days old. 6 out of 11 hatched and I am hoping for a better success rate for my two Pekins which both have 4 each under them. Hatch day should be the 14th.
|
|
Ā
|
|
Saturday, June 13
|
View Page
|
 |
The 1873 is doing well but has just experienced it's first 24 hr straight session of UK rain. It bugs me that I can't keep the root area at the moisture level I want but the rain could be a good thing as I think this plant could be exhibiting signs of too much nitrogen although I am pretty sure I have not overdone anything with this patch/plant.
|
|
Ā
|
|
Saturday, June 13
|
View Page
|
 |
All the secondaries are there and a good length too, only they are all shooting for the sky along with the tip of the main vine.
|
|
Ā
|
|
Saturday, June 13
|
View Page
|
 |
and some of the leaves (both new and old) have these little splits
|
|
Ā
|
|
Saturday, June 13
|
View Page
|
 |
and..... the vines are extremely thick and many are doubling up. Other than that I'm happy with it.
|
|
Ā
|
|
Saturday, June 13
|
View Page
|
 |
I think this picture shows the problem best.
|
|
Ā
|
|
Sunday, June 14
|
View Page
|
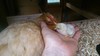 |
Say hello to 'Lucky'. I opended the hutch this morning to see an egg jiggling about. Zachary and Sophiana got arrived just in time to see this chick literally bust out of her egg. Betsy (the broody that was on her) started to attach the chick at which point Coco (pictured), who couldnt see what was going on, instively knew and jumped over a 1 foot high divide to intervene. Sad to have to do it but Betsy was removed from the coop, she was a dedicated broody but turned out homicidal.
Coco has adopted the eggs and an aptly named 'Lucky'. It was purely by chance as we would of otherwise discovered a dead chick.
Seven more to hatch.
|
|
Ā
|
|
Tuesday, June 16
|
View Page
|
 |
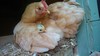
The chicks are perfect, 4 out of 8 hatched.
|
|
Ā
|
|
Tuesday, June 16
|
View Page
|
 |
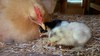
Nature is amazing, between one and two days old and they already no the ropes after watching mum. One even grabbed a small worm and new to run off with it so as not to share. Takes us humans years to learn to toilet train ourselves and chicks learn what they need to for their life in a matter of days
|
|
Ā
|
|
Tuesday, June 16
|
View Page
|
 |
The secondaries of the 1873 are being teased into place very slowly. I guess the trick is not to rush it. The weeds around the plant were removed at ground level with a very sharp scapel. Fine if you have the time and very effective without disturbing the root zone.
Weed maintenance is on that 'to do differently' list for this year.
|
|
Ā
|
|
Sunday, June 28
|
View Page
|
 |
I have no complaints with growth of the 1873 but it is popping out some strange growth in places. This is the second secondary out which I not having experienced this before I can only imagine it is what is termed a flat vine.
|
|
Ā
|
|
Sunday, June 28
|
View Page
|
|
It's pretty much stopped growing as the tip is congested through all the doubling and doubling etc. The tip was cut off and it contained 5 female flowers, at least a dozen males and a whole bunch of leaves.
|
|
Ā
|
|
Sunday, June 28
|
View Page
|
 |
There is however a flower in the tip which I'll go with. With the project plants in the Cannatown diary being pretty full on, I'm just going to go with the flow with the 1873 and let it do its thing.
|
|
Ā
|
|
Sunday, June 28
|
View Page
|
 |
It's always great to see the chicks so relaxed
|
|
Ā
|
|
Saturday, July 4
|
View Page
|
 |
1873 Steil x 1626 D.Gantner (2b), at 13.5'
Pollinated a little later than I'd like (10.15 am), hope it takes.
|
|
Ā
|
|
Sunday, July 12
|
View Page
|
 |
A very slow start to the 8DAP 1873 x 1626 at 13'. There have been more days without sunshine than with so far.
Pollinated the next one down the line at 14' (1873 x self).
I appear to have a black fly infestation on this plant so will need to treat it later today. Really need to get some more cover crop dug in.
|
|
Ā
|
|
Sunday, July 26
|
View Page
|
 |
By far the smallest D22 pumpkin ever to grace my patch but this is just how it is this year. Virtually zero sun due to cloud, cloud and more cloud. A very depressing year.
With this plant I have pretty much left it to it's own devices but the same slow growth is on all my plants and with them, I am doing everything as I should.
|
|
Ā
|
|
Saturday, August 1
|
View Page
|
 |
And so... until the sun comes out and there is a reason for me to be in the patch, I decided to turn my hand to building a chicken coop for a good friend.
As usual and with a very 'rough' plan in my head I look for materials and build the coopn around what's available.
So, there was a solid wooden door in the skip at work so through the saw it went, complete with the metal 'ladies toilet sign' that slipped out attention. The blade needed changing anyway ;)
|
|
Ā
|
|
Saturday, August 1
|
View Page
|
 |
1. Base complete
2. Aluminium corner trim (x2) screwed to each side
3. Aluminium hoops (x4) riveted to trim
4. Hoops riveted together with support strips
Note more hoops and strips to follow once some internal work is done.
|
|
Ā
|
|
Saturday, August 1
|
View Page
|
 |
x3 frames were made, two of which will have doors fitted
|
|
Ā
|
|
Saturday, August 1
|
View Page
|
 |
Two frames screwed into place.
The far end of the structure will be where the chickens will sleep and to keep it draft free I need the floor to be made from a single piece of wood.
And so, it will need to go in at the same time as the last door frame. A large piece of wood also needs to go on the middle frame and hence why not all the hoops are in place yet.
|
|
Ā
|
|
Saturday, August 1
|
View Page
|
 |
First coat of willow green paint for the wall going on the internal frame.
Naturally, for the health of the chickens there will be no painted wood in the sleeping area.
|
|
Ā
|
|
Sunday, August 2
|
View Page
|
 |
I always find that coops look great when you're at just the frame stage and then they go through ugly phase until finished.
|
|
Ā
|
|
Thursday, August 6
|
View Page
|
 |
It's about half done but I ran out of wood
|
|
Ā
|
|
Monday, September 7
|
View Page
|
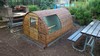 |
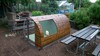
This was finished quite some time ago although this photo doesn't include the final touches (door locks and thumb turns)
|
|
Ā
|
|
Monday, September 7
|
View Page
|
 |
Pumpkin wise, my patch was also done a long time ago. The weather has been terrible this year and for the first 30 days the 1873 never got over 5 lbs a day before rotting off.
Just one of those years, hope 2016 is better!
|
|
Ā
|
|
Monday, September 7
|
View Page
|
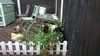 |
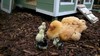
The only things growing this year are the chickens which have taken over this tomato plant. Out of 4 hatched chickens we have 3 hens and Neville the cockrel.
What to do about Neville?...... lets see how long he can stay quite. Shhhhhh!
|
|
Ā
|
