|
Monday, January 4
|
View Page
|
 |
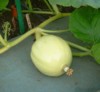
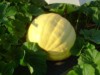
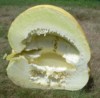
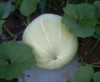
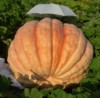
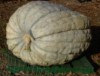
While a pumpkin that is now compost may not seem like it is that important to show inside and out, this case is a little different…
|
|
|
Wednesday, January 6
|
View Page
|
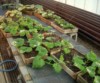 |
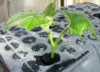
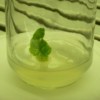
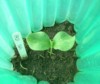
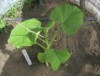
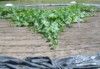
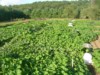
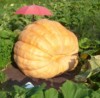
Here is my actively growing 1385 Jutras plant during the winter that grew my 1183 lb. pumpkin last fall. I realize the plant is not as robust as it was in the field, but if you think growing a pumpkin plant outside is a challenge, try growing in a greenhouse. I had many challenges, but talking with other growers and some trial and error of my own, I was able to develop a method that worked for me.
|
|
|
Sunday, January 17
|
View Page
|
 |
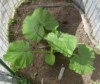
I found that while it appeared the plant was getting a nutrient deficiency, it was probably due to poor root development because of cold soil temperatures. The addition of a heat mat seemed to help increase root development, which allowed for an increase in nutrient uptake.
|
|
|
Sunday, January 17
|
View Page
|
 |
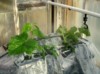
This helped regulate the soil temperature, so that during cloudy days and at night, the rooting area would be warm enough to allow continued root development at all times.
|
|
|
Sunday, January 17
|
View Page
|
 |
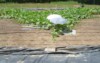
Here is the soil temperature of the potting media in the container that is sitting on the heat mat.
|
|
|
Wednesday, January 20
|
View Page
|
 |
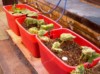
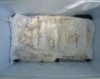
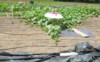
Pictured here, you can see that the roots reached the bottom of the container. To reduce the chance of disease, when I removed a back container I would not reuse it, but removed the potting media and put it in the compost pile.
However, I would flip it over and inspect the root development. If you look at the picture carefully, you can see the outline of the container and contour of the bottom that the roots followed.
|
|
|
Tuesday, February 2
|
View Page
|
 |
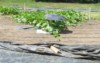
If you look closely, you can see the minimum and maximum temperatures that have been achieved in the greenhouse environment.
To make it easy to understand, the minimum temperature is 68 degrees-F, and the maximum is 86 degrees-F.
|
|
|
Tuesday, February 2
|
View Page
|
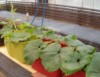 |
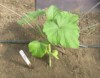
When everything comes together, the growth I was able to get can be classified simply as “excessive.” I was able to get 6” of vine growth a day! (Not bad for during the winter.)
However, in my attempt to prune the plant back to slow growth, I was a little too aggressive, and the plant growth suffered. The plant did not die, but the growth is not any where near excessive, but more like minimal. This entire process has been a learning experience, and this was just another step along the way.
|
|
|
Wednesday, February 3
|
View Page
|
 |
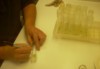
With some extra plant growth, I decided to try and propagate the side vines rather than have them go to waste.
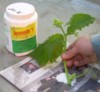
Removing actively growing side vines that were within 18” from the tip were chosen for propagation through inducing roots on the cutting. You can see in the picture the root initial is being dipped in a white powder called “Hormodin 1” which is a rooting hormone IBA (Indole 3-Butryic Acid, an auxin).
|
|
|
Wednesday, February 3
|
View Page
|
 |
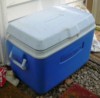
After the cutting was dipped in the rooting hormone, it was immediately placed in a propagating chamber, which goes by the trade name “EZ-Clone”. Think of it as a covered tank with water in the bottom that is misted through the red nozzles in the enclosed rooting area.
|
|
|
Wednesday, February 3
|
View Page
|
 |
Pictured here is the top view of the EZ-Clone propagation chamber. The cutting is constantly being misted in the rooting area with a nutrient solution to help encourage root formation. The upper portion is being misted in the mist bench section of a propagation greenhouse to reduce transpiration stress and keep it hydrated.
This high humidity environment allows for the cutting to easily produce roots.
|
|
|
Wednesday, February 3
|
View Page
|
 |
While geraniums are in the picture, this gives an idea of what the mist bench looks like when the mist is on. Think of it like a light rain that occurs every so often, depending on the weather, to make sure all the cuttings stay moist all the time.
|
|
|
Wednesday, February 3
|
View Page
|
 |
Hormodin one- Rooting hormone
Olivia’s Cloning Solution- nutrient solution in the misting solution to help encourage rooting
pH Down- the nutrient solution made the pH a little higher than I wanted, so using the pH down solution made the solution more acidic.
|
|
|
Friday, February 12
|
View Page
|
 |
Pictured here is the lid lifted up, which shows not only a newly placed cutting in the foreground, but also one that has well-developed roots in the distance. When the roots get to this stage in development, they are removed from the EZ Clone bed and are transferred to potting media.
|
|
|
Friday, February 12
|
View Page
|
 |
This shows what the developed roots look like. While there is only one point of attachment, seeing the branching is what I use as an indicator that signals it is time for transplanting to potting media.
|
|
|
Friday, February 12
|
View Page
|
 |
This shows the completely rooted cutting and gives an idea of the plant in relation to the size.
|
|
|
Friday, February 12
|
View Page
|
 |
Pro-Mix BX seemed to offer good results for root development. Other potting mixes, such as Fafard 3B mix, were used that also offered decent results. Plants did not require supplemental fertilizer applications.
|
|
|
Friday, February 12
|
View Page
|
 |
Here is the rooted cutting placed in potting media and then watered in very well. It is important to keep in mind that the EZ Clone environment babies the plants, so care must be taken to ease the plants to more “real world” conditions.
After getting watered in, the plant spends about a day in the mist bench, and then it is off to the 100% humidity section to help the hardening off process. Then, after some time in 100% humidity, the plant gets transported to the typical greenhouse section where it will be allowed to continue to grow.
|
|
|
Saturday, February 13
|
View Page
|
 |
This process was repeated as side vines became available and reached the appropriate size. Pictured here is the EZ Clone with the mist on.
|
|
|
Saturday, February 20
|
View Page
|
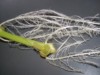 |
Here is just a visually interesting picture of what a well-developed root system on one of the cuttings looks like.
|
|
|
Saturday, February 20
|
View Page
|
 |
It is amazing how complex a leaf looks when lit from above and looked at from below.
While propagating a pumpkin plant with cuttings does have some challenges associated with the process, I wanted to try something a little more advanced this off-season…
|
|
|
Sunday, February 21
|
View Page
|
 |
Micropropagating a Giant Pumpkin Plant
(Specifically a 1385 Jutras)
|
|
|
Monday, February 22
|
View Page
|
 |
Note: The days posted are *not* accurate, since many trials were going on at the same time there was a lot of overlap. So, I decided to put everything in the proper sequence and focused on the same trial to make it easier to understand.
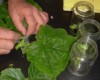
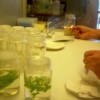
Taking a section of new growth from the stock plant, I would transfer it to the lab as soon as possible. Once in the lab, the leaves and tendrils were cut off so that only the nodes were left. These nodes were then placed in the baby food jars, so they would be ready for the next step in the process.
|
|
|
Monday, February 22
|
View Page
|
 |
Here is the first step in making the plant sample sterile. As you can see, all the steps from here on will take place under the hood.
|
|
|
Monday, February 22
|
View Page
|
 |
Keeping track of time is very important, because if the plant material is left sterilizing too long, damage can occur. Since only a small amount of tissue is needed, any damage that may occur can reduce the chances of the new plant developing.
|
|
|
Monday, February 22
|
View Page
|
 |
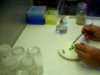
It is important to keep all the tools used sterile. Pictured here is how the nodes are transferred to their respective bottles. Again, this entire process is occurring in the sterile hood.
|
|
|
Monday, February 22
|
View Page
|
 |
Here is a close-up of the nodes going through a sterile water rinse so the chance of damage would be reduced. Sterile water has been autoclaved (meaning it was put under high pressure and temperature to kill off any potential living organisms).
|
|
|
Monday, February 22
|
View Page
|
 |
Preparing the tools for the next step involves flaming them to reduce the chance of contamination. In this picture, the tongs have already been flamed, and right now the scalpel with a new blade is in the process of being sterilized.
|
|
|
Monday, February 22
|
View Page
|
 |
Here you can see the small amount of final plant material that is used. From this small node, an entire plant will begin to develop.
|
|
|
Monday, February 22
|
View Page
|
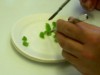 |
This close-up picture shows the selection of the most usable portion of the plant material. Only the two small sections on the left will be used for propagation. Ideally, if there is no contamination in the next step, at least two plants could be produced from these two small sections.
|
|
|
Monday, February 22
|
View Page
|
 |
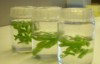
Once cut, the sections are placed on sterile media that is in the bottom of the baby food jars. Then lids are put on and sealed to keep the internal jar environment free of external contamination. Since the media contains sugar, many organisms would like to grow on this media. Ideally, with no contamination, only the pumpkin plant will grow with the nutrients present.
|
|
|
Monday, February 22
|
View Page
|
 |
Here are how all the bottles look once placed in the growth chamber. Sadly, some of these do not end up making it to the next stage due to contamination, despite keeping the entire process as sterile as possible.
This is why there is the strength-in-numbers approach taken for this experiment, which is especially important when trying something new. Since there is not a set protocol to follow, there is some more trial and error to go through.
|
|
|
Monday, February 22
|
View Page
|
 |
This is the entire tray of bottles in the growth chamber. The plants will hopefully start to grow very soon.
|
|
|
Friday, February 26
|
View Page
|
 |
Only 4 days later, distinct pumpkin leaves can be seen.
|
|
|
Thursday, March 4
|
View Page
|
 |
10 days later, significant development in the plant can be seen. Considering just a little node was all that was started with, it is amazing how quickly the plant grew.
|
|
|
Friday, March 5
|
View Page
|
 |
After about 4 weeks in the jars, the plants were transferred to salad trays to try and encourage rooting.
|
|
|
Friday, March 5
|
View Page
|
 |
Once the small plants are transferred to their salad trays again the conditions are kept similar to what they have been experiencing, which includes high humidity and good light source. Under these conditions the once sterile environment has now been removed.
Sadly, due to bad media, the plants rotted before they had a chance to root.
|
|
|
Wednesday, March 10
|
View Page
|
 |
Not giving up after having trouble with the first trial, but making improvements in some areas will hopefully increase my odds of success.
You can see here a Petri dish is being used because three nodes can be added to increase the amount of nodes that can be screened in a small space. The downfall with this method is that the plants can out grow the shallowness of the dish quickly.
|
|
|
Wednesday, March 10
|
View Page
|
 |
Here is the selected plant on a sterile plate being prepared for being transferred to an upgraded container.
|
|
|
Wednesday, March 10
|
View Page
|
 |
Carefully adding the plant to the media in the test tube will allow for an increase in plant height which was not possible in the Petri dish.
|
|
|
Wednesday, March 10
|
View Page
|
 |
With many different trials going on at the same time it is important to keep track of what each trial is. So, by labeling a test tube in each tray helps keep track of what each trial is testing.
|
|
|
Friday, March 12
|
View Page
|
 |
It seems that I always include a picture of my trip to Niagara Falls and this year it was difficult to get a decent picture, but here is the best picture I had for this 2010 season.
|
|
|
Thursday, April 8
|
View Page
|
 |
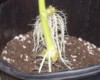
I have been busy in the division of pumpkin propagation and I want to show my latest progression with the trial. Here is a cutting that has just been removed from the EZ-Clone propagation bed. As you can see the root development is quite good when all the propagation factors come together.
|
|
|
Thursday, April 8
|
View Page
|
 |
I then simply transfer the rooted cutting to potting media that is in a decent sized pot. I have experimented with different sizes and I have found that small pots are too restrictive which can result in severely stunted the plants.
There is no pot to large but these ~2 gallon (by my visual estimation) size pots seem to offer a good size that does not stunt the plants and allows them to grow well. Also, the larger pots are a welcome bonus since it increases the water reserves and helps reduces the water stress on the plants.
|
|
|
Thursday, April 8
|
View Page
|
 |
This extensive root system is the reason I think these cuttings get established so quick. They are a little fragile but with some care I try and keep the damage minimal as I add the media.
|
|
|
Thursday, April 8
|
View Page
|
 |
This simply shows the level I fill the pots up with media. I have noticed that if I do not fill the pot up to this level the water reserves are to low and the cuttings experience water stress easily.
|
|
|
Thursday, April 8
|
View Page
|
 |
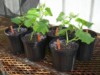
Luckily, I have been fortunate to get a few more replicates this week. The added sun seems to be helping but with the record highs outside temperatures there has been an increased level of plant stress.
As you can see there are six independent cuttings here. I am refining the methods of propagation so that I am having fewer errors and keep plant losses to a minimum.
|
|
|
Thursday, April 8
|
View Page
|
 |
Here are the plants in their pots that have been all watered in. The roots have been accustomed to a high humidity environment so I over water the plants to try and ease them to the moisture content found in the soil. I also keep the humidity high to again try and reduce the water stress to the leaves.
From here they are planned to go into a greenhouse section for what I hope is continued growth and establishment.
|
|
|
Friday, April 9
|
View Page
|
 |
Clones that had a distant home started with the same method of production but instead of getting transplanted into a pot they had to be prepared for shipping. They key was to ensure the transfer process went as quickly as possible and provide as little shock to the plant as possible.
|
|
|
Friday, April 9
|
View Page
|
 |
This shows two clones that have just been removed from the propagation chamber and are placed on moistened newspaper. Also, since both plants are the same genetically you will notice two ID tags so that each clone can be treated somewhat as an individual for the duration of the trial.
|
|
|
Friday, April 9
|
View Page
|
 |
Here are the same clones wrapped in newspaper to ensure their roots do not dry out (desiccate) and become damaged as they are in transit.
|
|
|
Friday, April 9
|
View Page
|
 |
As you can see the cones were then placed in a plastic bag, packed loosely with newspaper and mailed out overnight express mail.
|
|
|
Friday, April 9
|
View Page
|
 |
Here is the box ready for the address of a lucky grower immediately before heading to the post office for shipping. In one case I was able to ship a clone from Connecticut (East Coast) to California (West Coast) in less than 24-hr!
Out of all the clones I mailed not one was damaged during the shipping process which was great to hear.
|
|
|
Tuesday, April 20
|
View Page
|
 |
Now for the official start of my 2010 growing season. (After doing the clones all winter it never felt like the season ended, only changed forms.)
My official Line-up for 2010…
1544.5 Revier ’09 (F: 1385 Jutras x M: 1161 Rodonis)
1421.5 Stelts ’09 (F: 1385 Jutras x M: 904 Stelts)
1385 Jutras ’07 (F: 1068 Wallace x M: 998 Pukos)
1385 Jutras clone plant #1 (woods) [not pictured]
1385 Jutras clone plant #2 (road) [not pictured]
1353 DeBacco ’08 (F: 1385 Jutras x M: 775 Dill)
1229 Sundin ’08 (F: 1263 Pitura x M: 1388 LaRue)
1140 Stevens ’08 (F: 1073 Carlson/Peterson x M: 998 Pukos)
799* DeBacco ’09 (F: 663* Andrews x M: 800* DeBacco)
725.6* DeBacco ’09 (F: 800* DeBacco x M: 663* Andrews)
|
|
|
Wednesday, April 21
|
View Page
|
 |
I have used this tool in the past to make filing seeds quick and easy. Simple sand paper would work but I start quite a few seeds so this tool makes it very quick and easy.
|
|
|
Wednesday, April 21
|
View Page
|
 |
After being labeled and filed the seeds go into pre-moistened paper towels and then directly into small (snack sized) labeled plastic bags.
|
|
|
Wednesday, April 21
|
View Page
|
 |
There is a heat mat at the bottom that keeps the temperature in that sweet zone of around 80-degrees Fahrenheit. Now all I can do is wait and see what happens.
|
|
|
Wednesday, April 21
|
View Page
|
 |
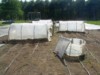
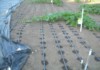
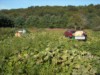
Meanwhile here is a picture of the patch ready and waiting for the seeds that I started.
|
|
|
Saturday, May 1
|
View Page
|
 |
Here are the chosen ones right before they get planted. I also put in two 1385 Jutras clones but they were not included in this picture. All seedlings once planted in their respective cold-frames had the addition of a Wall O’Water placed over them to increase the odds of survival.
|
|
|
Tuesday, May 4
|
View Page
|
 |
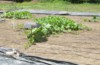
This picture shows the cold-frames I use and how my patch looks in its fully operational mode. An interesting note is that on this day (May 4th, 2010) I had a major Cucumber beetle hatch on both my clones and my 1353 DeBacco plant. I have never seen that many beetles so early.
The weather has been unseasonably warm for this time of year, but only having the plants in the ground for 3 days suggests it is going to be a long battle with some patch pests.
|
|
|
Tuesday, May 4
|
View Page
|
 |
This plant was very hard to tell which way the first true leaf was going. The reason being because there was no true leaf! This was the first time I had experienced a plant that would remain alive but would not throw a true leaf or vine out. Luckily, I have a friend who has experience germinating tricky seeds who was able to get a seedling with a true leaf for me to plant only a week later. The plant pictured here was later pulled and replaced with a normal 725.6* DeBacco seedling.
725.6* DeBacco ’09 (F: 800* DeBacco x M: 663* Andrews)
|
|
|
Tuesday, May 4
|
View Page
|
 |
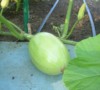
This is a very aggressive seedling, which is nice to see, (especially from a squash plant). I am hoping this plant is as easy to pollinate as the (female) parent was. Ideally, I have combined an easy to pollinate squash line with a quick growing dark green line. Only time will tell if this on paper cross translated to results.
799* DeBacco ’09 (F: 663* Andrews x M: 800* DeBacco)
|
|
|
Tuesday, May 4
|
View Page
|
 |
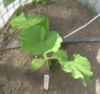
1385 Jutras clone plant #1 (woods)
This clone was placed in one of my smaller cold-frames. Its growth has slowed as expected since it is now out of the ‘ideal’ greenhouse environment and there is a little leaf burn but all and all it is looking good.
|
|
|
Tuesday, May 4
|
View Page
|
 |
1385 Jutras clone plant #2 (road)
This clone was placed into the larger cold-frame set-up that I have so that the growth could be compared to the other clone in the smaller sold-frame. It looks like this plant is having an easier time transitioning because while the growth has slowed, it is starting to vine out a little bit.
|
|
|
Tuesday, May 4
|
View Page
|
 |
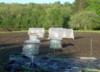
Here is an aerial picture of how the seedlings look inside the Wall O’Water that I use. Typically, I try and get the Wall “Water to form a point at the top, but for the picture I positioned it so the water tubes are as vertical as possible so the entire environment could be seen. You will also notice the edge of my cold-frame in the picture. This double layer of protection has helped get my plants through some chilly to cold nights since adding supplemental heat is not an option at my patch.
This plant is looking very nice at this early stage of development.
1544.5 Revier ’09 (F: 1385 Jutras x M: 1161 Rodonis)
|
|
|
Tuesday, May 4
|
View Page
|
 |
I am fortunate to get to grow a 1385 Jutras seed this year. It has done very well for me in the past so I have high hopes for it again this year. It is still early but this time around the seedling seems a little slower to get going, but I know this plant has the ability to consistently grow late into the season so I am not worried.
1385 Jutras ’07 (F: 1068 Wallace x M: 998 Pukos)
|
|
|
Tuesday, May 4
|
View Page
|
 |
Last fall I was able to see both pumpkins that made this cross and I was impressed with both of them. The pollinator had a beautiful glowing orange color. While the 1421.5 I had the actual job of harvesting the seeds which allowed me an up close and personal look at the interior structure of this pumpkin. There were no major internal flaws to report and I was even scraping the sides to make sure I was able to get every last seed that was in there. The pumpkin itself was in the process of being carved so I was gaining more interior light as the seed harvest went on and everyone there acted like my eyes to ensure there was not a seed left inside.
This seedling looks very nice and appears to be developing the fastest in the patch.
1421.5 Stelts ’09 (F: 1385 Jutras x M: 904 Stelts)
|
|
|
Tuesday, May 4
|
View Page
|
 |
I chose to plant this seed again based on what I saw last year in my patch and also what other growers were able to produce. It goes orange which is a great trait and can also go over 18% heavy.
Also during my 2008 growing season I was fortunate to cross my best two performing plants together, so ideally I have the best of both worlds in one seed.
1353 DeBacco ’08 (F: 1385 Jutras x M: 775 Dill)
|
|
|
Tuesday, May 4
|
View Page
|
 |
This plant is looking good, but for some reason it is slowly turning so that it is not going to vine in the exact right direction that it was planted. Still should not be that hard to correct it is just odd to watch the seedling slowly rotate 90-degrees as it grows.
1140 Stevens ’08 (F: 1073 Carlson/Peterson x M: 998 Pukos)
|
|
|
Tuesday, May 4
|
View Page
|
 |
A winters worth of seed research allowed me to find this seed. It may not be known by many but I think its potential is there with some of the other great seeds out there so I am giving it a shot.
The plant has not had the best of luck because during one of the many wind storms that has occurred recently my cold-frame was lifted slightly which allowed the wind to get caught, which lead to the Wall O’Water getting knocked over and landing directly on my 1229 Sunding seedling. The plant itself recovered well from being literally flat to now reorienting its leaves in the proper direction. Hopefully, this shows how tough this plant can be because I am sure there are many more stresses to come this season.
1229 Sundin ’08 (F: 1263 Pitura x M: 1388 LaRue)
|
|
|
Tuesday, May 4
|
View Page
|
 |
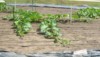
Here is how the patch looks from the other side. You can see my drip tapes set-up and the two different styles of cold-frames that I use.
|
|
|
Monday, May 10
|
View Page
|
 |
Sadly a grower had an 1161 Rodonis seedling that all of a sudden wilted down. Once removed from the patch there was noticeable corn maggots at the soil line.
|
|
|
Monday, May 10
|
View Page
|
 |
This picture shows the location of the problem a little clearer. The maggots can be easily seen.
|
|
|
Monday, May 10
|
View Page
|
 |
Here is a high quality close-up image of what the maggots look like, hopefully you will not see these in your patch but you can use this as a reference.
|
|
|
Friday, May 28
|
View Page
|
 |
Well after getting some help germinating this seed it has now produced a normal looking plant. Yes, it might be a little spindly but now that I have removed the other back-up plants it should get some full sun and be off and running soon. I realize this plant is about a week behind but it has the squash genetics that I am interested in.
725.6* DeBacco ’09 (F: 800* DeBacco x M: 663* Andrews)
|
|
|
Friday, May 28
|
View Page
|
 |
Plant continues to do well and the leaves look similar to the female side of the cross. I am waiting for it to beginning to start growing the main vine so I can get it headed in the correct direction.
799* DeBacco ’09 (F: 663* Andrews x M: 800* DeBacco)
|
|
|
Friday, May 28
|
View Page
|
 |
This poor plant has not recovered fully from the massive Cucumber Beetle attack that occurred early on. It may not look that great in the picture but I know what this plant can produce so I am not giving up on it. While the main part of the plant is clearly under some stress the growing tip has not burned so there is still the opportunity for growth.
As a back-up I planted a spare 1385 Jutras clone plant that I had leftover to see how a later in the season planting would do. The back-up did not get hit with Cucumber beetles nor did it have a cold-frame, but I just could not bring myself to throw out a good looking 1385 Jutras clone plant, especially when I had this plant that is not looking in the best of shape.
1385 Jutras clone plant #1 (woods)
|
|
|
Friday, May 28
|
View Page
|
 |
This clone is doing better and it could be in part due to the fact that it is growing in a larger (5’ x 9’) cold-frame. Leaves are still remaining small but the main vine is growing and looking good.
1385 Jutras clone plant #2 (road)
|
|
|
Friday, May 28
|
View Page
|
 |
Despite being grown in my small cold-frame design it appears to be doing quite well. It also looks like I will be able to get the main vine to grow in the direction that I want because I watched this seedling do a slow 7-day rotation in the wrong direction. I have had plants turn slightly in the past but this one ended up almost going 180-degrees on me, very odd.
1544.5 Revier ’09 (F: 1385 Jutras x M: 1161 Rodonis)
|
|
|
Friday, May 28
|
View Page
|
 |
Plant looks very good, not my biggest in the patch but I am glad to have some more 1385 Jutras genetics in the patch to hopefully make some good crosses.
1385 Jutras ’07 (F: 1068 Wallace x M: 998 Pukos)
|
|
|
Friday, May 28
|
View Page
|
 |
This is my biggest plant in the patch with the main vine on the ground and running. Leaves look great and some are fully expanded. Hope it continues at this pace in both vine and pumpkin growth.
1421.5 Stelts ’09 (F: 1385 Jutras x M: 904 Stelts)
|
|
|
Friday, May 28
|
View Page
|
 |
It is nice to see some consistency as this is the second year I have grown this seed, for whatever reason it tends to favor growing upwards as it starts to vine out. What is odd is that once it makes touchdown it behaves normally, but only initially it has this upward trait. Even commuting to the patch about every 3rd day I have not had any problems with breaking the main it just requires some extra bamboo stakes.
1353 DeBacco ’08 (F: 1385 Jutras x M: 775 Dill)
|
|
|
Friday, May 28
|
View Page
|
 |
After a little bit of a slow start this plant is starting to grow. It must be the lack of any 1068 Wallace in its background;-)
1140 Stevens ’08 (F: 1073 Carlson/Peterson x M: 998 Pukos)
|
|
|
Friday, May 28
|
View Page
|
 |
Considering this plant has run into some bad luck with a Wall ‘O water falling on it, and the cold-frame lifting in the high winds, this plant has proven resilient because if you just look at the picture you would never know that anything happened to the plant. Hopefully all the bad luck is out of the way and there is only good luck in the future.
1229 Sundin ’08 (F: 1263 Pitura x M: 1388 LaRue)
|
|
|
Friday, May 28
|
View Page
|
 |
I have been keeping at the weeds and so far I have maintained the upper hand, but I think the weeds are about to send in reinforcements. Also, as you can see the drip tapes are set-up but I have not turned them on yet. I typically wait until the plants out grow the cold-frames and I begin vine burying before turning them on. As of right now I am doing the time consuming hand watering method, but at least I will not have to do it much longer.
|
|
|
Saturday, June 19
|
View Page
|
 |
All the cold-frames are off and the plants are in the ‘real world’ now. The silt fence I set up has taken a beating with all the wind the patch has seen but the plants themselves look good (as of today). Keeping the weeds down has been the main consumer of my time in the patch recently.
You will also notice the SVB (Squash Vine Borer) traps at a density of one per plant. I have used these for the last 4 years and I like the monitoring they provide each season. They keep me informed on when insect pressure increases and long it lasts. I have chosen to the traps numbers to a rate of one per plant to hopefully also get the added benefit of mating disruption.
Lastly, I realize it is hard to tell but, the second and third plants that you see pictured are 1385 Jutras clones. This is one of the very few cases where a male flower could be taken from a separate plant and the cross would still be a ‘self’ and not a ‘sib’ since both plants are genetically identical.
|
|
|
Sunday, June 27
|
View Page
|
 |
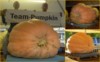
Here is Team-Pumpkin in action with a patch tour at my patch during our tour of the state. We had a great turn out with growers from State Record holders to first year growers. I think everyone had a great time and learned something.
|
|
|
Friday, July 2
|
View Page
|
 |
You can compare this picture to the last one I posted that was taken on June 19th, 2010 to see how much the plants have grown. I also took the time today to go around and take pictures of the individual plants so you can see each one.
The umbrellas you see are over my potential pollinations. The goal is to keep the female flower cool before pollination and also after. In case of rain (or the water from my overheads that I use to help cool the plants) the umbrellas double as a way to keep the flowers dry. I think this has helped increase my pollination success. The umbrellas are easy to find, quick to set-up (mine are tied to a stake in the ground) and store in very little space all winter.
|
|
|
Friday, July 2
|
View Page
|
 |
You can clearly see the areas I have been weeding and the areas I have not. This patch has very high weed pressure so it is a constant battle.
Also, I use water tank pictured until the plants are about to the size they are now (pollination time) so that I can provide warm water to my plants when they are small. Now I just use the drip lines that are hooked up to the main water line. It is much easier to use the drip lines but when the plants are small the drip lines irrigate a lot of extra area, so that is another reason why I hand-water in the early part of the season.
|
|
|
Friday, July 2
|
View Page
|
 |
725.6* DeBacco ’09 (F: 800* DeBacco x M: 663* Andrews)
Considering this plant was planted about a week after everything else it is doing quite well. It is not my biggest plant but it is starting to aggressively grow the side vines which should help set down more roots so the plant can get established quickly.
|
|
|
Friday, July 2
|
View Page
|
 |
799* DeBacco ’09 (F: 663* Andrews x M: 800* DeBacco)
Another well behaved squash plant which is nice to see. It is also showing a female that should open in a few days. The plant is a little smaller then I would like to set a squash on right now, but I am going to go ahead and at least attempt the pollination.
|
|
|
Friday, July 2
|
View Page
|
 |
1385 Jutras clone plant #1 (woods)
This clone site has turned into a double experiment. I added another clone about 2-weeks after the one I originally to see if there were any differences. Well if you look at the picture the plant on the LEFT was planted later and the plant on the RIGHT was the original planting.
What I have noticed is that for whatever reason the plant that was transplanted later is showing less signs of leaf burn and increased vigor. While it may not be as long as the originally planted clone it is growing faster and putting secondaries out more aggressively. My personal thinking is that because the later planted clone did not get hit with the Cucumber Beetle hatch and with the warm weather we have been having the transition from the greenhouse to the outside environment was minimal so the combination of these factors may have allowed it to grow more aggressively.
|
|
|
Friday, July 2
|
View Page
|
 |
1385 Jutras clone plant #2 (road)
This clone has suffered the most from leaf burn in the heat, but it does seem to be adjusting. Leaves are burning less and secondaries are forming and growing out as would normally be expected. There is about 5ft. of the main vine area nearest the initial plant site that is still having some problems but after that section the plant looks normal. There is even a potential pollination that I am going to see if I can get to grow.
|
|
|
Friday, July 2
|
View Page
|
 |
1544.5 Revier ’09 (F: 1385 Jutras x M: 1161 Rodonis)
Great looking plant! All the leaves are growing at the same height and making a nice continuous canopy. It is almost like you could walk across them as if they were Lilly pads on a lake. Only downfall is I do not see many female flowers on the main vine at the present time.
|
|
|
Friday, July 2
|
View Page
|
 |
1385 Jutras ’07 (F: 1068 Wallace x M: 998 Pukos)
This is my third year growing this seed and I still like its behavior. For whatever reason this year the leaves seem to have greater spacing and the pumpkins (at this early stage) are more round / baseball-like in shape then the football shape I have gotten in the past. I have two potential pollinations on the plant right now, and I hope that one of them will be my keeper but as a back-up I have a third down the line just in case.
|
|
|
Friday, July 2
|
View Page
|
 |
1421.5 Stelts ’09 (F: 1385 Jutras x M: 904 Stelts)
This is my biggest plant in the patch and I have two potential pollinations on the plant. The first one looks like it set and the other I just did this morning so time will tell. Since the main vine is quickly approaching my deer fence this early in the season and I only have two potential pollinations I have decided to give the main vine a 90-degree turn so that I can have the option of a third pollination in case something terrible happens to the first two.
I am going to treat the main more like a secondary after the 90-degree turn. However, I may grow some of the secondaries a few feet to fill in some of the empty space that results from removing the secondaries near the chosen pumpkin.
|
|
|
Friday, July 2
|
View Page
|
 |
1353 DeBacco ’08 (F: 1385 Jutras x M: 775 Dill)
Looking at this plant reminds me of the pollinator plant I grew back in 2008. I hope the pumpkin also looks like the pollinator because it will be symmetrical, orange and decent size. I know it is early but I like what I have seen so far from this plant, now I just hope my pollination takes.
|
|
|
Friday, July 2
|
View Page
|
 |
1140 Stevens ’08 (F: 1073 Carlson/Peterson x M: 998 Pukos)
While the plant started off a little slow it is now beginning to get growing. There is a potential pollination in about 3 days which would still keep this plant with-in the typical range of prime time pollinations which is nice to know since early on it looked like the plant was going to miss the ideal window.
|
|
|
Friday, July 2
|
View Page
|
 |
1229 Sundin ’08 (F: 1263 Pitura x M: 1388 LaRue)
Yet another nice plant with leaves that are slightly larger than other plants in the patch but not overly huge by any means. There are two potential pollinations on this plant that up to this point both look good and I have them under the umbrellas and pulp mill fabric ready. Once they both get a little larger I will have to make the final call on which one is the ‘chosen one’.
|
|
|
Friday, July 2
|
View Page
|
 |
This shows the black plastic weed block that I use. I run my drip tapes under this so that I can add water under the plastic if need be. As the plants grow I simply roll the plastic back until it is no longer needed and then it is simply rolled up and removed.
I get the plastic in 25ft. wide x 100ft. long rolls. Since my patch is 130ft. long I end up needing about 3 total rolls. I have used both the 4mil and 6mil black plastic and both seem to hold up fine. The 6mil is a little more tear resistant but it is heavier. I have used the 4mil for 3 years now and it is still working out great, there are just a few holes that have torn in it but it is a big time saver for me.
A loop hoe is used in the area not covered by the plastic and as long as you keep at it and get the weeds while they are small you can keep the patch mostly weed free. It takes me about an hour to go over the entire patch every third day or so.
|
|
|
Friday, July 2
|
View Page
|
 |
Pictured here is the reason why I like drip irrigation so much, as you can see it offers even and consistent watering. There is no noticeable difference between the first foot of the drip lines and the last 130 feet in my case. This allows me to ensure all the plants are getting the same amount of water.
The small wet spots you see make it look like the area between the drip lines is not getting watered and while this is the case on the surface, below the surface these cones meet offering complete irrigation where the plants need it the most, at the root zone. Also, this method of irrigation with my black plastic weed block offer some help in weed control since I am not watering the entire patch surface only the areas near the drip lines.
My irrigation is on a timer with a rain sensor so it is hands off from my end for the majority of the season which is a nice feature.
|
|
|
Friday, July 2
|
View Page
|
 |
While I do not rely on my overhead sprinklers for irrigation I do have them come on for a short while during the heat of the day to cool the plants. I only use two overheads to cover my 10 plants with each sprinkler covering about 5 plants each. Due to water pressure and volume I can only run one impact sprinkler at a time, but with the timer set-up I have I just program it once and let it run its cycle.
I took this picture as the sun was setting because the stream of water shows up better with the shadow in the background. Typically I have them come on 4 times during the heat of the day with enough time to allow the water to dry before the sun begins to set.
|
|
|
Tuesday, July 20
|
View Page
|
 |
725.6* DeBacco ‘09 (x 799* DeBacco)
Day: 6
Circumference: 22â€
Est. weight: ? (to small)
Pollination Date: July 14th, 2010
Number of lobes: 5
This plant has retained some of the easier to pollinate squash genes from the pollinator side of the cross which is a welcomed trait to the squash line. This is the youngest fruit in the patch but it looks good. The weed block fabric that it is sitting on was mainly to ease the squash to the ground since I did have one break off the stem before touch down so I wanted to be extra cautious with this one.
|
|
|
Tuesday, July 20
|
View Page
|
 |
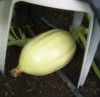
799* DeBacco ‘09 (x 725.6* DeBacco)
Day: 8
OTT: 60.5â€
Est. weight: ? (to small)
Pollination Date: July 12th, 2010
Number of lobes: 4
I realize it is still early but this is the longest squash I have seen. So far, it is growing good and I am slowly working to get it to the ideal 90-degree angle to the main vine.
|
|
|
Tuesday, July 20
|
View Page
|
 |
1385 Jutras clone plant #1 (woods) (x 1385 Jutras J. Williams clone)
Day: 8
Circumference: 27â€
Est. weight: ? (to small)
Pollination Date: July 12th, 2010
Number of lobes: 4
The offspring from this clone are very long which I am not complaining about but I expected a somewhat long not a very long shape from this clone. It is currently being shaded by a small table which it should be out growing soon.
This is also the first cross where both sides are clones that have produced 1,100lb+ pumpkins. Consider this a super sib cross.
|
|
|
Tuesday, July 20
|
View Page
|
 |
1385 Jutras clone plant #2 (road) (x 1385 Jutras seed)
Day: 19
OTT: 174â€
Est. weight: 122lb
Pollination Date: July 1st, 2010
Number of lobes: 4
This pumpkin looks familiar ;-) Since this is a clone I was expecting similarities to the original plant I grew last year and so far this plant and pumpkin are, “just like old timesâ€.
|
|
|
Tuesday, July 20
|
View Page
|
 |
1544.5 Revier ’09 (x 1353 DeBacco)
Day: 7
Circumference: 21â€
Est. weight: ? (to small)
Pollination Date: July 13th, 2010
Number of lobes: 3
Due to a simple lack of females I was almost going to pull this plant, but only a few days before I was going to pull the plant I had an opportunity to do a pollination. So this was the pumpkin that saved the plant.
Now, when I did the pollination and I saw a 3 lobe flower and I was actually very happy since the track record for 3-lobed pumpkins is not too bad unlike the rumors that I have heard about. This was the only 3 lobe flower that I saw this year.
|
|
|
Tuesday, July 20
|
View Page
|
 |
1385 Jutras ’07 seed (x 1421.5 Stelts)
Day: 23
OTT: 210.5â€
Est. weight: 206.5 lb
Pollination Date: June 27th, 2010
Number of lobes: 4
Nice growing pumpkin that has a more roundish shape then I have seen in the past. It is already beginning to show some ribs and will hopefully be a decent orange color as it matures.
|
|
|
Tuesday, July 20
|
View Page
|
 |
1421.5 Stelts ’09 (1385 Jutras seed)
Day: 18
OTT: 165.5â€
Est. weight: 106 lb.
Pollination Date: July 2nd, 2010
Number of lobes: 4
For such a young pumpkin to be sucking in the blossom end has me a little nervous. I did not expect this trait from this seed but it seems to be common from a few of the other 1421.5 Stelts pumpkins I have seen in my area.
I did cull a bigger pumpkin that was down the vine but because of its poor shape I decided to remove it at about day 16 with an estimated weight of about 80 lb. The person I gave the cull to did some practice carving with it and said I made the right decision because the area I was concerned with was very thin. Hope this pumpkin does not have any thin spots.
|
|
|
Tuesday, July 20
|
View Page
|
 |
1353 DeBacco ’08 (x 1544.5 Revier)
Day: 19
OTT: 180.5â€
Est. weight: 135 lb
Pollination Date: July 1st, 2010
Number of lobes: 5
I do not like to play favorites but… this is my personal favorite pumpkin in the patch. It has the most symmetrical shape and brightest yellow color which will hopefully make for a great looking pumpkin at the end of the season. The skin is still very shiny and youthful looking with evenly spaced ribs, exactly what I want to see and have been breeding for.
|
|
|
Tuesday, July 20
|
View Page
|
 |
1140 Stevens ’08 (x 1229 Sundin)
Day: 15
OTT: 149â€
Est. weight: 80.2 lb.
Pollination Date: July 5th, 2010
Number of lobes: 5
Nice round shape to this pumpkin, that looks like it may take on a more wheel-like shape since it is getting tall for its size/age. Time will tell what it will develop into.
|
|
|
Tuesday, July 20
|
View Page
|
 |
1229 Sundin ’08 (x 1140 Stevens)
Day: 22
OTT: 215.5â€
Est. weight: 220.2 lb.
Pollination Date: June 28th, 2010
Number of lobes: 4
It is hard to see in the picture, but this pumpkin is quite wheel-like. The side to side measurement seems to be growing the fastest. Also, the blossom end is getting a little lower which is a little strange since I was expecting a long shape to this pumpkin. I have nick named this pumpkin ‘the spaceship’.
|
|
|
Tuesday, July 20
|
View Page
|
 |
The plants are beginning to fill their allowed area and the pumpkins are beginning to rise out of the pumpkin patch.
I have tried to take this same general picture so you can see how the patch changes throughout the season so I hope it works out as you look back at some of the previous entries.
|
|
|
Saturday, July 24
|
View Page
|
 |
Early stages of a foaming stump. While my patch has been foaming stump free (knock on wood) this is a picture from another growers patch. As you can see there is a white foam forms at the initial plant site.
|
|
|
Saturday, July 24
|
View Page
|
 |
More advanced stages of what is called a “foaming stumpâ€. It gets its name from the white foam you see on the ground. While the exact cause is still debated I believe it is a water issue based on the conditions that seem to favor this problem.
|
|
|
Saturday, July 24
|
View Page
|
 |
This is solution to the problem, complete removal. While this may look extreme it may be an effective method of reducing the chance of the problem spreading up the vine. The key is to remove enough vine so that you reach clean tissue.
|
|
|
Sunday, July 25
|
View Page
|
 |
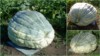
207.3 DeBacco ’10 (F: 1385 Jutras clone plant #2 (road) x M: 1385 Jutras seed)
8.8% Heavy
This is a three picture collage showing multiple angles of one of the pumpkins from my clone plant. Sadly, the pumpkin suffered from a stem split that went through the cavity but I noticed it early so I could get a weight on the pumpkin before it turned into a pile of mush.
|
|
|
Sunday, July 25
|
View Page
|
 |
207.3 DeBacco ’10 (F: 1385 Jutras clone plant #2 (road) x M: 1385 Jutras seed)
8.8% Heavy
Looking at this pumpkin from the outside it looked very similar to the original pumpkin I grew last year. What was very surprising is that the inside wall thickness resembled the original plant also. The stem split seemed like an odd feature because all the other good traits that I saw in the plant the previous year carried through.
This shows that clones do have the potential to not only produce a similar pumpkin visually but also % heavy. It was just a shame to get the small stem split so I could not take this pumpkin to the end of the season.
|
|
|
Saturday, July 31
|
View Page
|
 |
725.6* DeBacco ‘09 (x 799* DeBacco)
Day: 17
OTT: 186.5”
Est. weight: 147.5 lb.
Oddly enough, the green color on this squash has gotten lighter but is still present. There is some distinct rib striping that does add some character. Overall this squash is going well.
|
|
|
Saturday, July 31
|
View Page
|
 |
799* DeBacco ‘09 (x 725.6* DeBacco)
Day: 19
OTT: 193”
Est. weight: 162 lb.
This squash has so far maintained its long and low shape. The color is even though-out and while it has gotten a little lighter in color it is consistent.
|
|
|
Saturday, July 31
|
View Page
|
 |
1385 Jutras clone plant #1 (woods) (x 1385 Jutras J. Williams clone)
Day: 19
OTT: 170.5”
Est. weight: 115 lb.
This pumpkin has a long shape but for its age the ribs seem deep so I am worried about it making it to the end.
|
|
|
Saturday, July 31
|
View Page
|
 |
1544.5 Revier ’09 (x 1353 DeBacco)
Day: 18
OTT: 181”
Est. weight: 136 lb.
While this may be the smallest pumpkin in the patch I still like what I see. The bright yellow skin will hopefully translate to nice orange color as this pumpkin matures.
|
|
|
Saturday, July 31
|
View Page
|
 |
1385 Jutras ’07 seed (x 1421.5 Stelts)
Day: 34
OTT: 277”
Est. weight: 453 lb.
The ribs are getting more pronounced on this pumpkin. So far they are evenly spaced and are not too deep so it looks very nice. There is a small vine split that occurred (maybe due to some vine stress) that opened up a small spot, but with the umbrella covering the area to keep it dry there has been no rot and it has actually healed over.
|
|
|
Saturday, July 31
|
View Page
|
 |
1421.5 Stelts ’09 (1385 Jutras seed)
Day: 29
OTT: 266.5”
Est. weight: 395 lb.
Every time I look at this pumpkin it seems the blossom end gets more and more sucked in. The rest of the pumpkin looks good the stem is staying low and it is keeping an overall symmetrical shape. I just hope I do not get a blossom end split as it gets deeper and deeper.
|
|
|
Saturday, July 31
|
View Page
|
 |
1353 DeBacco ’08 (x 1544.5 Revier)
Day: 30
OTT: 254.5”
Est. weight: 355 lb
Due a mysterious soft spot that developed about 2ft. from the stem of this pumpkin it is now growing on just half a plant. I cut the main vine right near the pumpkin shortly after this picture and now, only the plant material beyond the pumpkin (that is the newest growth) is left to support the pumpkin as it hopefully continue to grow.
On the bright side this pumpkin is still the best looking in the patch and still has the best shape and color. Now with only half the plant left the final size is going to be reduced but it still should be a crowd pleaser.
|
|
|
Saturday, July 31
|
View Page
|
 |
1140 Stevens ’08 (x 1229 Sundin)
Day: 26
OTT: 263.5”
Est. weight: 392 lb.
Here you can see the blossom end being sucked in which I did not expect from this plant. The rest of the pumpkin looks good and there is a chance at some decent orange color.
|
|
|
Saturday, July 31
|
View Page
|
 |
1229 Sundin ’08 (x 1140 Stevens)
Day: 33
OTT: 286.5”
Est. weight: 499.5 lb.
Well when I gave this pumpkin the nick name of a space ship I did not think it was going to get this pronounced. This pumpkin is actually slowly falling on the blossom end! I have actually had to remove the lobes so there would not be one pressure point. The secondaries growing off the main are slowing the fall but when I loosen them I can hear the pumpkin adjust on the material it is resting on. If it keeps this up it is going to end up with the stem growing at the top. Stay tuned to see if “the spaceship” lands.
|
|
|
Saturday, July 31
|
View Page
|
 |
This shows how all 10 of my plants look on July 31st, 2010. Most of the plant sites have filled in with just a little bit more area left to fill. I have also maintained a walking path down the center so I can inspect all of my plants throughout the season.
If you look at previous patch overview pictures for this growing season you can get an idea of how my plants have progressed.
|
|
|
Saturday, August 28
|
View Page
|
 |
Well, shortly after one of our few rain storms of the year the problems began to occur. Pictured here is a collage of my 1140 Stevens offspring. It suffered from some unknown (internal?) rot. I could not find the area that it originated so I am just chalking this up to bad luck.
It was just starting to get some great orange color and I can only image what it would have looked like come Halloween.
800.0 DeBacco ’10 dmg (F: 1140 Stevens x M: 1229 Sundin)
OTT: 328.5”
7.23% heavy
54 days old
|
|
|
Saturday, August 28
|
View Page
|
 |
Here is the view of the two halves side by side. Again still not sure of the cause of the rot but it was spreading so it was time to pull this plant. Despite the sunken in blossom end the walls were still thick enough to prevent a split from occurring.
800.0 DeBacco ’10 dmg (F: 1140 Stevens x M: 1229 Sundin)
OTT: 328.5”
7.23% heavy
54 days old
|
|
|
Saturday, August 28
|
View Page
|
 |
Sadly, my squash developed a pin hole split and had to be removed from the patch. This squash was getting a longer shape to it which I have not seen in many other squashes.
The overall color pattern resembled the pollinator from last year and for the most part this plant was relatively easy to pollinate (again, just like last year’s pollinator).
Some are just not meant to be…
714.4* DeBacco ’10 dmg (F: 725.6* DeBacco ‘09 x M: 799* DeBacco ’09)
OTT: 314.5”
8.9% heavy
45 days old
|
|
|
Monday, August 30
|
View Page
|
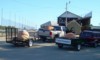 |
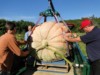
Here is the official Team-Pumpkin Marshfield Fair pick-up crew. Driving down the highway with the pick-up truck and trailer as the head vehicle and the “Team-Pumpkin” sign at the end resulted in numerous pictures, thumbs-up, looks, and beeping horns.
Go Team-Pumpkin!!!
|
|
|
Wednesday, September 1
|
View Page
|
 |
799* DeBacco ‘09 (x 725.6* DeBacco)
Day: 51
OTT: 324.5”
Est. weight: 719.5lb
This squash started out a great green color, then oddly went very pale and now it is getting its color back. I did not expect this since the background of this squash has strong green coloration in its background. It is still growing good, which I guess is the important part.
|
|
|
Wednesday, September 1
|
View Page
|
 |
1544.5 Revier ’09 (x 1353 DeBacco)
Day: 50
OTT: 315”
Est. weight: 659lb
I decided to go to an early weigh-off and this was my selected pumpkin, it will be harvested tomorrow morning. Having just lost two other plants I want to get something to the scale. It may not be the biggest but it is not a bad little pumpkin. I would also expect the orange color to develop further in the future.
|
|
|
Wednesday, September 1
|
View Page
|
 |
1385 Jutras ’07 seed (x 1421.5 Stelts)
Day: 66
OTT: 341.5”
Est. weight: 836.5lb
This is the tallest 1385 Jutras I have grown. It has some ribs showing some nice texture. What the picture does not show is that there is a new woodchuck hole about 4ft. from this pumpkin. Every time I go to the patch only this pumpkin has the white sheet removed from it. The sheet is always pulled in the same direction (toward the hole) and it is frustrating when I am trying to protect the pumpkin from the sun.
I have deer netting covering all my pumpkins which has prevented any woodchuck bite marks but he can still grab a corner of the sheet and try and use it as a blanket. The woodchuck just moved in so I am hoping to discourage him so he moves on to another field.
|
|
|
Wednesday, September 1
|
View Page
|
 |
1421.5 Stelts ’09 (x 1385 Jutras seed)
Day: 61
OTT: 370.5”
Est. weight: 1064.5lb
Other than the sunken in blossom (that actually has not gotten much worse since the last update) I like this pumpkin. The overall shape is nice and the color keeps getting better.
|
|
|
Wednesday, September 1
|
View Page
|
 |
1353 DeBacco ’08 (x 1544.5 Revier)
Day: 62
OTT: 313.5”
Est. weight: 650lb
By far my best looking pumpkin this year, it has great color and perfect shape. I wish it was growing on a full plant but I had to cut the main due to a strange wilt/rot that developed. I stopped the problem from spreading but growth did slow down also.
|
|
|
Wednesday, September 1
|
View Page
|
 |
1229 Sundin ’08 (x 1140 Stevens)
Day: 65
OTT: 357.5”
Est. weight: 958lb
The spaceship has landed! I had no intention of growing a pumpkin this way, it just happened (maybe for a reason?). This plant is right next to my 1353 so I have the two contrasting pumpkin adjacent to one another which makes this one look even more ‘out of this world’.
|
|
|
Wednesday, September 1
|
View Page
|
 |
Here is just a quick picture of my long gourds. I went from just plants to a bunch of gourds. I wish I knew what changed so I could replicate it, but it is nice to see some growing gourds even if it is late in the season.
|
|
|
Wednesday, September 1
|
View Page
|
 |
Rarely do I take all the sheets off at once, but I thought it would make a nice patch overview picture to go with the rest I have been taking over the course of the year. It still amazes me the changes that occur over just the growing season.
|
|
|
Thursday, September 2
|
View Page
|
 |
827 DeBacco ’10 (F: 1544.5 Revier ‘09 x M: 1353 DeBacco ’08) 25.5% heavy
OTT= 315”
25.5% heavy
51 days old
After just losing two pumpkins in the patch I decided to pull this pumpkin and bring it to an early weigh-off. I selected the Woodstock Fair since this is one weigh-off that I have not exhibited in. It was great to see Gene and the Dwelly’s there at this old time Fair.
Also, many people got to see my pumpkin while it was on display. I was very happy as it went way heavy for me. It commented that people were surprised my pumpkin won 1st place because it certainly was not the biggest.
|
|
|
Thursday, September 2
|
View Page
|
 |
827 DeBacco ’10 (F: 1544.5 Revier ‘09 x M: 1353 DeBacco ’08) 25.5% heavy
OTT= 315”
25.5% heavy
51 days old
Here is the cut away picture after many days off the vine that it began to rot. So, that thin part in the bottom right is just where there was some pumpkin soup sitting. I did catch the rot early so most of the wall integrity (and seeds) were saved. Overall this was a very thick pumpkin that if I had known what it weighed I probably would have let it grow longer in the patch.
|
|
|
Wednesday, September 15
|
View Page
|
 |
757.4 DeBacco ’10 dmg (F: 1353 DeBacco ’08 x M: 1544.5 Revier ’09) 11.71% heavy
OTT= 318”
11.71 % heavy
76 days old
Well not all of my pumpkins made it out of the patch in one piece this year. This pumpkin was especially hard to see go down, not because it was my own seed, but because of how great it looked all season. It had great shape, and color as well as stem health.
Mysterious side rot occurred that was this pumpkins downfall. Even though I inspected this pumpkin after the rot was 1st seen I could not find any weak points or other areas if rot. The inside was also very consistent and showed no areas of concern at all, must be those great 1385 Jutras genes;-)
|
|
|
Wednesday, September 15
|
View Page
|
 |
757.4 DeBacco ’10 dmg (F: 1353 DeBacco ’08 x M: 1544.5 Revier ’09) 11.71% heavy
OTT= 318”
11.71 % heavy
76 days old
Not the best picture of the inside of the pumpkin but I think the exterior got the approval from none other than the “Queen of Orange”. I want to thank Bill and Dawn for being my official patch and scale inspectors. Nothing but the finest for Team-Pumpkin!
|
|
|
Tuesday, September 21
|
View Page
|
 |
1421.5 Stelts ’09 (x 1385 Jutras seed)
Like I said not all the pumpkins made it out of the patch in one piece this year and this was the hardest one to find a soft spot on because it was my biggest and also had great color. Personally, I am not a fan of the sunken in blossom end but a growing pumpkin with good color and a healthy stem sure are good traits.
Pictured here is my 1421.5 Stelts ’09 pumpkin as I was clearing vines to get ready to get an official weight on it.
|
|
|
Tuesday, September 21
|
View Page
|
 |
1421.5 Stelts ’09 (x 1385 Jutras seed)
Here is the same pumpkin as the previous picture, but for some reason this picture looks prettier;-)
|
|
|
Tuesday, September 21
|
View Page
|
 |
1421.5 Stelts ’09 (x 1385 Jutras seed)
I turn my back to get the pumpkin lifter set-up next to my other pumpkin and Bill set-up the tripod. He was considering building one and I think he is well on his way to replicating the Team-Pumpkin design.
|
|
|
Tuesday, September 21
|
View Page
|
 |
1279.1 DeBacco ’10 dmg (F: 1421.5 Stelts ’09 x M: 1385 Jutras ’07) 4.75 % heavy
OTT= 388”
4.75 % heavy
81 days old
The official weight of the pumpkin and my official scale reader/patch inspector/ Team-Pumpkin cheerleader;-) It was a great time with Bill and Dawn I just wish we were lifting a solid pumpkin.
Either way it was still the heaviest pumpkin grown in Connecticut for 2010, but I think, what could have been.
|
|
|
Tuesday, September 21
|
View Page
|
 |
1279.1 DeBacco ’10 dmg (F: 1421.5 Stelts ’09 x M: 1385 Jutras ’07) 4.75 % heavy
OTT= 388”
4.75 % heavy
81 days old
The Team-Pumpkin team! While the set-up, lift, and weighing all went smoothly we were only half done as I have another (solid) pumpkin to bring to the Durham Fair, so we still have work to do…
|
|
|
Tuesday, September 21
|
View Page
|
 |
1385 Jutras ’07 seed (x 1421.5 Stelts)
It is always nice to have some extra help in the patch, especially when picking pumpkins. Here is Dawn Northrup who came all the way from Canada to Connecticut to pick my pumpkin. (Well, something like that.)
Pictured here is the official Team-Pumpkin pumpkin lifter. We had both the tripod and pumpkin lifter going today. Both methods worked just fine, but what I like about the pumpkin lifter is that it can be done 100% by one person. This pumpkin was a close fit and that is why you see the carpet and foam to prevent the pumpkin from getting scratched as it is lifted up.
(I am just looking busy, Dawn is really doing all the work.)
|
|
|
Tuesday, September 21
|
View Page
|
 |
1385 Jutras ’07 seed (x 1421.5 Stelts)
Once the pumpkin is lifted the entire lifter and pumpkin just roll right into the trailer with the aid of a boat winch and Dawn at the crank. Bill and I are just making sure everything is centered as the pumpkin is lowered down on the pallet and foam.
|
|
|
Tuesday, September 21
|
View Page
|
 |
1385 Jutras ’07 seed (x 1421.5 Stelts)
After a busy afternoon the tailgate is up and the work is done. Now for the careful drive home and dinner with a side of “oyster crackers”;-)
|
|
|
Tuesday, September 21
|
View Page
|
 |
This picture shows what both the tripod and pumpkin lifter systems look like in fully functional mode at the same time. This is a first to have these two systems operational at the same time.
Both worked flawlessly but it was nice to be able to show both Bill and Dawn both systems that they have only heard about up to this point.
|
|
|
Wednesday, September 22
|
View Page
|
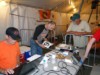 |
Durham Fair (volunteer) working crew. Pictured here from left to right is Bart, my dad (Jim) and Norm.
Bart is making sure our live weight display is up-to-date with all the entries, my dad is organizing all the numbers and Norm is ready to inspect the next pumpkin and read the scale. Team-Work at its finest!
|
|
|
Wednesday, September 22
|
View Page
|
 |
After much delay it my pumpkins turn to hit the scale. This picture shows some of the competition and it looks like another great year for Team-Pumpkin and the Durham Fair.
|
|
|
Wednesday, September 22
|
View Page
|
 |
1064.5 DeBacco ’10 (F:1385 Jutras ’07 seed x M: 1421.5 Stelts) 15.33% heavy
OTT= 353”
15.33 % heavy
86 days old
I was very happy with this weight as the pumpkin went heavy for me and got over the 1,000lb mark. This pumpkin ended up in second place which was another welcomed surprise for me.
You will also notice the blue handle in the background, which is the official Team-Pumpkin broom to clean the scale. So everyone that saw my fine broom work at the SNGPG weigh-off in Rhode Island, I had some practice and I also got to see Jim Kuhn’s method at Topsfield. Good times.
|
|
|
Wednesday, September 22
|
View Page
|
 |
I want to publically congratulate Russ for entering the 1/2 ton pumpkin club. There were many phone calls and patch visits made during the growing season, but I think it was all worth it.
Russ’s beautiful orange 1037.5lb pumpkin was grown from my own 1353 DeBacco ’08 (F: 1385 Jutras x 775 Dill). My 1064.5 pound pumpkin was grown off the 1385 Jutras so you can see how the 775 Dill sure added some orange color, but the shape and ribbing from the 1385 Jutras stayed true to form. It is nice when a genetic cross works out as planned.
|
|
|
Thursday, September 23
|
View Page
|
 |
1064.5 DeBacco ’10 (F:1385 Jutras ’07 seed x M: 1421.5 Stelts) 15.33% heavy
OTT= 353”
15.33 % heavy
86 days old
Here you can get an idea of what the pumpkin looked like on all sides. It was very symmetrical the entire way around.
Note pictures were taken 68 days post harvest, and it was still in great shape.
|
|
|
Thursday, September 23
|
View Page
|
 |
1064.5 DeBacco ’10 (F:1385 Jutras ’07 seed x M: 1421.5 Stelts) 15.33% heavy
OTT= 353”
15.33 % heavy
This internal picture shows just how thick this pumpkin was all the way around, again no internal flaws from a 1385 Jutras. This seeds has been very consistent in this area which is why I have tried to include it in most of my seed lines.
Note: Pictures were taken 68 days post harvest, and there were no seeds germinated inside. I have found that a nice consistent environment makes these pumpkin last as long as possible. When it is 11/28/10 growers want to know if I have seeds available so I decided that is was time to get an internal view.
|
|
|
Friday, September 24
|
View Page
|
 |
Some of the officials at the Durham Fair wanted to compete with us but find growing the giants to great of a challenge so they have introduced a new category, lightest pumpkin wins. There was a tie this year at 5oz. (141.7g) but there could be some more competition next year;-)
This area had many pictures taken and comments from fair goers so I think this was enjoyed by many.
|
|
|
Friday, October 1
|
View Page
|
 |
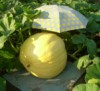
963 DeBacco ’10 (F: 799* DeBacco ‘09 x M: 725.6* DeBacco ‘09) 9.8% heavy
OTT= 347â€
9.8 % heavy
81 days old
I went up to the Topsfield Fair, and it seemed odd to be driving in the day-light on a Friday afternoon. I was a judge/volunteer and between the pumpkin taping, inspecting and bottom assessing I did not have much time to take many pictures. But I did hold the lead for a little while, and I was able to get a picture of my name in lights (which did not last long).
|
|
|
Friday, October 1
|
View Page
|
 |
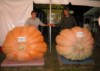
My fruit was ruled a pumpkin, which was after much debate. Pictured here is last year’s “squash” [895* DeGrazia ’09 (F: 960 Lancaster x M: self) -12% light] and my “pumpkin” [963 DeBacco ’10 (F: 799* DeBacco ‘09 x M: 725.6* DeBacco ‘09) 9.8% heavy].
Can you tell the difference?
|
|
|
Friday, October 1
|
View Page
|
 |
963 DeBacco ’10 (F: 799* DeBacco ‘09 x M: 725.6* DeBacco ‘09) 9.8% heavy
OTT= 347”
9.8 % heavy
81 days old
This “pumpkin” was thick as the interior picture shows. If you look toward the stem end you will see a ruler (12” in length) that stuck to the pumpkin as it was oozing fresh sticky pumpkin sap.
Even the blossom end was 5” thick, which is nice to see that my years of breeding have produced some nice thick walls.
|
|
|
Friday, October 1
|
View Page
|
 |
963 DeBacco ’10 (F: 799* DeBacco ‘09 x M: 725.6* DeBacco ‘09) 9.8% heavy
OTT= 347”
9.8 % heavy
81 days old
Another great picture of my “pumpkin” after the Topsfield Fair with the piece of duck-tape still attached that reads #13…
|
|
|
Saturday, October 2
|
View Page
|
 |
1,111 DeBacco ’10 est (F: 1229 Sundin ’08 x M: 1140 Stevens) estimated weight
Sadly the day before Topsfield Fair a small rot spot was noticed on this pumpkin so I DQ’e d it in the patch. (Note: Picture was taken by Bill Northrup during his visit.) I did not have my in-line scale with me (that is why I go to weigh-off’s) so by time I was able to get down next the pumpkin was un-weighable. It appeared as if the soft spot was eaten by a mouse as there was a physical hole when I returned that compromised the bottom structure.
I did chop it up to get seeds out of it and all that I can say is that other than the bottom rot/soup area this pumpkin was thick! (However, there were no viable seeds.)
|
|
|
Saturday, October 2
|
View Page
|
 |
1,111 DeBacco ’10 est (F: 1229 Sundin ’08 x M: 1140 Stevens) estimated weight
It will be known as the 1,111 estimated weight, but honestly I think it weighed more after seeing the inside. Also, I could not find any viable seeds in this pumpkin which was another let down.
I did not take many pictures of this pumpkin as I did not care for the look, but other growers did seem to ask about the ‘spaceship’ which was this pumpkins nickname.
|
|
|
Saturday, October 9
|
View Page
|
 |
Another weekend another weigh-off!!! This time it is the SNGPG in Rhode Island.
This picture shows the beautiful day we had and some of the pumpkins. In the background you can see some of the larger pumpkins and growers but I think this picture provides a good overview of the participants.
|
|
|
Saturday, October 9
|
View Page
|
 |
Pictured here is an “Octopus style Lifter”. Not sure if this is the real name or not but that is what it looks like to me. It was crafted by the woodwork (and pumpkin grower) expert Joe Jutras and it seemed to work very well.
It allows a bunch of people to pick up a pumpkin with a ring system and not trip over each other (as much) as you would with a typical lifting tarp. This lifter does have limits on weight, but it seemed to do the job well.
|
|
|
Saturday, October 9
|
View Page
|
 |
Other than some big pumpkins getting weighed, here are some progression photos of the carver that was present. I never made it over for the final shot but I think you get the idea.
|
|
|
Friday, October 29
|
View Page
|
 |
The hour has come to open up the 2010 world record pumpkin to see what is has for a seed count. It is like opening up a mummy’s tomb, you do not know what you are going to find and you hope there is not a curse.
|
|
|
Friday, October 29
|
View Page
|
 |
As the sign says we are a Team and I want to make sure that I had witnesses and some extra pairs of eyes to make sure I did not miss a single seed in any of the pumpkins. Thanks to Gene and Steve for your help!
|
|
|
Friday, October 29
|
View Page
|
 |
After all the seeds were harvest out of the 1,810 Scott Cully went to work doing what he does best. Pictured here is his rough cut to get an idea of what areas his is going to more detail into. I was fortunate enough to see Scotts work last year; it is a sight to watch.
I wonder, how does the pumpkin feels having all those knives stuck into it?
|
|
|
Friday, October 29
|
View Page
|
 |
Clearly the pumpkin can bite back! But do not worry this was just a play bite as the carver got away unharmed.
|
|
|
Friday, October 29
|
View Page
|
 |
Here is the Team harvesting seeds from the 1674.5 Connolly. Not sure how to explain it but this pumpkin was the warmest of them all even though they had all been sitting out all night. If you look at this picture closely, I am the one in the pumpkin, but why is Steve the one with the rain suit on?
|
|
|
Friday, October 29
|
View Page
|
 |
This picture is my personal favorite. Honestly, I was asked repeatedly “can you stick your head out, again” and I was not sure what to expect. While I did my best to find the latest camera to look at I could not see what was around me very well. I did not realize it at the time but this turned out to be a great picture.
|
|
|
Friday, October 29
|
View Page
|
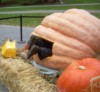 |
Next up is the 1725 Sweet, which I “dove” right into. You can see a sample of the wall thickness form the piece that became the door into the pumpkin. Of course everyone wanted the inside report so when I evaluated my new surrounding I turned around to tell the crowd of my findings. “There are seeds, and it is cold in here” was the report.
It was also nice to see the pumpkin from the inside out as I have already seen the plant that grew the pumpkin as it is one of my hopeful clones I have going this off-season.
|
|
|
Friday, October 29
|
View Page
|
 |
Looking at this picture just puts into perspective how big these pumpkins truly are. I think this unique size comparison and just plain eye catching image is part of the reason why so many pictures were taken. I looked at it as I had to get the seed out of there somehow, so I just got the job done.
|
|
|
Friday, October 29
|
View Page
|
 |
Here I am getting into my work.
I may be one of the first people to thump a pumpkin from the inside! I can also say that to all those growers that thump your pumpkins it is quite loud on the inside.
|
|
|
Friday, October 29
|
View Page
|
 |
Here I am handing Gene the last of the seeds to be put into the colander from the 1725 Sweet. As you can see we needed to have security around us at all times to ensure the seeds were safe.
All the seeds from the 1,810 Stevens and 1,725 Sweet were brought back home with me to ensure a proper drying protocol was followed. I did everything I could to ensure the highest germination rate as possible for future growers. Those that are lucky enough to get seeds I wish you the best of luck with them.
|
|
|
Sunday, October 31
|
View Page
|
 |
2010 Season Summary
Here is a quick summary of what I grew during the 2010 growing season.
In the picture you can see the seeds in the germination chamber. Some of those listed below had low seed counts but you are welcome to ask if any of the crosses are of interest. (The Dill’s Premium list will also be carrying the 1064.5, 827, and the 757.4 as a heads-up.)
1279.1 DeBacco ’10 dmg (F: 1421.5 Stelts ’09 x 1385 Jutras ‘07) 4.75% heavy
1111 DeBacco ’10 est (F: 1229 Sundin ‘08 x 1140 Stevens ‘08) est
1064.5 DeBacco ’10 (F: 1385 Jutras ‘07 x M: 1421.5 Stelts ‘09) 15.33% heavy
963 DeBacco ’10 (F: 799* DeBacco ’09 x M: 725.6* DeBacco) 9.8% heavy
827 DeBacco ’10 (F: 1544.5 Revier ’09 x M: 1353 DeBacco ’08) 25.5% heavy
800.0 DeBacco ’10 dmg (F: 1140 Stevens ’08 x M: 1229 Sundin ‘08) 7.23% heavy
757.4 DeBacco ’10 dmg (F: 1353 DeBacco ’08 x M: 1544.5 Revier ’09) 11.71% heavy
714.4* DeBacco ’10 dmg (F: 725.6* DeBacco ‘09 x M: 799* DeBacco ’09) 8.9% heavy
(See diary for details like days old, pictures, and descriptions.)
|
|
|
Saturday, November 6
|
View Page
|
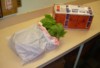 |
Well you have seen the pumpkin, but here is the plant that grew the pumpkin. It was packaged in a very fitting Halloween box.
What you are looking at are cuttings from the 1161 Rodonis plant that grew the 1,725 Sweet!
|
|
|
Saturday, November 6
|
View Page
|
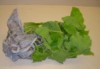 |
While these 1161 Rodonis vine tips all looked healthy at this stage as they began to grow out a virus infection became evident. As a result many of these were lost for fear of contamination.
At this time I cannot say if I will have plant material available come spring but I am hoping to find some clean tissue. Late season aphids were the reason for the virus and it was initially only evident in trace amounts until the stress of propagation started and the virus infection became more wide spread.
|
|
|
Saturday, November 6
|
View Page
|
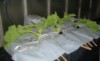 |
Here is a night time shot of my propagation chamber as I had to come home and then back to school for preparation of the clones. I can say that while they look a little weak here they had just come out of the box, after going through the shipping process. I can tell you that by the morning they were all perked up (turgid) and looked great.
|
|
|
Saturday, November 6
|
View Page
|
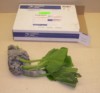 |
This plant material is from the 1421.5 Stelts plant that grew the 1,663lb Zoellner pumpkin. This plant material has remained cleaner through the propagation process so let’s hope that I can just keep it going.
Time will tell...
|
|
|
Thursday, December 9
|
View Page
|
 |
This is how one of the surviving 1421.5 Stelts clones that grew the 1,663lb Zoellner is looking. This is one of the best as of right now. There has not been much progress (as expected) but they are alive so there is hope that I will have some plant material come spring time.
|
|
