|
Tuesday, March 23
|
View Page
|
 |
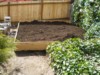
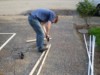
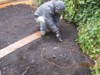
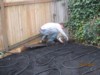
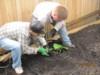
This year we decided to go big. This is the new area that I carved away from overgrowing ivy and weeds. It took a lot of work to get it to this point.
|
|
|
Tuesday, March 23
|
View Page
|
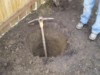 |
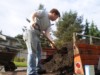
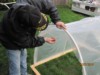
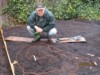
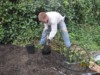
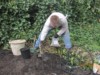
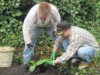
My brother and I decided to dig deep holes in the hard packed clay/pea gravel mixture to allow the plant to have a region that it can freely grow and deeply.
|
|
|
Tuesday, March 23
|
View Page
|
 |
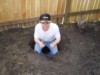
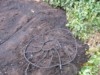
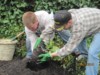
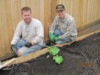
We dug holes on either side of the growing area. This will give two chances for a large pumpkin. When the vines begin to collide we will be forced to cull down to one plant for the growing area.
|
|
|
Tuesday, March 23
|
View Page
|
 |
Our thinking was that since we have such a limited growing area and can grow only one plant why not give two different plants the opportunity to grow and then select the healthiest, best groing plant as the primary for the season.
|
|
|
Tuesday, March 23
|
View Page
|
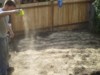 |
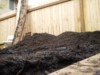
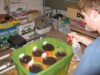
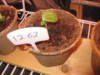
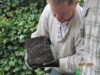
Additions to the soil. We will till these in as we continue on our quest for a giant pumpkin.
|
|
|
Tuesday, March 23
|
View Page
|
 |
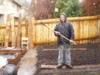
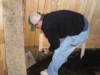
Hand Tilling is fun. After seeing how much it would cost for a rototiller from the local equiptment rental shop we decided to whip out some shovels and do it our selves. Maybe we should have rented the tiller. This takes forever!
|
|
|
Tuesday, March 23
|
View Page
|
 |
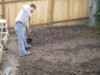
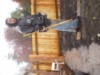
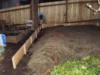
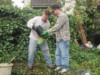
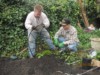
Here is Jeff hard at work while I continue to till. It was prety grueling.
|
|
|
Saturday, March 27
|
View Page
|
|
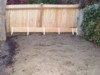
New growing bed creation
This marks the beginning of the 2010 pumpkin season. I am very excited about this year of growing. Last year my family and I grew a 55lb pumpkin and are determined to grow a 100+lb pumpkin. I have acquired several 1132.5 Westervelt-09, 1502 Holland-09, 1400 Holland-09, 1278 Holland-09, 1262 Holland-07, 1131 Holland-09, 996 Holland-09, 830.5-09 seeds.
The new growing area began as hard packed pea gravel-clay mixture. The weeds had over taken the area, including feet upon feet of ivy. Everything was weeded or trimmed back. 7 lbs of bone meal, 3 lbs of dolomite, and 3lbs of lime were laid on top of the gravel/clay soil. A dressing of Pacific Topsoil Enviromix, 1/3 sand and 2/3 pacific garden mulch, (1/3 yard total) was added. This was then tilled in. to a depth of 4” to 6” deep. The remaining 2/3 yard of Enviromix were added on top. 10 cubic feet of steer manure was laid down, finally 1 yard of cedar Grove Compost was laid down. 5 lbs of Kelp Meal and 5 lbs of Dr. Earth Life Fertilizer was laid down. This would was then tilled down to the broken up clay layer.
|
|
|
Sunday, March 28
|
View Page
|
 |
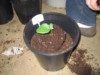
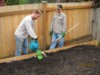
Adding Kelp meal to the growing bed. Just another day in the trenches of Pacific Northwest gardening!
|
|
|
Sunday, March 28
|
View Page
|
 |
Just a little sun couldn't hurt right?
|
|
|
Thursday, April 15
|
View Page
|
 |
New bed preparation
Today Jeff, my brother, and I added new dirt to the growing bed. The bed was around 4-6 inches of soil. The new dirt was laid down on top of the previous dirt. Tilling did not reach the level of the previously added soil. From the suggestions of other pumpkin growers I decided to add more dirt to the growing bed. With only 4-6 inches of soil over hard packed clay/pea gravel there was concern over the water collecting at the clay base and potentially rotting out the roots. I added 3 yards of dirt. 1 yard of Pacific Topsoil Nutrient mix (a manure blend of horse, cow, and chicken). 1 yard of Pacific Topsoil Supreme Mix (1/3 loam soil 1/3 compost 1/3 sand. 1 yard Pacific Topsoil Pacific garden mulch (composted yard and garden material).
The soil was amended with 2 pounds of sweet lime, 5 pounds of bone meal, 5 pounds of kelp meal, and 7 pounds of Dr. Earth Life fertilizer. 2 pounds of fish meal was worked into each planting mound and surrounding area. The growing mounds were prepared with Cedar Grove Booster blend and the imported soil. The remaining bed was covered with Cedar Grover booster blend as well as Cedar Grove Compost as a dressing.
The bed was walled with cedar fencing boards to add a wall to the entire new growing area. The soil is now 12-14 inches deep. With the cedar boards added the growing area was resized to 13.5’ X 16’. And looks great I might add. Green houses were prepared to cover the new growing areas. The green houses for each planting mound is 4’ X 6’. 2.5’ X 5’ green houses were prepared for the side growing areas. They were built with a wooden frame and then curved ½” PVC over the top.
|
|
|
Thursday, April 15
|
View Page
|
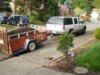 |
Pulling up to the house with my new dirt
|
|
|
Thursday, April 15
|
View Page
|
 |
Thats a lot of dirt
|
|
|
Thursday, April 15
|
View Page
|
 |
Unloading the dirt
|
|
|
Thursday, April 15
|
View Page
|
 |
this is how deep the soil is now
|
|
|
Thursday, April 15
|
View Page
|
 |
Jeff working a corner of the cedar board wall
|
|
|
Thursday, April 15
|
View Page
|
 |
The wall is up
|
|
|
Thursday, April 15
|
View Page
|
 |
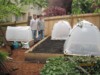
The finished new growing bed 13.5' by 16'
|
|
|
Thursday, April 15
|
View Page
|
 |
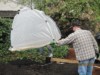
Jeff working on the wooden frame of the greenhouses
|
|
|
Thursday, April 15
|
View Page
|
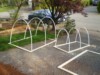 |
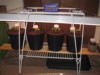
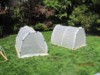
The greenhouses without plastic covering. Ill will add the covering before I put my starts outside.
|
|
|
Friday, April 16
|
View Page
|
 |
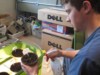
Building my germination box
|
|
|
Friday, April 16
|
View Page
|
 |
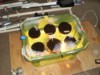
Seed starting
On April 15 we began the seed starting process. My brother and I chose 6 seeds to start. We will only grow 2 plants. From these two plants we will cull down to 1 plant. We will be growing the plants on opposite ends of the 13.5’ X 16’ bed. The plant that looks the best when the begin to touch will be chosen as the primary plant.
After selecting the seeds (3 1132.5 Westervelt, 1400 Holland-09, 1278 Holland-09, and finally the 1262 Holland-07). I filed them down with 220 grit sandpaper. We then oaked them in a 1 teaspoon/ quart of water of Neptune’s Harvest Seaweed Fertilizer from 5pm to 11pm. At 11pm we placed the seeds into pre-soaked 4” peat pots with Miracle grow Organic potting soil as a medium for growing.
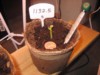
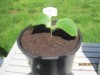
The seeds were placed into a germination box that had undergone testing to get a temperature between 85°-90° at a constant temperature. A soil thermometer was placed into one of the pots to allow for continual monitoring of the temperature.
|
|
|
Friday, April 16
|
View Page
|
 |
I placed the seeds in my germination box around 11pm 4/15/10.
|
|
|
Monday, April 19
|
View Page
|
 |
Adding the cedar walls to the sides of the new bed.
|
|
|
Monday, April 19
|
View Page
|
 |
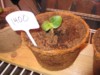
First starts
The seeds popped today. After the germination box held a fairly constant temperature of 86°-88° the seeds germinated. The sides of the peat pots were sprayed twice a day, 1-3 sprays were applied to the top of the pots as well. The soil was kept damp but not wet. One of the 1132.5-09 Westervelts and the 1262-07 Holland came up today. They will be placed under grow lights until they are ready to be placed outside.
|
|
|
Monday, April 19
|
View Page
|
 |
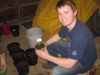
Jeff with the 1132.5 Westervelt
|
|
|
Monday, April 19
|
View Page
|
 |
Jeff with the 1262-07 Holland
|
|
|
Monday, April 19
|
View Page
|
 |
The germination box with starts
|
|
|
Monday, April 19
|
View Page
|
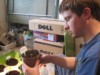
|
At 5pm, Jeff moved the grow light set-up to the rec room and moved the two plants underneath them. We decided the rec room is the best place to place the starts since there is more space to develop and hold all the plants.
Its 7pm, and I just looked at the remaining plants, and the 1132.5-09 Westervelt on the front row, right corner is just starting to show a green stem. I'm sure by morning; we will see the leaves poking up through the soil. The 1400-09 Holland is bulging up a good size amount of soil, but has not broken through. Again, I sure he will be showing green tomorrow when we check them.
|
|
|
Tuesday, April 20
|
View Page
|
 |
Exciting times!. 5 of six starts have come up. All three of the 1132.5-09 Westervelt's, the 1400-09 Holland, and 1262-07 Holland have come up. The 1262-07 Holland has an underdeveloped cot leaf. The plants have been moved out of the germination box underneathe the grow light. The peat pots dry out quickly now that they are exposed to the open air so we are spraying the sides to keep them moist. The soil remains damp with good moisture levels.
|
|
|
Tuesday, April 20
|
View Page
|
 |
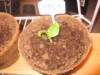
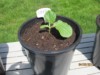
Here is the first 1132.5-09 Westervelt that came up. It looks nice and green and healthy.
|
|
|
Tuesday, April 20
|
View Page
|
 |
The 1262-05 Holland has an underdeloped cot leaf. The remaining leaf looks good however I wonder how this will affect the plant.
|
|
|
Tuesday, April 20
|
View Page
|
 |
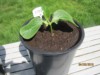
The 1400-09 Holland is nice and stocky. It has a wider girth ont eh stem than any of the other pumpkin starts. You can already see a tiny weeny main popping up between the cot leaves in this pic. Which is amazing considering this is its thrid day of life above ground!
|
|
|
Tuesday, April 20
|
View Page
|
 |
Number 2 of the 1132.5-09 Westervelt seeds. The was grown off of the 1404-08 Urena and crossed with the 1536-08 Van Kooten. WOW what amazing genetics are packed into this seed. I got in contact with Richard Westervelt today, the grower of the 1132.5-09 seed. Its nice to see the cooperation and comradship in the pumpkin growing community. It makes it fun to chat with the man responsible for the seed you are spending all of your time nurturing and growing.
|
|
|
Tuesday, April 20
|
View Page
|
 |
The remaining 1132.5-09 Westervelt has just began sticking its neck out of the dirt in the germination chamber so we will leave it there until tomorrow. 5 for 6 not a bad start to the year for my first attempt at giant pumpkins.
|
|
|
Wednesday, April 21
|
View Page
|
 |
Emergence day +4:
The seeds are looking nice and healthy. No signs of life on the 1278-09 Holland at this time. However the remaining seeds are growing quite nicely. We may have to repot these soon.
|
|
|
Wednesday, April 21
|
View Page
|
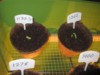
 |
We have labeled each of the 1132.5-09 Westervelt seeds to allow for easier identification. They are numbered in order of emergence. The 1132.5's are soild looking starts. In continuing to email Dick Westervelt I was informed that 5 other people in California are growing the 1132.5-09 Westervelt seeds. I would be curious to know how they do as well.
|
|
|
Wednesday, April 21
|
View Page
|
 |
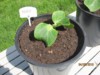
As you can see the 5th pumpkin to come up (#3 of the Westervelt seeds) has two underdeveloped cot leaves. Since I will only be planting 2 pumpkin plants this has narrowed my choices down to the 3 strong and healthy starts. (two 1132.5-09 Westervelt and the 1400-09 Holland)
|
|
|
Thursday, April 22
|
View Page
|
|
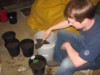
Today my brother Jeff and dad went to buy more potting soil from the store as they begin the process of repotting the seeds into larger containers. These will be their new homes until they are once again transplanted outside into the final homes.
|
|
|
Friday, April 23
|
View Page
|
 |
Repotting day-
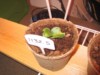
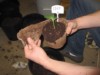
Today my brother and dad repotted the starts today. In addition the last 1278-09 Holland began to stick out of the dirt in the germination box. 6 for 6 thats a good way to start the season! Here is a look a the 1262-07 Holland, the first one to be repotted.
|
|
|
Friday, April 23
|
View Page
|
 |
Ripping away the peat pots from the soil. As an experiment we used 4 peat pots and 2 coconut husk pots to start our plants. Jeff soon discovered the peat pots are the way to go. In ripping away the peat pot we are giving the roots new room to grow. We decided to use 2 gallon pots over 1 gallon pots to give the plants more room to grow.
|
|
|
Friday, April 23
|
View Page
|
 |
To start our seeds this year we used Miracle Grow Organic potting soil. We then mixed 1/3 cup BioGrow Endo Plus into each cubic foot of potting soil to encourage Mycorrhizae growth on the roots.
|
|
|
Friday, April 23
|
View Page
|
 |
Adding new Miracle Grow Organic potting soil with BioGrow Endo Plus mixed in, to the pot.
|
|
|
Friday, April 23
|
View Page
|
 |
Our 1132.5-09 Westervelt's are definately the healthiest looking starts. Their cot leaves just continue to grow bigger and bigger.
|
|
|
Friday, April 23
|
View Page
|
 |
Good thing we didn't wait any longer. The roots are already down to the bottom and sides of the peat pots. I am sure the starts will be happy in their new homes.
|
|
|
Friday, April 23
|
View Page
|
 |
Here is the 1400-09 Holland in the cocunut pot. At first these pots seemed like a great idea. They are much more porus than the peat pots, lighter too. However, through the starting process this had more draw backs than benefits. The coconut pots dried out quicker than the peat pots in the germination box as well as under the grow light. In addition it was much harder to remove them as you can se in this picture.
|
|
|
Friday, April 23
|
View Page
|
 |
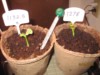
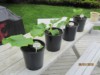
Here are the plants repotted in their new happy homes. The 3rd 1132.5-09 Westervelt was left in its peat pot until it grows a little larger. The remaining 1278-09 Holland is still in the germination chamber but will be removed soon and placed under the grow light.
|
|
|
Saturday, April 24
|
View Page
|
 |
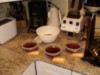
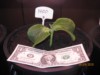
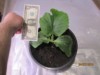
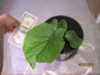
Here are the plants the day after repotting. They have responded well to their new homes. They are growing like gangbusters! We are now using the dollar bill for size instead of the quarter. My brother and dad got a new little watering can for the plants.
|
|
|
Saturday, April 24
|
View Page
|
 |
Here is the first 1132.5-09 Westervelt. Very healthy looking. The first true leaf is just starting to emerge between the cot leaves.
|
|
|
Saturday, April 24
|
View Page
|
 |
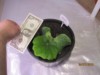
The 1262-09 Holland has the largest first true leaf growing. I am thinking it is trying to compensate for the underdeveloped cot leaf.
|
|
|
Saturday, April 24
|
View Page
|
 |
The stocky 1400-09 Holland has good growth on the first true leaf and you can even see the small vine starting to show between the cot leaves.
|
|
|
Saturday, April 24
|
View Page
|
 |
The 2nd 1132.5-09 Westervelt is a barnburner. The cot leaves are like lilly pads. Huge, 4 inches long and wide.
|
|
|
Saturday, April 24
|
View Page
|
 |
Here are the remaining two pumpkins. The 5th and 6th are a bit deformed however there is hope. The #3 132.5-09 Westervelt has its first true leaf coming through. Some of the biggest pumpkins have been grow on some of the most sickly starts. We will do a light fertilization today 1/2 tsp into a 4 cup watering pot. The fertilizer will be Neptune's Harvest Seaweed Fertilizer (0-0-1). This will be mild but enhance their growth.
|
|
|
Saturday, April 24
|
View Page
|
|
To everyone that is following my pumpkin diary, you can now access a clone of these postings and leave comments on http://blumepumpkin.blogspot.com/ I would appreciate any tip/ideas/thoughts you have on growing. I look forward to hearing from you.
|
|
|
Sunday, April 25
|
View Page
|
 |
Yesterday we began the season of fertilization. Jeff used a half dose of Neptune's Harvest Seaweed Fertilizer on the starts. These starts have really responded to their new pots and have continued to grow at a rapid rate. The first true leaf is groing well on most and there are even signs of the second leaf with the vine bud following. Today my dad began the hardening off process by taking the starts outside for a couple of hours. These starts look very strong and I am sure are enjoying the fresh air and natural sunlight.
|
|
|
Sunday, April 25
|
View Page
|
 |
The #1 1132.5-09 Westervelt looks good. It has not developed its first true leaf as quickly as some of the other starts. However it does have massive cot leaves.
|
|
|
Sunday, April 25
|
View Page
|
 |
The 1262-07 Holland's first true leaf is coming along nicely. The plant seems to be gaining strength from the first true leaf. As a result it is now back in the running to be a viable candidate for the patch this year.
|
|
|
Sunday, April 25
|
View Page
|
 |
The 2nd 1132.5-09 Westervelt at this point, is our best looking start. Its cot leaves reach beyond the pot, and it has the largest first true leaf. This start is primed for a strong season if it continues with this growth rate.
|
|
|
Sunday, April 25
|
View Page
|
 |
The second leaf on the stocky 1400-09 Holland is shoing it's face this is a good sign. The second true leaf will show us where the vine will generally go. This plant has very wide cot leaves as well that are soaking up all of the energy they can muster.
|
|
|
Tuesday, April 27
|
View Page
|
 |
Adding the plastic the the greenhouses. We used clear packing tape to hold the plastic onto the PVC frame.
|
|
|
Tuesday, April 27
|
View Page
|
 |
The weather decided to to pour on us as we were building our greenhouses. Then it began to hail. The hail got some nice bounces off of the deck. I ran into the house but Jeff had a different iidea.
|
|
|
Tuesday, April 27
|
View Page
|
 |
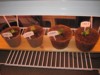
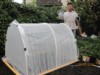
The finished greenhouses. Jeff and I used the large binder clips to hold on the doors to the green houses to allow for easy access into the plants.
|
|
|
Tuesday, April 27
|
View Page
|
 |
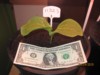
Here is plant #4 the second 1132.5-09 Westervelt to come up. It is our largest growing plant at this time. It is the front runner for a planting spot at this time. Its just an inch short of a dollar now. Wow how these things grow!
|
|
|
Tuesday, April 27
|
View Page
|
 |
The 1400-09 Holland is the second strongest plant at this time. It also has some interesting genetics. The father was the 1385 Jutras.
|
|
|
Wednesday, April 28
|
View Page
|
 |
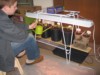
Installing the heating cables. In each planting mound my brother and I placed 24ft heating cables about 4 inces deep into the soil. These are self regulating and will heat up to 72-74 degrees, keeping the soil warm for the roots.
|
|
|
Wednesday, April 28
|
View Page
|
 |
Jeff with the heating cable on mound #2.
|
|
|
Wednesday, April 28
|
View Page
|
 |
To wather the pumpkins we will use soaker hose. Powdery mildew has been a problem for our pumpkins for years. Powdery mildew destroys our plants from the August time frame until the end of the season. We have always hand watered, from the top, and are looking to aviod getting water on the leaves this year. We setup the soaker hose prior to planting the pumpkins. Around each planting mound we setup a soaker hose.
|
|
|
Wednesday, April 28
|
View Page
|
 |
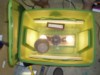
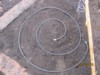
Mound 1 has a different soaker hose system. I found a soaker hose system for a tree and will try it our this year. It is shaped like an old wagon wheel. The soaker hoses are attached to a watering timer so the entire system will be automatic. This will greatly help out when we do our numerous Blume fishing adventures over the summer months.
|
|
|
Wednesday, April 28
|
View Page
|
 |
Bond, James Bond. I decided to spray the entire patch with Bio-Magic Biostimulant to enhance the beneficial bacterial growth in the patch. I wanted to do this before I laid down the rest of the soaker hose.
|
|
|
Wednesday, April 28
|
View Page
|
 |
Finishing up the soaker hose setup. We used old coat hangars to hold down the soaker hose. The soaker hose in in three sections. The first is around each planting mound. Then the first 4-5 feet infront of the planting mound. Finally the remaining section stretches over the rest of the patch. We did this so that each section of the soaker hose could be turned on individually. This will save on the water usasge over the season.
|
|
|
Thursday, April 29
|
View Page
|
 |
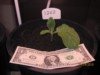
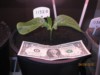
What a difference a couple of days can make. Here is plant #4 the 1132.5-09 Westervelt. It has grown huge. This little baby is ready to get out in the garden and go nuts.
|
|
|
Friday, April 30
|
View Page
|
|
Today I worked in aobut 12 pounds of gypsum into the soil. in addition I worked in 3 pounds of blood meal and 1.5 pounds of soil acidifier(30%sulfur) into the soil.
|
|
|
Saturday, May 1
|
View Page
|
 |
Planting day! After hardening the pumpkins for a couple of day It is now time to unleach these fellas onto the garden. We have decided to go with the 1132.5-09 Westervelt and the 1400-09 Holland. These are both great starts.
|
|
|
Saturday, May 1
|
View Page
|
 |
Digging out the hole that will be ready to recieve the 1132.5-09 Westervelt.
|
|
|
Saturday, May 1
|
View Page
|
 |
To each mound I added 1/3 of a cup of BioGrow Endo Plus. I added part into the hole and part to the dirt that was dug out of the hole and will be placed back around the pumpkin. BioGrow Endo Plus is a Mycorrhizae Soil Inoculant. The Mycorrhizae will assist the roots of the pumpkin in obtaining nutrients for the big upcoming growing season.
|
|
|
Saturday, May 1
|
View Page
|
 |
In the process of removing the pots from the plants my brother and I quickly realized why other pumpkin growers cut the pots in half. This was difficult and tedious at best to try and get the plant out without damaging it.
|
|
|
Saturday, May 1
|
View Page
|
 |
After careful deliberation and slow work we got the pot off without any damage
|
|
|
Saturday, May 1
|
View Page
|
 |
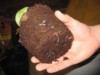
Look at the root growth on the 1132.5-09 Westervelt already. This guy is growing like gangbusters. I hope he can handle to move outside. He will have protection though.
|
|
|
Saturday, May 1
|
View Page
|
 |
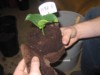
Jeff and I placing the 1132.5-09 Westervelt into its prepared planting mound. In the dirt it goes and now we really have to watch it and baby it or the plant may go into shock and die.
|
|
|
Saturday, May 1
|
View Page
|
 |
Placing the dirt back around the yound start. This has the BioGrow Endo Plus mixed into the soil. We placed the second leaf towards the opposite end of the patch. the second leaf is the general direction that the vine will grow in. In addition we tilted the plant towards the second true leaf to encourage it to grow in that direction.
|
|
|
Saturday, May 1
|
View Page
|
 |
We placed the wagon wheel soaker hose back around the start to setup the watering system.
|
|
|
Saturday, May 1
|
View Page
|
 |
Jeff and I placing the greenhouse overtop of the new planted 1132.5-09 Westervelt start. This greenhouse will help protect the plant from cold temperatures outside.
|
|
|
Saturday, May 1
|
View Page
|
 |
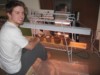
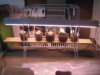
In addition to the heating cables buried in the dirt and the greenhouse above the soil we have added heat lamps to the greenhouses. These will be turned on at night or during very cold days to heat up out plants. The bulb is a 125 watt brooder bulb. Doing some testing the night before the temperature held around 64-68 degrees when the temperature was around 45-48 degrees outside. We bought a wireless thermometer so we can monitor the temperature inside the house of the greenhouses out back.
|
|
|
Saturday, May 1
|
View Page
|
 |
Prepping planting mound #2 for the 1400-09 Holland.
|
|
|
Saturday, May 1
|
View Page
|
 |
Into the dirt the 1400-09 Holland goes. I am sure it will be much happier in the dirt than its growing pot.
|
|
|
Saturday, May 1
|
View Page
|
 |
Now both plants are buried into the soil.
|
|
|
Saturday, May 1
|
View Page
|
 |
To water in the plants I used Neptune’s Harvest Fish & Seaweed Fertilizer. This is a bit stronger then the Neptune’s Harvest Seaweed Fertilizer and will give the plants some good growth nutrients to begin the season. I am using all organic materials for this season.
|
|
|
Saturday, May 1
|
View Page
|
 |
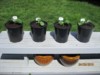
Finally we got the two plants in the ground and each of their greenhouses are prepared. In addition to the giant pumpkin patch I will be growing some field pumpkins. The two smaller side boxes will hold the field pumpkins.
|
|
|
Saturday, May 1
|
View Page
|
 |
The lunar base! My dad looked out into the backyeard and remarked that it looked like we had setup a lunar base. He is not to far off. These plants are out of this world with growth potential. I am sure the neighbors will be wondering what we are doing in the back yard.
|
|
|
Monday, May 3
|
View Page
|
|
My 1132.5-09 Westervelt start is beginning to show signs of yellowing. This concerns me a bit. It has been outside for two days now so I am hoping the plant is not getting damping off disease. The 1400-09 Holland is growing strong and shows no signs of any slowdowns after it was transplanted. In fact it is almost like the young plant was turbo charged. I am wondering if it has to do with the Holland seed coming from Western Washington and the Westervelt seed coming from California. I will have to investigate further the advantages and disadvantages of a seed from my own region of the country. I watered today and fertilized with Biomin Calcium Concentrate Fertilizer. The fertilization schedule has kicked in. I will be rotating through three fertilizers until I approach the flowering and pollination phase of growing. I will be using Neptune’s Harvest Fish & Seaweed Fertilizer, Neptune’s Harvest Seaweed Fertilizer, and finally Calcium Concentrate Fertilizer on my plants. I will be rotating through them. Each will get applied once a week. In addition once the plant begins to vine I will be adding BioGrow Endo Plus (Mycorrhizae) to each leaf axil.
|
|
|
Wednesday, May 12
|
View Page
|
 |
On Sunday I thought I was going to have to put in new plants. This picture is from Sunday 5/9. After talking with some people I believe my pumpkins contracted scabs or leaf spot. Both of these are a fungal infection and the treatment is the same. Jeff sprayed both plants with neem oil. In addition he fertilized on that day with Neptune's Harvest Fish/Seaweed fertilizer as per the fertilization program. When I saw the plants on Tuesday 5/11, the plants seem to have begun their recover. The plants looked perky and healthy green again. There has been damage to the leaves but it does not seem to have increased in its area. Today I sprayed the plants with Serenade, a bacterial fungicide. This will also combat the scab or leaf spot fungus. The plants are looking good. After almost ripping the plants out, we are back in business! With June approaching I am hoping these plants will start to take off.
Oh one thing of note. The stumps on the two plants especially the 1400-09 Holland are becoming very thick. The 1400-09 Holland is roughly 3/4 in. in diameter already!
|
|
|
Monday, May 17
|
View Page
|
 |
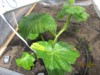
My pumpkins are looking great except for an infection that has been spreading for about a week now. The plant will show a yellowing and then an irregular hole about the size of a pea in the leaf. I would appriciate any suggestions as to how to treat this fungus or diesease. I am currently spraying Neem oil and Serenade on the plants once a week.
|
|
|
Monday, May 17
|
View Page
|
 |
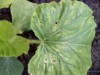
Here is a close-up of the second leaf on the 1132.5-09 Westervelt plant. As you can see the leaf looks healthy except for the yellowing areas and holes on the leaves. We are looking into using Daconil to spray on the leaves to hopefully stop the infection on the plants.
|
|
|
Monday, May 17
|
View Page
|
 |
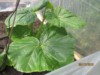
Here is the 1400-09 Holland. The plant is starting to vine however the infection is much greater on this plant. It has irregular splotches of yellowing in addition to the holes on the leaves. Other that that though, the plant is growing well and the stump is continually getting thicker. I wonder what is affecting these plants, leaf spot or scabs possibly? Any suggestions would be appreciated.
|
|
|
Monday, May 17
|
View Page
|
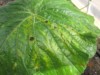 |
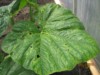
Here is a leaf on the 1400-09 Holland. The 1400-09 Holland is more infected with the diesease than the 1132.5 Westervelt. The new leaves on the 1132.5-09 Westervelt do now show as much infection as the leaves of the 1400-09 Holland. Both plants have recieved the same fungicide spray. I am wondering if the greenhouses are increaseing the breeding of the fungus on the plants. It does make the plant quite humid.
|
|
|
Monday, May 17
|
View Page
|
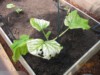 |
This plant is growing in a side box in my yard. There are two planting boxes. Each one of the plants in the side boxes seems to have this going on. It began as soon as they were planted outside a few days ago. The leaves are just turning white and developing holes and will be dying. I am currently working on replanting a new batch of starts but I am looking for any suggestions as to what may be causing this or how to cure/prevent it from occurring again.
|
|
